Table of Contents
Advertisement
Quick Links
Advertisement
Table of Contents

Subscribe to Our Youtube Channel
Related Manuals for Native Instruments TRAKTOR KONTROL S2


Summary of Contents for Native Instruments TRAKTOR KONTROL S2
-
Page 2: Table Of Contents
Table of Contents 1. Disclaimer ........................1 2. Welcome to TRAKTOR KONTROL S2 ................. 2 2.1. Document Conventions ..................2 2.2. Documentation Resources ................3 2.3. In this Document ....................3 3. Concepts ........................4 3.1. Automatic Track Synchronization ............... 5 3.1.1. - Page 3 7.16.6. Cuing the Next Track using the Jog Wheels ......... 42 7.16.7. Mixing in the Next Track ..............42 8. Preferences ......................43 9. Integrating a Microphone ................... 46 10. Setting the TRAKTOR KONTROL S2 as Your Default Audio Interface ......47...
-
Page 4: Disclaimer
The information in this document is subject to change without notice and does not represent a commitment on the part of Native Instruments GmbH. The software described by this document is subject to a License Agreement and may not be copied to other media. No part of this publication may be copied, reproduced or otherwise transmitted or recorded, for any purpose, without prior written permission by Native Instruments GmbH, hereinafter referred to as Native Instruments. -
Page 5: Welcome To Traktor Kontrol S2
Welcome to TRAKTOR KONTROL S2 2. WELCOME TO TRAKTOR KONTROL S2 Thank you for choosing TRAKTOR KONTROL S2. It is because of customers like you that we can continue developing groundbreaking music software and hardware. TRAKTOR KONTROL S2 is a fully integrated hardware and software DJ performance system. -
Page 6: Documentation Resources
• TRAKTOR PRO 3 Manual: For in-depth information on all features provided by the TRAKTOR software, refer to the TRAKTOR PRO 3 Manual. 2.3. In this Document What you are reading now is the TRAKTOR KONTROL S2 Manual. This manual is structured as follows: •... -
Page 7: Concepts
Deck Types: Track Deck, Remix Deck, STEM, Deck, and Live Input. TRAKTOR KONTROL S2 provides you with two physical Decks. The left Deck on your S2 controls Deck A in the software and the right Deck controls Deck B in the software. Additionally, you can gain control over TRAKTOR's Decks C and D using the S2's SAMPLE mode. -
Page 8: Automatic Track Synchronization
Concepts 3.1. Automatic Track Synchronization This section introduces the principles of the automatic synchronization features offered by TRAK- TOR. One of the key features of TRAKTOR is the automatic synchronization of tracks. After loading tracks into the Decks, you can synchronize the track tempos with the SYNC function. The tempo of the synced track then adjusts the tempo of the Tempo Master, for example, the track in the playing Deck. -
Page 9: Stem File Playback
Concepts 3.3. STEM File Playback Generally, the S2 is designed to control tracks using Track Decks. However, you can also load STEM Files into the Decks. In this case the Decks in TRAKTOR switch to Deck Type STEM Deck and show the individual STEM Part waveforms and additional controls. With the S2 you can play- back the STEM Files like normal tracks but you are not able to further control the STEM Files. -
Page 10: Setting Up Traktor Kontrol S2
Registering and Installing a Native Instruments Product using NATIVE ACCESS. This section describes how to set up the TRAKTOR KONTROL S2. When all devices are connec- ted your setup will look like the following illustration: TRAKTOR KONTROL S2 setup. -
Page 11: Connecting Active Speakers
Setting up TRAKTOR KONTROL S2 4.2. Connecting Active Speakers To connect your power amplifier or active speakers to the TRAKTOR KONTROL S2: • Connect the MAIN OUT RCA (or 3.5 mm) outputs on the rear panel of the TRAKTOR KON-... -
Page 12: Connecting Headphones
KONTROL S2, using the 3.5 mm connector. 4.4. Final Preparation After successfully setting up the TRAKTOR KONTROL S2 system, you can switch on the devices. We recommended that you follow the order in the instructions below: Switching on Devices and Starting TRAKTOR On your S2, turn down the volumes to minimum position by using the MASTER knob, and the VOL knob for the headphones volume. - Page 13 Setting up TRAKTOR KONTROL S2 • Click Yes to confirm. The data is imported. Switching to TRAKTOR Default Settings When you start TRAKTOR with the S2 for the first time, TRAKTOR asks if you want to switch switch Mixer FX selection to default values. This is necessary to get the intended user ex- perience of your S2: TRAKTOR alert for switching Mixer FX pre-selection to default.
-
Page 14: Importing Music To The Track Collection
Setting up TRAKTOR KONTROL S2 4.5. Importing Music to the Track Collection The most convenient way to get your tracks into TRAKTOR's Track Collection is using drag and drop: • Drag the music files from the location on your computer and drop them in the Track Collec- tion folder in TRAKTOR's Browser Tree. -
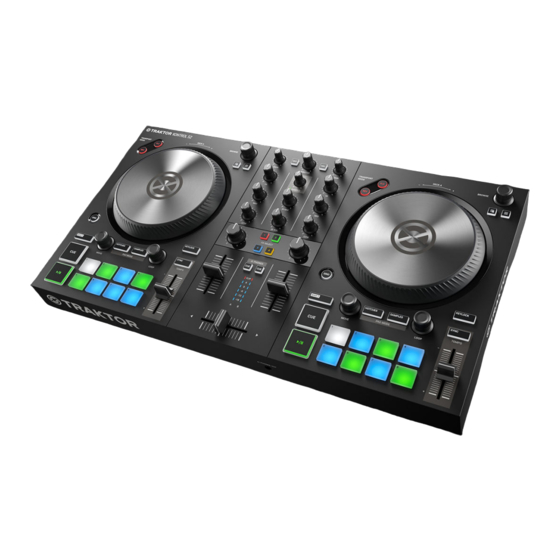
Page 15: Traktor Kontrol S2 Overview
TRAKTOR KONTROL S2 Overview 5. TRAKTOR KONTROL S2 OVERVIEW This section introduces you to the TRAKTOR KONTROL S2 and all its control elements and con- nectors. TRAKTOR KONTROL S2. (1) Decks: TRAKTOR KONTROL S2 provides you with two physical Decks. You can use the Decks to control tracks and Samples. - Page 16 TRAKTOR KONTROL S2 Overview S2 Deck. (1) BROWSE encoder: You can navigate within TRAKTOR's Browser, select tracks in the Track List by turning the BROWSE encoder. You can load the selected track into the Deck by pressing the BROWSE encoder.
-
Page 17: Mixer
Decks C and D. 5.2. Mixer You can use the Mixer to mix the audio signals coming from the Decks. The Mixer is situated in the middle of your TRAKTOR KONTROL S2 controller and contains the following control elements:... - Page 18 TRAKTOR KONTROL S2 Overview Mixer. (1) Mixer channel A and B: The Mixer channels A and B receive the individual audio signals from the Decks A and B. Each Mixer channel contains controls to adjust the audio signal's frequency content and to adjust the outgoing volume before the audio signal is send to the MASTER out- put.
-
Page 19: Mixer Channel
TRAKTOR KONTROL S2 Overview (9) CUE button: Sends the Mixer channel’s audio signal to the CUE channel for preparing the next transition and previewing tracks. (10) Channel Level Meter: Gives you visual feedback of the GAIN level on that Mixer channel. -
Page 20: Front View
(6) iOS: Connects an iOS device for future iOS compatibility. (7) USB: Connects your S2 with your computer using the included USB cable. (8) Power Supply socket: Connects the optional Native Instruments Power Supply to be pur- chased separately on the Native Instruments online shop. -
Page 21: Mixing Your First Tracks Using Sync
6.2. Loading the First Track into Deck A Press the Browser View button to maximize the Browser view in the software. Turn the BROWSE encoder to select one of your tracks, or a demo track, for example Berlin Hauptbahnhof by Native Instruments. -
Page 22: Starting Playback Of Deck A
Mixing Your First Tracks using SYNC Press the BROWSE encoder to load the track into the Deck. TRAKTOR now analyzes the track to determine its tempo, and to create the Beatgrid and the Waveform. Press the Browser View button again to minimize the Browser View. 6.3. -
Page 23: Loading The Second Track Into Deck B
Press the Browser View button to maximize the Browser view in the software. Turn the BROWSE encoder to select one of your tracks, or a demo track, for example Li- sa by Native Instruments. Press the BROWSE encoder to load the track into the Deck. -
Page 24: Starting Playback Of The Second Track
Mixing Your First Tracks using SYNC The tempo of the track in Deck B is now synced to the running track, indicated by the equal tempo value in the software's Deck Header. The SYNC button lights up on Deck B. 6.6. - Page 25 Mixing Your First Tracks using SYNC The audio signal of Mixer channel A slowly fades out of the Master signal. Only Mixer chan- nel B is now audible. When the playback of Deck A ends, Deck B automatically becomes the Tempo Master and is ready to transition to the next track.
-
Page 26: Tutorials
Tutorials 7. TUTORIALS The tutorials in this section introduces you the several functions and features of the S2. The follow- ing list provides you with an overview of the tutorials including the link to it: • Browsing and Loading Tracks: By having your music imported in TRAKTOR, you can use the Browse controls on the S2 to find tracks for your mix. -
Page 27: Browsing And Loading Tracks
Tutorials • Correcting Beatgrids of Tracks: If the SYNC function is enabled but the playing tracks are not synced, it is likely that the Beatgrids were miscalculated. The S2 allows you correct Beat- grids manually. For more information, refer to Correcting Beatgrids of Tracks. -
Page 28: Controlling Track Playback
Tutorials 7.2. Controlling Track Playback The Transport Controls and the Jog Wheels on the S2 let you control the playback behavior of tracks. This section describes several ways to control track playback and how to preview tracks in the CUE channel when creating transitions. Starting or Pausing Playback To start the playback of the loaded track: •... -
Page 29: Adjusting Volume Levels
Tutorials 7.3. Adjusting Volume Levels When mixing tracks you need to make sure that the volumes of both tracks are at the same level for flawless transitions. For this, you can define the volume level for the incoming audio signal into the Mixer channel (GAIN) on the one side, and you can define the volume for the outgoing signal to the MASTER output on the other side. -
Page 30: Adjusting Track Tempo
Tutorials Attenuating Frequency Bands in the Audio Signal • Turn the EQ knobs clockwise to attenuate the individual frequency band. Using the equalizer while cueing a track can support manual tempo alignment of complex tracks. For example, you can remove the high and middle frequency bands from the next track to focus on the bassline. -
Page 31: Playing With Mixer Effects
Tutorials Move the TEMPO fader up or down to change the track tempo. The track tempo changes but the key value remains at the locked value. 7.7. Playing with Mixer Effects A Mixer FX is a grouped effect that can be applied to the audio signal in the Mixer channel using the Mixer FX Amount knob. -
Page 32: Playing With Loops
Tutorials Storing Cue Points as Hotcues To store a Cue Point as Hotcue: • At the desired position in the track, press a Pad. The Cue Point is set at the current playback position in the track and stored as Hotcue on the Pad. -
Page 33: Snap Mode And Quantize Mode
Tutorials Changing the Loop Size You can change the size of the enabled or disabled Loop: • Turn the LOOP encoder clockwise or counterclockwise. The Loop size for the enabled Loop instantly changes by the value displayed in the Loop Control bar. -
Page 34: Using Flux And Reverse Modes
Tutorials Examples for Using SNAP Mode Depending on what you want to do, you can enable or disable Snap mode and Quantize mode at any time. Here are a few examples: • Enable Snap mode, if you want to set a Loop starting directly on a beat. •... -
Page 35: Previewing Tracks Using The Cue Channel
Tutorials Press the FLX button on the selected Deck. Flux mode is enabled. The second, virtual playhead continues forwards in the track. Press and hold a Pad with the Hotcue. The playback continues from the stored Cue Point or Loop. Release the Pad. -
Page 36: Adding Samples To Your Mix
Tutorials Adding Tracks to the Preparation List To add tracks to the Preparation List: Turn the BROWSE encoder to select a track in the Track List. Press the Preparation List button on the Deck. The track is added to the Preparation List. A diamond icon appears in the first column in the Track List in TRAKTOR indicating that track is added to the Preparation List. -
Page 37: Correcting Beatgrids Of Tracks
Tutorials In the Browser Tree in TRAKTOR, click on plus icon of the Track Collection folder to ex- pand it. Select the subfolder All Samples to show all Samples in the Track List. In the Track List, drag the Samples and drop it into the first Sample Cell of any Sample Slot in the Remix Deck one-by-one. -
Page 38: Mixing Tracks Using Jog Wheels
Tutorials Release the GRID button. The track's Beatgrid is corrected and saved with the track. 7.16. Mixing Tracks Using Jog Wheels In this section, you learn how to mix your first two tracks using Deck A and Deck B, the Jog Wheels and your headphones. -
Page 39: Starting Playback Of Deck A
Tutorials Turn the BROWSE encoder to select one of your tracks in the Track List, or a demo track, for example, Berlin Hauptbahnhof by Native Instruments. Press the BROWSE encoder to load the track into the Deck. TRAKTOR now analyzes the Track to determine its tempo and to create the Beatgrid and the Waveform. -
Page 40: Loading The Second Track Into Deck B
Press the Browser View button to maximize the Browse View in the software. Turn the BROWSE encoder to select one of your tracks in the Track List, or a demo track, for example, Lisa by Native Instruments. Press the BROWSE encoder to load the track into the Deck. -
Page 41: Syncing Tracks Manually
Tutorials TRAKTOR now analyzes the Track to determine its tempo and to create the Beatgrid and the Waveform. Press the Browser View button again to minimize the Browser View. Press the Play/Pause button on Deck B to start playback. The Waveform starts moving and the Channel Volume Meter LEDs in Mixer channel B illumi- nate. - Page 42 Tutorials Adjust the Mixer channel's GAIN level by turning its GAIN knob, so that it matches to Mixer channel A. Adjust the volume and the cue-master-mix signal by turning the VOL knob and MIX knob, so that you hear both tracks equally in your headphones. Adjusting the Track Tempo The Deck Headers in the software Decks indicate the current track tempos.
- Page 43 Tutorials Checking the Tempo Adjustment You can check if the tempos of both tracks perfectly match before you perform the transition: Hold the top plate of the Jog Wheel of Deck B. The playback of the track is held in place. While holding the Jog Wheel, turn it into any direction until you hear a beat in your head- phones.
- Page 44 Tutorials Turn the Jog Wheel counterclockwise to place the playhead position directly before that beat and hold the Jog Wheel. At the moment you hear the downbeat in the track, release the top plate. Ideally the tracks now play in sync. The Phase meters in the Decks also indicate if the track in Deck B is still playing faster or slower.
-
Page 45: Cuing The Next Track Using The Jog Wheels
Tutorials 7.16.6. Cuing the Next Track using the Jog Wheels When the tracks are in sync, use your headphones and the Jog Wheel to find the right position in the next track for fading it in: Touch and hold the Jog Wheel on its top plate. The playback is held at the current position. -
Page 46: Preferences
Preferences 8. PREFERENCES In this section you learn how to access the Preferences dialog in TRAKTOR and about the options that are provided on the Traktor S2 MK3 page. When opening the Preferences dialog in TRAK- TOR you will find an additional page for the S2 controller. On this page you are provided with sev- eral options to customize your S2 to your needs. - Page 47 Preferences Preferences - Traktor S2 MK3 Page Preferences - Traktor S2 MK3 Page. Transport • Tempo Faders: Determines the behavior of the TEMPO faders: • In Absolute mode, the track tempo automatically adjusts according the TEMPO fader posi- tion when loading the track. •...
- Page 48 Preferences Jogwheel • On touching Platter: Determines the behavior of touching the top plate of the Jog Wheel dur- ing track playback: • When Scratch is selected, you hold the track playback and you can scratch the track. • When Pitch Bend is selected, you can bend and nudge the track tempo with the top plate as with the outer rim of the Jog Wheel.
-
Page 49: Integrating A Microphone
Integrating a Microphone 9. INTEGRATING A MICROPHONE On your S2 you can integrate a microphone to add vocals to your mix. On the rear panel on the S2 you are provided with the MIC input for connecting a microphone with a 1/4" connector. With the MIC GAIN knob you can adjust the microphone signal level. -
Page 50: Setting The Traktor Kontrol S2 As Your Default Audio Interface
10. SETTING THE TRAKTOR KONTROL S2 AS YOUR DEFAULT AUDIO INTERFACE If you want to use the TRAKTOR KONTROL S2 for playback of all audio applications on your com- puter, you can set it as your default audio interface. Windows...
Need help?
Do you have a question about the TRAKTOR KONTROL S2 and is the answer not in the manual?
Questions and answers