Advertisement
Advertisement

Subscribe to Our Youtube Channel
Summary of Contents for AVANTIS ClassVR
- Page 1 Setup and User Guide V 1.0 www.classvr.com/support...
-
Page 2: Table Of Contents
Open the case by pushing the latch buttons down. Attach the power lead to the back of Section 2 – Learn the Basics the case making sure it is fully inserted. Section 3 – Set Up and Manage the ClassVR Headsets Section 4 – Using the ClassVR Portal Section 5 – Technical Setup Guide Section 6 –... - Page 3 When the unit is charging you will see a green light appear on the hub. The power switch can be found on top of the hub. 1.4. Safely transporting the ClassVR hardware The headset case comes complete with a sliding handle built into the back. To access the handle simply pull it upwards until it clicks into position.
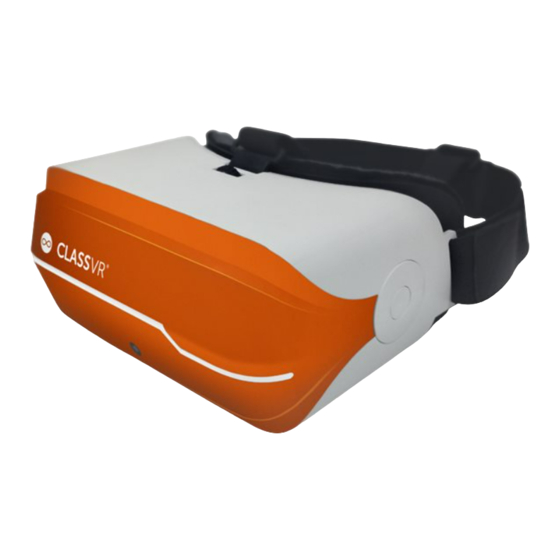
- Page 4 1.5. The VR headset at first glance Keypad controls Volume up Back button (long-press to switch display mode) Power button Select/Action button Volume down Head Strap Reset Button Face Padding Focus Adjustment 3.5 mm Headphone Out Left View Navigation Pad Memory Card Proximity Sensor Camera...
- Page 5 1.6. How to adjust the head strap 1.7. How to replace the padding Pull the foam face rest gently away from the plastic, so the velcro releases. Replace the foam in the desired position, making sure the soft fabric is aligned with the plastic grips. Pull the straps through the slots, then use the velcro to tighten the straps so the headset fits securely and comfortably on...
-
Page 6: Learn The Basics
Section 2 2.2. Gesture controls While students are wearing the ClassVR headset and it is not being controlled by the Learn the Basics: How do the ClassVR teacher, they can navigate using simple ‘select’ gestures or button presses. headsets work? 2.1. -
Page 7: Set Up And Manage The Classvr Headsets
Set Up and Manage the ClassVR Headsets 3.1. Log in to your school’s ClassVR Portal To manage your ClassVR headsets, you’ll need to log in to the ClassVR Portal (http://portal.classvr.com) for your school. If your information was provided to us prior to While wearing the headset, shake your head smoothly from side-to-side, or press the back delivery as a Key Contact, you should receive an email invitation from Avantis. - Page 8 From here, click ‘Invite User’ under the name of your school. When inviting colleagues, This tool will generate a QRKey that you can scan with each ClassVR headset. you have a number of user types to choose from. Most colleagues should be invited as Follow the steps below: the ‘Teacher’...
-
Page 9: Using The Classvr Portal
Scan QRKeys with each headset Section 4 On each of your ClassVR headsets, open the Scanner app by looking at the icon of a QR Using the ClassVR Portal code and making a select gesture with your hand in front of the device. - Page 10 To send the playlist for your students to explore independently, click this icon. You can view most image and video file types on your ClassVR headsets, but the following To the right of the page, you’ll see the Libraries pane. From here you can access other will be most effective: sources of content.
- Page 11 In the Deliver section, you’ll see three panes: your Playlist at the left, a list of your school’s dotted line guiding them towards that point: ClassVR headsets at the right, and the currently-selected VR experience from the Playlist in the centre: Teacher view You’ll notice that the devices on the right are greyed-out when you first open the Deliver...
- Page 12 From here, you can tell if your devices are connected to the network. Once they are in use (being worn), they will show as Active. This pane also gives you a useful warning if any of your ClassVR headsets are running low on battery or have been in use for more than 15 minutes:...
- Page 13 QRKey until the screen turns green. Beacon Zone This filter allows you to select the set of ClassVR headsets that you have in your classroom. Make sure you follow these steps: Bring the case and the headsets you wish to use into your classroom.
-
Page 14: Technical Setup Guide
5.1. Check IP addresses Click the LAN settings button. You will require one IP address per ClassVR headset. Ensure that there are enough available From the Local Area Network (LAN) Settings window, tick Bypass proxy server for local addresses within your school’s range. -
Page 15: Troubleshooting
360 content correctly, ask your technician to check the whitelisting requirements (see page 26). Make sure you press and hold the power button for five seconds. If the ClassVR logo does not appear on the screen after releasing the button, plug your headset into the charging I have forgotten my password for the ClassVR Portal. -
Page 16: Health And Safety
Do not modify or open any of the components provided. ○ precautions while using the headset: Do not use the product if any cable is damaged or any wires are exposed. Immediately contact Avantis ○ Systems Ltd. Use only in a safe environment: the headset produces an immersive virtual reality experience that distracts you from and completely blocks your view of your actual surroundings. - Page 17 www.classvr.com/support...
- Page 18 This equipment has been tested and found to comply with the limits for a Class B digital device, pursuant to Part 15 of the FCC Rules. These limits are designed to provide reasonable protection against harmful interference in a residential installation. This equipment generates uses and can radiate radio frequency energy and, if not installed and used in accordance with the instructions, may cause harmful interference to radio communications. However, there is no guarantee that interference will not occur in a particular installation. If this equipment does cause harmful interference to radio or television reception, which can be determined by turning the equipment off and on, the user is encouraged to try to correct the interference by one or more of the following measures: ...
Need help?
Do you have a question about the ClassVR and is the answer not in the manual?
Questions and answers