Table of Contents
Advertisement
Blood Glucose Monitoring System
Self-monitoring of blood glucose (SMBG) is an integral part of diabetes care, but
the high cost of testing can make this impossible. At ACON, our goal is to provide
high quality glucose monitoring at a price that allows you to test as often as
necessary. Together, we can better manage your diabetes and help you live a
longer and healthier life.
Welcome, and thank you for choosing the On Call
Monitoring System. The On Call
give you accurate blood glucose results in just a few simple steps.
To ensure accurate results from your On Call
System, please follow these guidelines:
•
Read instructions before use.
•
Use only On Call
Blood Glucose Meter.
•
For in vitro diagnostic use only. Your blood glucose monitoring system is to be
used only outside the body. It's for monitoring the effectiveness of diabetes
control. It should not be used for the diagnosis of diabetes.
•
For self-testing and professional use.
•
Test only whole blood samples with the On Call
Strips and On Call
•
For self-testers, consult your physician or diabetes healthcare professional
before making any adjustments to your medication, diet or activity routines.
•
Keep out of reach of children.
•
Keep this User's Manual in a safe place, do not discard it.
Following the instructions outlined in this User's Manual. You will be able to use
®
your On Call
glucose and better manage your diabetes.
®
Extra Blood Glucose Test Strips with the On Call
®
Extra Meter.
Extra Blood Glucose Monitoring System to monitor your blood
®
Extra Blood Glucose Monitoring System will
®
Extra Blood Glucose Monitoring
i
®
Extra Blood Glucose
®
Extra Blood Glucose Test
®
Extra
Advertisement
Table of Contents

Summary of Contents for On Call Extra
- Page 1 Read instructions before use. ® ® • Use only On Call Extra Blood Glucose Test Strips with the On Call Extra Blood Glucose Meter. • For in vitro diagnostic use only. Your blood glucose monitoring system is to be used only outside the body. It’s for monitoring the effectiveness of diabetes control.
-
Page 2: Table Of Contents
On Call Extra Blood Glucose Meter ............3 Meter Display ..................... 5 ® On Call Extra Blood Glucose Test Strips ..........7 ® On Call Extra Glucose Control Solution ............ 9 Installing the Battery ..................11 ... -
Page 3: Getting Started
Extra Bl lood Glucose M onitoring System m. Depending on n the ® ® On Call Extra product yo ou purchased, som me of the compon nents may need t to be purchase ed separately. Ple ease check the list... -
Page 4: Component Descriptions
The three levels of control solution, CTRL 0, CTRL 1 and CTRL 2 are ® available in the On Call Extra Glucose Control Solution package which is sold separately. Carrying Case: Provides portability for blood glucose testing wherever you go. -
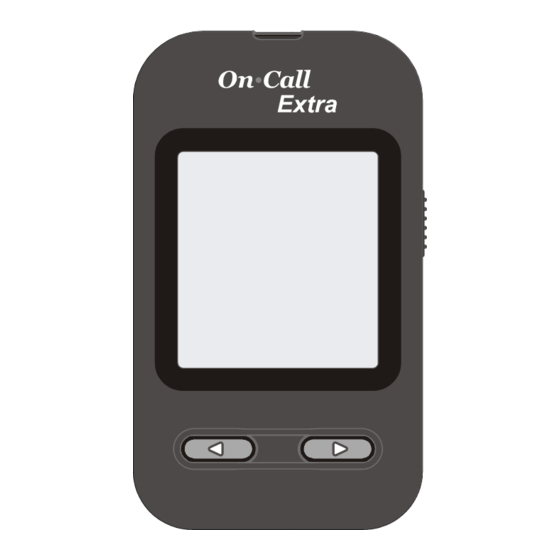
Page 5: On Call ® Extra Blood Glucose Meter
® On Call Extra Blood Glucose Meter The meter reads the test strips and displays the blood glucose concentration. Use these diagrams to become familiar with all the parts of your meter. Strip Port Liquid Crystal Display (LCD) Strip Ejector ◄... - Page 6 Liquid Crystal Display (LCD): Shows your test results and helps you through the testing process. ◄ Button: Recalls previous test results from the meter memory and performs other menu selection functions. ► Button: Selects meter settings and performs other menu selection functions. Strip Port: Test strips are inserted into this area to perform a test.
-
Page 7: Meter Display
Meter Display Month Day Hour Minutes Pound Sign (#) Test Result Area Test Remind Symbol Before Meal Symbol Blood Drop / After Meal Symbol Strip Symbol Battery Symbol Control Solution Symbol Measurement Unit Hyper Symbol Memory Ketone Hypo Symbol Battery Symbol: Warns when you should replace the battery. Blood Drop / Strip Symbol: Wait for the Blood Drop / Strip Symbol to appear before applying the sample. - Page 8 Meter Use and Precautions • Wait for the Blood Drop / Strip Symbol to appear before applying the sample. • The meter is pre-set to display blood glucose concentration in either millimoles per liter (mmol/L) or milligrams per deciliter (mg/dL) depending on which unit of measure is standard in your country.
-
Page 9: On Call ® Extra Blood Glucose Test Strips
® On Ca Extra Bloo od Glucose T Test Strips ® The On Call Extra Blood d Glucose Test S Strips are thin stri ps. The strips ha ave a ® chemica al reagent system. They work with t he On Call... - Page 10 orrect Incorrect Storage e and Handling Please r review the followin ng storage and ha andling instructions • Store e test strips in a cool, dry place at t 2-30 °C (36-86 °F). Store them a away from m heat and direct s sunlight.
-
Page 11: On Call ® Extra Glucose Control Solution
On Call Extra Glucose Control Solution ® The On Call Extra Glucose Control Solution contains a known concentration of ® glucose. It is used to confirm that your On Call Extra Blood Glucose Meter and test strips are working together properly. It also confirms that you are performing the test correctly. - Page 12 Storage and Handling Please review the following storage and handling instructions: • Store the control solution at 2-30 °C (36-86 °F). • Do not refrigerate or freeze. • If the control solution is cold, do not use until it has warmed to room temperature.
-
Page 13: Installing The Battery
Installing the Battery The battery may not be preinstalled in the meter. The meter requires one CR 2032 3.0V coin cell battery. Please find the battery in your carrying case and install it according to the following steps: 1. Turn over the meter. Slide the battery cover in the direction of the arrow to open it. -
Page 14: Meter Setup Before Testing
Meter Setup Before Testing Before using your meter for the first time, you will need to adjust the settings that are listed in detail below. 1. Meter Setup Mode: When meter is off, in memory mode or in average mode, press and hold the ►... - Page 15 Hour Hour Minute Minute 5. Meal Marker: The meter comes with the meal marker feature disabled. The meter allows the user to enable or disable this option. The words “On” or “Off” will be displayed on the large center segments of the display. The before meal symbol together with the after meal symbol will be displayed as shown below.
- Page 16 Press the ◄ button to turn the meter beep “On” and “Off”. Press the ► button to confirm your selection. 7. Ketone Indicator: The meter comes with the Ketone indicator feature disabled. Press the ◄ button to switch between turning the Ketone indicator “On” and “Off”.
- Page 17 Note: The meter allows the hyperglycemia level to be as low as 6.7 mmol/L (120 mg/dL) or higher. The hyperglycemia level should be above the hypoglycemia level. Consult your diabetes healthcare professional before determining what your hyper blood glucose level is. 9.
- Page 18 second Test Reminder time (Time is adjusted by every minute). Press the ► button to confirm the second Test Reminder time and then go to the third Test Reminder set up. • Repeat the same set up procedure for Test Reminder 3, 4 and 5. •...
-
Page 19: Performing A Quality Control Test
Performing a Quality Control Test The quality control test confirms that the test strips and meter are working together properly. It also confirms that you are performing the test correctly. It is important to perform this test: • Before you first use your meter. •... - Page 20 Note: If the test strip has been inserted incorrectly, the meter will not turn on. 4. Press the ◄ button to mark the test as a control solution test. Once the ◄ button is pressed, the control solution symbol will appear on the display. It indicates that a drop of control solution can be added.
- Page 21 Test results are displayed either in mmol/L or mg/dL depending on the unit of measure most common in your country. Note: The control solution range is the expected range for the control solution results. It is not a recommended range for a blood glucose level. 7.
- Page 22 If you cannot fix the problem, please contact your local distributor for help. ® Please contact your local distributor for information on ordering the On Call Extra Glucose Control Solution kit. The kit contains Control Solution 0, Control Solution 1...
-
Page 23: Testing Your Blood
Step 1 1 – Getting a Drop of Bloo ® The On Call Extra Blood Glucose Monitori ng System require es a very small dro op of blood w hich may be obta ained from the fin... - Page 24 2. Hold d the lancet firmly in the lancing dev vice and twist the s safety tab of the la ancet until it loosens. Then pull the safety tab b off the lancet. S Save the safety ta ab for lance et disposal.
- Page 25 6. Prior r to testing, wipe y your hands with an n alcohol swab or wash your hands s with soap p. Use warm wate er to increase bloo od flow in your fin gers if necessary . Dry your r hands thoroughly y.
- Page 26 • Fing ertips should be u used if testing is w within 2 hours of a meal, an insulin d dose or ex xercise and any tim me you feel gluco ose levels are chan nging rapidly. • should test with th he fingertips anyti me there is a con cern for hypoglyce...
- Page 27 Disposa al of the Lancet 1. Unsc crew the lancing d device cover. Plac ce the safety tab o of the lancet on a hard surfa ace. Carefully inse ert the lancet need dle into the safety tab. 2. Pres ss the release bu utton to make su ure that the lance...
-
Page 28: Step 2 - Testing Blood Glucose
Step 2 – Testing Blood Glucose Note: Insertion of a new test strip at any time, except while in the data transfer mode (detailed on page 33) will cause the meter to automatically enter the test mode. 1. Insert a test strip into the strip port, contact bars end first and facing up. This will turn on the meter and display all the display segments. - Page 29 see the countdown begin, you may reapply a second drop of blood within 3 seconds. DO NOT: • Apply the sample to the front or back of the test strip. • Smear the blood drop onto the test strip. • Press your finger against the test strip. 5.
- Page 30 ◄ button when meal marker symbol is flashing to switch the marker from “before meal”, “after meal”, no marker or invalid result. After deciding the selection, press the ► button to confirm the selection for either “before meal marker”, “after meal marker”, “invalid result” with pound sign (#) or none of these three symbols.
-
Page 31: Hi" And "Lo" Messages
6. After inspection, record valid results in your logbook with the date and time, and compare them to the target goals set by your diabetes healthcare professional. Refer to Suggested Testing Times and Target Goals on page 37 for more details on your target blood glucose level goals. 7. -
Page 32: Hypo" And "Hyper" Messages
“Hypo” and “Hyper” Messages If “Hypo” appears on the display, the measured concentration value is below the “Hypo” (low blood sugar) target level that you have set. If “Hyper” appears on the display, the measured concentration value is above the “Hyper”... -
Page 33: Using The Meter Memory
Using the Meter Memory The meter automatically stores up to 300 test records. Each record includes the test result, time and date. If the memory is full, the oldest record will be erased to make room for a new one. The meter will also calculate the average values of records from the last 7, 14, 30, 60 and 90 days. - Page 34 4. Press the ◄ button to go through the stored records. Press the ► button to view the data averages. The words “DAY AVG” will appear on the screen. You can also view the data averages by pressing the ► button when the meter is off.
-
Page 35: Clearing The Memory
The meter can transfer stored information to a Windows-based personal computer (PC) using an optional data transfer cable and software package. To make use of ® this feature, you need the On Call Diabetes Management Software and a USB data transfer cable from ACON. - Page 36 PC is completed, the meter will automatically turn off. In this case, if you want to enter “PC” mode again, press the ◄ and ► buttons together. ® See the User’s Guide included with your On Call Diabetes Management Software Kit for detailed instructions.
-
Page 37: Maintenance
Replacing the Battery ® Your On Call Extra Meter uses one 3.0 Volt CR 2032 lithium battery. When the battery icon ( ) is blinking, it means the meter battery is running low. You should replace the battery as soon as possible. An “E-6” error message will appear if the battery is too low to perform any more blood glucose tests. -
Page 38: Caring For Your On Call ® Extra Blood Glucose Monitoring System
® Your On Call Extra Blood Glucose Meter does not require special maintenance or cleaning. A cloth dampened with water and a mild detergent solution can be used to wipe the outside of the meter. Take care to avoid getting liquids, dirt, blood or control solution into the meter through the strip or data ports. -
Page 39: Suggested Testing Times And Target Goals
Suggested Testing Times and Target Goals Tracking your blood glucose concentration through frequent testing is an important part of proper diabetes care. Your healthcare professional will help you to decide the normal target range for your glucose levels. They will also help you to determine when and how often to test your blood glucose. -
Page 40: Comparing Meter And Laboratory Results
® Your On Call Extra Blood Glucose System and laboratory results both report the glucose concentration in the serum or plasma segment of your blood. However, the results may differ somewhat due to normal variation. The Meter results can be affected by factors and conditions that do not affect laboratory results in the same ®... -
Page 41: Troubleshooting Guide
Troubleshooting Guide The meter has built-in messages to alert you of problems. When error messages appear, note the error number. Turn off the meter and then follow these instructions. Display Causes Solution Battery may be damaged or Replace battery. not be charged Meter fails to If meter has been exposed to or stored turn on... - Page 42 On ® Non On Call Extra test strip ® Call Extra Blood Glucose Meter. inserted in the meter If the problem persists, please contact your local distributor. Please test again by using a new strip. Test strip damaged...
-
Page 43: Specifications
Specifications Feature Specification Meter Model Number OGM-191 Measurement Range 0.6 – 33.3 mmol/L (10 – 600 mg/dL) Plasma-equivalent, calibrated by using YSI (Model 2300 STAT PLUS) Glucose Analyzer Result Calibration reference instrument, which is traceable to NIST reference standard. Sample Fresh capillary whole blood Minimum Sample Size 0.4 μL... -
Page 44: Warranty
Warranty Please complete the warranty card that came with this product and mail it to your dealer to register your purchase. If the meter fails to work for any reason other than obvious abuse within the first five (5) years from purchase, we will replace it with a new meter free of charge. For your records, also write the purchase date of your product here. -
Page 45: Index Of Symbols
Index of Symbols Consult instructions for use For in vitro diagnostic use only Store between 2 – 30 ºC (36 – 86 ºF) Contains sufficient for <n> tests Use by Lot Number Manufacturer Authorized Representative Sterilized using irradiation Control Range Catalog # Model Number Serial Number... -
Page 46: Index
Index Averaging Results…………….. Setting the Clock…………. Battery, Replacing the………... Specifications………….…. Carrying Case…………………… Strip Ejector…………….… 3,29 Clearing the Memory………..… Procedure Data Port........Precautions and Limitations Date Format....... 8,10 Testing Your Blood………… Guidelines......... Quality Control Test………… Hematocrit......... Control Solution…………… Hyperglycemia......14,30 How to Run………………… Hypoglycemia......
Need help?
Do you have a question about the Extra and is the answer not in the manual?
Questions and answers