Table of Contents
Advertisement
Advertisement
Table of Contents

Related Manuals for SCA SCADVR18

Summary of Contents for SCA SCADVR18
- Page 1 FULL HD 1080P DASH CAM Owners/Instruction Manual PLU 557209...
-
Page 2: Product Overview
Product overview Thank you for purchasing the SCADVR18 FULL HD 1080P Dash Cam. This Dash Cam is specifically designed for real time video and audio recording when driving. The Dash Cam simply mounts to the windscreen and records footage onto a Micro SD memory card. It has a G-sensor with adjustable sensitivity and loop recording functionality. -
Page 3: Table Of Contents
Table of contents Product overview..............2 Product features..............2 Table of contents..............3 Package components............4 Product structure..............5 Charging the Dash Cam............7 Installing the Dash Cam............7 Instructions for video operation..........9 Instructions for Photo operation........10 Video/Photo playback & protecting file......11 Dash Cam menu...............12 Movie mode menu settings..........12 General settings..............13 Still capture menu settings..........15 Connecting to a PC............15... -
Page 4: Package Components
Package components Suction mount bracket USB cable SCADVR18 Car charger... -
Page 5: Product Structure
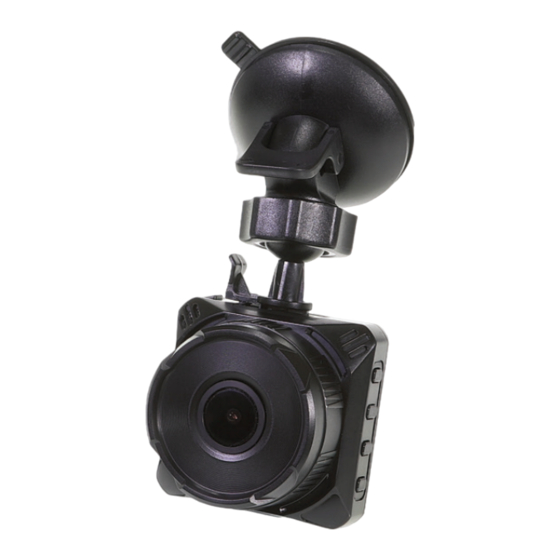
Product structure 1) Power button 5) Indicator light 2) Micro SD card slot 6) Screen 3) Reset button 15) Locking nut 4) Mini USB connection 16) Suction lock 17) Suction mount... - Page 6 Product structure cont... 7) OK button 11) Microphone 8) Down button 12) Lens 9) Up button 13) Speaker 10) Menu button...
-
Page 7: Charging The Dash Cam
Charging the Dash Cam The Dash Cam can be charged multiple ways: 1. Using the provided car charger. 2. Using a USB cable to connect to the Mini USB interface. When the Dash Cam is charging, a red indicator on the Dash Cam glows red. - Page 8 Installing the Dash Cam cont... 1. Ensure windscreen is clean and free of debris. Attach suction cup to the windscreen and lock into position with the lever. 2. Fix where the vision is not blocked (Place close to rear-view mirror is recommended). Don't install device on an airbag or within its working range.
-
Page 9: Instructions For Video Operation
Instructions for video operation Once the power source is connected and the ignition is turned on, the red indication lamp will light up and it will start recording automatically. Once ignition is turned off it will save the last file and power OFF. To power ON/OFF manually press the power button underneath. -
Page 10: Instructions For Photo Operation
Instructions for Photo operation Press the Power button to switch from video mode to photo mode when not recording. The screen will change from a movie icon to camera icon. To take a picture press the OK button. The Dash Cam make a camera sound when a picture is taken. -
Page 11: Video/Photo Playback & Protecting File
Video/Photo playback & protecting files Press the Power button until you see the video reel or photo icon on the top left of the screen. Using the arrow buttons, you can choose between all your recorded videos or photos. Press the OK button to select a file for playback. -
Page 12: Dash Cam Menu
Dash Cam menu Menu Settings Press the Menu button to enter into Movie or Still Capture menu when not recording. Press again to enter the General Settings. You can navigate the through the individual settings menu by using the Up/Down buttons. To change or edit a selected setting, use the arrow buttons and press the OK button to confirm. -
Page 13: General Settings
General settings Beep Sound: Allows you to turn the button beep sounds on or off. Clock Settings: This feature will allow you to edit the date and time for use with Stamp format Date Format: This feature will allow you to change the format displayed for the year, month and day Stamp Format: This feature will stamp the date/time and logo (Dash Cam... - Page 14 General Settings cont... LCD Power Save: This feature will turn your LCD off completely or off after 1 or 3 minutes but will continue to record regardless. This feature is useful for night driving as having the LCD on could be a distraction or illegal.
-
Page 15: Still Capture Menu Settings
Still capture menu settings Still Image Size: This is the resolution size of the photos taken, choose 3M, 2M, 1.2M or VGA. Still Quality: Allows you to choose Superfine or Fine for a more detailed image. Exposure: This feature will change the light and dark balance of your photos. -
Page 16: Maintenance
Maintenance Maintaining the Battery: To prolong the battery life you must charge your Dash Cam on a 5 volt home charger at least once a week for 2-3 hours with the Dash Cam off. If you don't use the car daily, for cars that are used daily for more than 1 hour you can charge the Dash cam once every 3 weeks for 2-3 hours. -
Page 17: Product Specifications
Product specifications MSTAR MSC8328 Display 2.0-inch LCD screen Screen resolution 960*240 pixels Color Black Video Video resolution 1080 FHD 1920*1080 at 30fps 720 HD 1280*720 at 30fps Picture 3M/ 2M/ 1.2M/ VGA Picture format Viewing angle 120 degree wide viewing angle Camera sensor GC2023 (1080P) Functions... -
Page 18: Warranty
FULL HD 1080P DASH CAM Warranty This product is guaranteed against defects for a period of 12 months from date of purchase. This warranty is provided by Super Cheap Auto Pty Ltd ACN 085 395 124 (Supercheap Auto) of 751 Gympie Rd Lawnton QLD 4501. Ph (07) 3482 7500. Supercheap Auto will offer a repair, replacement product or store credit if the product is assessed as being defective during the warranty period.
Need help?
Do you have a question about the SCADVR18 and is the answer not in the manual?
Questions and answers