Behringer U-Control UMA25S User Manual
Behringer keyboard user manual
Hide thumbs
Also See for U-Control UMA25S:
- User manual (23 pages) ,
- Quick start manual (15 pages) ,
- Quick-stard manual (4 pages)
Table of Contents
Advertisement
Advertisement
Table of Contents

Related Manuals for Behringer U-Control UMA25S


Summary of Contents for Behringer U-Control UMA25S
- Page 1 User Manual A50-50233-00001...
-
Page 2: Important Safety Instructions
U-CONTROL UMA25S Important safety instructions Caution: To reduce the risk of electric shock, do not remove the top cover (or the rear section). No user serviceable parts inside. Refer servicing to qualified personnel. Warning: To reduce the risk of fire or electric shock, do not expose this appliance to rain and moisture. - Page 3 All trademarks (except BEHRINGER, the BEHRINGER logo, JUST LISTEN and U-CONTROL) mentioned belong to their respective owners and are not affiliated with BEHRINGER. Mac OS is a trademark of Apple Computer, Inc., registered in the U.S. and other countries. Windows is a registered trademark of Microsoft Corporation in the United States and other countries.
-
Page 4: Table Of Contents
MIDI controller. The task of designing our new UMA25S certainly meant a great deal of responsibility, which we assumed by focusing on you, the discerning user and musician. Meeting your expectations also meant a lot of work and night shifts. -
Page 5: Introduction
Please ensure proper disposal of all packing materials. 1.1.2 Initial operation Ensure adequate air supply, and to avoid overheating, do not place your UMA25S on top of a power amplifier or near radiators, etc. The UMA25S runs via USB, batteries or an external power adapter. -
Page 6: Online Registration
1.3 Hardware configuration To connect the UMA25S to your computer, use the provided USB cable. Connect the supplied headset as shown in Fig. 1.3. Optionally, hook up further units to the UMA25S as can be seen from the diagram. * included Fig. -
Page 7: Stand-Alone Mode
1.3.1 Stand-alone mode In case the USB connection is not available or detected, the UMA25S automatically switches to the stand-alone mode. In this mode, you can use the UMA25S to control external units via the MIDI output. MIDI THRU Fig. 1.4: Stand-alone mode U-CONTROL UMA25S 1.3.2 USB mode (default) -
Page 8: Software Installation
In this mode, the keyboard messages are transmitted via USB to the computer and simultaneously to MIDI OUT. The messages from the computer are only picked up by the UMA25S and not passed on to MIDI OUT. This mode is ideal for recording your keyboard performance to your computer even when your sequencer or virtual instrument produces high latencies. -
Page 9: Controls And Connections
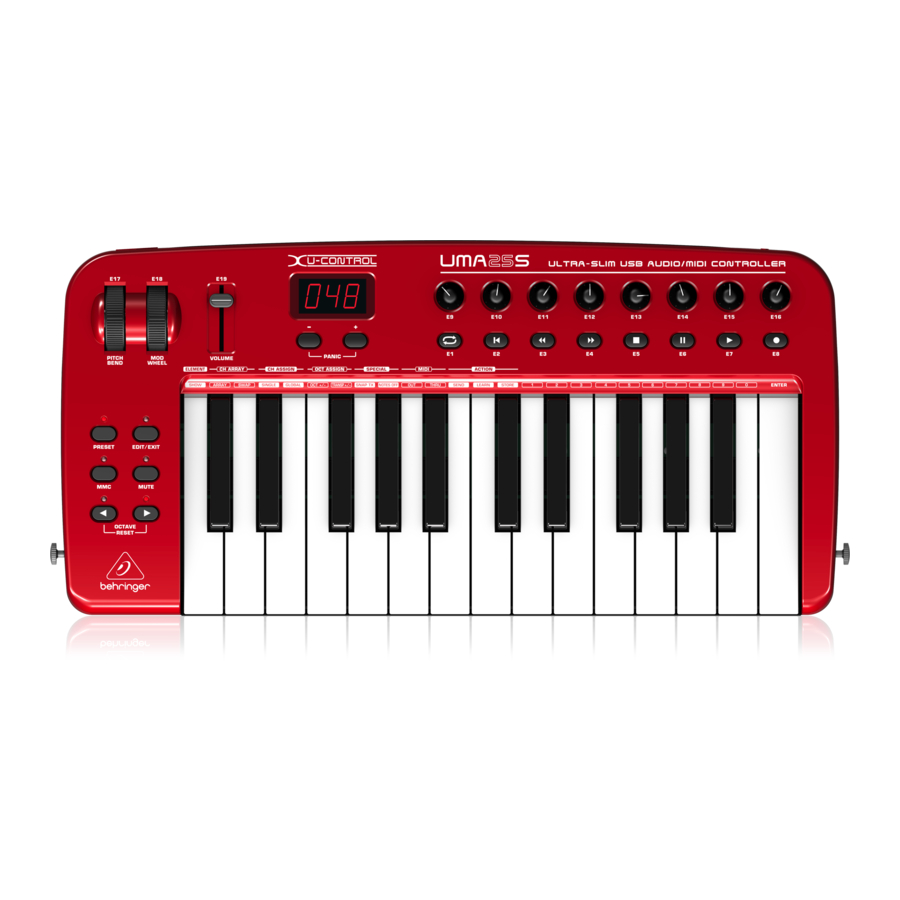
3. Controls and connections Fig. 3.1: Top view of the UMA25S The keyboard of the UMA25S has 25 velocity-sensitive, full-size keys with half action. The OCT </> push buttons allow you to shift the keyboard range up to 4 octaves up or down. These push buttons are also used for transposition (see Chapter 5.2.2). -
Page 10: The Uma25S As Audio Interface
For monitoring purposes, plug the stereo headphones into the PHONES output on the UMA25S or into the headphone output on the mixer. Use the supplied USB cable to connect your computer by way of the USB port. -
Page 11: The Uma25S As Usb/Midi Controller
5. UMA25S as USB/MIDI controller At the highest control level of the U-CONTROL, you play and control the MIDI data (Play Mode). The UMA25S has an array of control elements with which you can control your MIDI equipment via the MIDI output or with which you are able to control your computer applications via USB (using the MIDI standard). -
Page 12: Changing The Velocity Curve
And how does it work? Each control element of the UMA25S can be assigned to particular MIDI parameters. Assignments are carried out in Edit Mode (see Chapters 5.3 and 5.4). Whenever one of these control elements... -
Page 13: The Mmc Function
Press the LEARN key. “Lrn” appears on the display while the MIDI device waits for an external MIDI message. Transmit the MIDI message to the UMA25S from the device you want to control. If valid MIDI data are received, the display shows “Gd!”... -
Page 14: Assignment Of Control Messages In Edit Mode
It is possible to specify settings that are different from the presets. To do so, you need to determine which control elements on the UMA25S generate which MIDI messages. You need to specify how the incoming controllers are to be interpreted on the slave unit. -
Page 15: Midi Messages
In case you want to activate preset no. 6 in bank 8, adjust as follows: E11 = 8, E12 = Off, E13 = 6. Result: First, the UMA25S transmits the higher ranking bank number 8 as CC, followed by the program number... -
Page 16: Control Changes
MIDI messages. They allow you to control plenty of parameters and functions. You can assign CC messages to each control element on the UMA25S. Since it is possible to use push buttons, sliders and rotary knobs, the controller values can be controlled either statically or dynamically in real time. -
Page 17: Pitch Bend
5.5.5 Pitch Bend The Pitch Bend wheel E17 on the UMA25S is used to change the pitch of a note. It has its own type of message in the MIDI specification. The Pitch Wheel message can also be assigned to other continuous elements (such as slider, knobs and expression pedal). -
Page 18: More Functions In Edit Mode
Use the keyboard to enter two digits for the GLOBAL SEND CHANNEL you want to use (for example, “0” and “6” for MIDI channel 06). Press the ENTER key to confirm. The EDIT LED goes out. 5. UMA25S as USB/MIDI controller... - Page 19 Global Device Dump Dump MMC Frame Factory Receive Ch. Single Rate Select Reset 1-16, Off 1 - 16 Run/ Run/ Off, 24, 25, 30d, 30...
-
Page 20: Specifications
Factory Reset) appears on the display. Press the ENTER key once to reset to the factory settings. Then, the UMA25S switches back to normal Play Mode. Caution! With Factory Reset, all configured data and user presets are irreversibly deleted! To avoid an accidental deletion, save your presets by sending a SysEx dump to your computer beforehand. -
Page 21: Appendix
CC 10 Reverb Send CC 91 Chorus Send CC 93 Delay/Variation Send CC 94 Table 7.1: GS/XG parameters Musical MIDI Octave Position Note Note Number C#3/Db3 D#3/Eb3 F#3/Gb3 G#3/Ab3 A#3/Bb3 Table 7.2: MIDI note number assignment U-CONTROL UMA25S 7. Appendix... - Page 22 U-CONTROL UMA25S E1~E8 Buttons Element Name MIDI data type E1 (Loop) CC 21 (undefined) E2 (Loc 0) CC 22 (undefined) E3 (Rew) CC 23 (undefined) CC 24 (undefined) E4 (Fwd) E5 (Stop) CC 25 (undefined) E6 (Pause) CC 26 (undefined)
-
Page 23: Warranty
No part of this manual may be reproduced or transmitted in any form or by any means, electronic or mechanical, including photocopying and recording of any kind, for any purpose, without the express written permission of BEHRINGER International GmbH. Mac and Mac OS are trademarks of Apple Computer, Inc., registered in the U.S.
Need help?
Do you have a question about the U-Control UMA25S and is the answer not in the manual?
Questions and answers