Advertisement
Short Reference for the Actilino
Version 1.6
Please also review the detailed User Manual, which you can find on the StartStick.
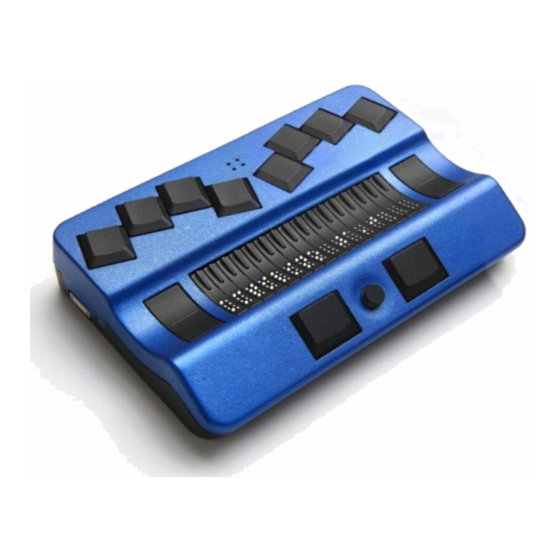
The first two keys on the front are the space keys. In the following description, the left space
bar is called [SPCL] and the right space bar is called [SPCR]. If either the left or the right
space bar can be used, they will be called [SPC].
Between the two space keys, you can find a control stick which greatly facilitates navigation
within the internal mode, on mobile platforms such as Android or iOS, as well as on a
connected PC or laptop. The control stick can be pushed into the four main directions, that is,
up, down, left or right. In this way, it allows you to navigate through menus and content. In
addition, you can depress the control stick in the direction of the device to perform an action
on whatever is selected.
Behind the space keys are 16 ergonomic Braille display elements with integrated cursor
routing keys. The cursor routing (CR) keys which are integrated as part of each Braille cell
enable you to place the cursor directly at the text position of this Braille cell.
The Triple Action Keys are to the left and right of the Braille display and flush with the Braille
cells. You can activate the Triple Action keys at the top, in the centre and at the bottom.
The Triple Action Key functions are:
The left or right Triple Action Key's (Up) position also serves as a reading key to move
backward within the text and will be referred to as [TLU] or [TRU] in the list below. The left or
right Triple Action Key's (Down) position also serves as a reading key to move forward
through the text and are referred to as [TLD] or [TRD] in the list below. In the event of the
right as well as the left Triple Action Key (Up) can be pressed, it is called [TU]. If alternatively,
the Triple Action Key left or right (Down) can be used, this is called [TD].
The centre position of either the left or the right Triple Action Key [TLC] and [TRC] can be
used for additional functions.
Located behind the Braille modules are eight ergonomically arranged function keys. These
function keys are also used for Braille input. They correspond to the usual Braille keyboard
layout and are, from the left to the right as follows:
7
3
2
1
4
5
6
8
The built-in microphone is located in between and above dot 1 and 4. It is recognizable by
the four small holes in the housing. The microphone can be used to make and receive phone
calls via a connected smartphone.
If you move along the right side of the housing towards the back, you will first feel the main
power button. Located behind the power button is a USB A port for connecting a USB
keyboard.
On the left side of the housing, you can find a round headphone plug (3.5 mm) to connect a
headphone or an external loudspeaker. Behind this headphone plug there is oval and tactile
magnetic USB port for PC connection or to connect a charger.
On the left and right front side of the device there are corrugated openings behind which the
stereo speakers are located. Directly next to the left speaker you can find the slot for the
micro SD card.
Please do not remove the micro SD card at any time from the device while it is on. Data on
the card can be damaged. Please turn the Actilino off, before you insert or remove the micro
SD card.
The Actilino is equipped with a lithium-ion battery. The battery compartment is located in the
middle of the Actilino. It can be opened from the Actilino's bottom. To open the battery
compartment, drag the locking latch which you can find on the right side of the unit in
direction of the center. Then you can remove the lid of the battery compartment and remove
Advertisement
Table of Contents

Related Manuals for Handy Tech Actilino

Summary of Contents for Handy Tech Actilino
- Page 1 SD card. Please do not remove the micro SD card at any time from the device while it is on. Data on the card can be damaged. Please turn the Actilino off, before you insert or remove the micro SD card.
-
Page 2: Navigating The Menu System
Please switch off the Actilino and disconnect all cables before you remove the battery. We recommend not removing the battery at all, because after replacing the battery the capacity is not shown accurately. In order to show the right battery capacity, a complete and lengthy discharging and charging cycle for calibration is necessary. -
Page 3: Keys In Pc Mode
Function Keys Exchange mark and cursor SPC+7 8 Toggle insert/overstrike mode Chord i (SPC+2 4), insert mode is default Set mark TU+TD Jump to mark Chord m (SPC+1 3 4) Incremental forward search Chord f (SPC+1 2 4) Incremental backward search Chord F (SPC+1 2 4 7) Forward search and replace Chord r (SPC+1 2 3 5) - Page 4 The key assignments for the different screen readers Window-Eyes, JAWS and Hal/SuperNova on the Actilino are as similar as possible. In the following table, you find the assignments for JAWS. You can find the tables for Window-Eyes and Hal/SuperNova as well as the complete table for JAWS in the user manual.
- Page 5 Change cursor representation (dots 7 and 8, all 8 dots, blinking and non-blinking). [2 8] Toggle between 6/8 dot Braille. [1 8] Handy Tech configuration dialog (starting from Handy Tech JAWS Driver version 3.x) [4 8] Toggle between focused text on Braille display/same text as on screen.
Need help?
Do you have a question about the Actilino and is the answer not in the manual?
Questions and answers