Table of Contents
Advertisement
Quick Links
Advertisement
Table of Contents

Related Manuals for Dragon Touch DT50


Summary of Contents for Dragon Touch DT50
- Page 1 USER MANUAL DT50 Baby Monitor...
-
Page 2: Table Of Contents
CONTENTS Warning Packing List Overview Getting Started 1. Charge the Camera 2. Camera Pairing 3. View 4. Lullabies 5. Feeding Timer 6. Auto Tracking 7. Setting Contact US... -
Page 3: Packing List
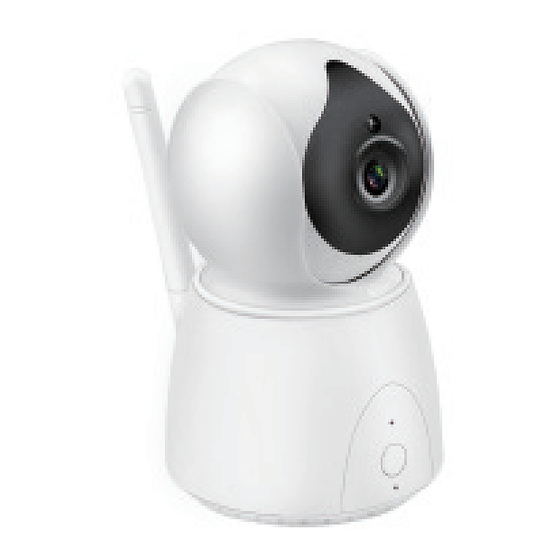
6. This product is not a toy. Do not allow children to play with it. GUIDE DT50 Baby Monitor 7. This product is not intended to replace proper adult supervision of children. 8. You must check your child’s activity regularly, as this product will not alert parents to silent activities of a child. - Page 4 1. Menu Button: Press to access different menu options or exit the menu. 1. Main Camera Lenses 6. Antenna 2. OK / : Short press to confirm the option. Long press to digital zoom. 2. Night Vision Sensor 7. The temperature and humidity sensor : Short Press to adjust monitor’s voice.
-
Page 5: Getting Started
GETTING STARTED ② Press “OK” button to enter to the interface. 1. Charge the Camera 22°C MENU Add Camera Delete Camera Camera 1 Camera 5 VOL+ Camera 2 Camera 6 VOL- Camera 3 Camera 7 Camera 4 Camera 8 ① Connect the camera power adapter to the camera unit. ②... -
Page 6: View
④ Press camera’s PAIR key, then connect successfully. ② Press “OK” to scan camera 1. 14 : 52 : 03 22°C MENU VOL+ PAIR (On The Bottom Of Camera) VOL- Camera 1 Camera 2 Camera 3 Camera 4 Scan 3. View ③... -
Page 7: Lullabies
4. Lullabies 5.Feeding Timer ① Press Menu button to enter to the function interface, choose “Lullabies”. ① Press Menu button to enter to the function interface, choose “Feeding Timer”. 22°C 22°C MENU MENU VOL+ VOL+ Camera View Lullabies Camera View Lullabies VOL- VOL-... -
Page 8: Auto Tracking
6. Auto Tracking 7. Setting ① Press Menu button to enter to the function interface, choose “Auto Tracking”. Press Menu button to enter to the function interface, choose “Setting”. 22°C 22°C MENU VOL+ Camera View Lullabies Camera View Lullabies VOL- Feeding Timer Auto Tracking Setting... - Page 9 7.2. Brightness Setting 7.3. Date & Time ① Choose “Brightness Setting” and press “OK” to confirm the option. ① Choose “Date & Time” and press “OK” to confirm the option. 15 : 11 : 06 15 : 11 : 06 22°C 22°C MENU...
- Page 10 7.4. Temperature Setting 7.5. Temperature °F/°C switch ① Choose “Temp Setting” and press “OK” to confirm the option. Switch °C & °F easily by this function. 15 : 11 : 06 15 : 11 : 06 22°C 22°C MENU MENU Language Setting Brightness Setting Language Setting...
- Page 11 7.6. Frequency 7.7. Motion Detecting Switch 60Hz & 50Hz easily by this function. ① Choose “Motion Detection” and press “OK” to confirm the option. 15 : 11 : 06 15 : 11 : 06 22°C 22°C MENU MENU Language Setting Brightness Setting Language Setting Brightness Setting...
- Page 12 7.8. VOX 7.9. Power Saving ① Choose “VOX” and press “OK” to confirm the option. ① Choose “Power Saving” and press “OK” to confirm the option. 15 : 11 : 06 15 : 11 : 06 22°C 22°C MENU MENU Language Setting Brightness Setting Language Setting...
-
Page 13: Fqa
7.9. Default Setting ① Choose “Default Setting” and press “OK” to confirm the option. Q: Cannot to connect to camera. A: 1. Please ensure the camera keep charging. 2. Please ensure the camera and monitor within 900 feet (at open area). 15 : 11 : 06 22°C MENU...
Need help?
Do you have a question about the DT50 and is the answer not in the manual?
Questions and answers