Advertisement
Quick Links
TE390
FCC ID:2ANY6-TE390
Quick Start Guide
Thanks for choosing our product!
This Quick Start Guide Only applicable to: TE390.
Before using the product, please read the Quick Start Guide to fully
benefit from it.
Note
Warranty period is 1 year from date of purchase.
This product involves constant upgrading and/or improvement,
our company reserves the right to change the specifications of
software and/or hardware mentioned in this operating guide without
any prior notice. The product specifications and information
mentioned in the operating guide are for reference only.
Check List
Battery×1
USB Data Cable×1
TE390×1
Travel
Charger×1
Quick Start Guide×1
Belt
Clip×1
Notice:
Please check the following accessories before you discard the packing
material. Please contact your local dealer immediately if there is any
missing or damage parts.
Basic Operation
Power on/off
Long press the Power Button to power on/off the device.
Screen interaction
Channel Switch
Single Click: Lighten the screen/ enter a menu or choose an option
Long Press: Back to the previous menu
Double Click: When you are connecting the WIFI and inputting password, double click
to input lowercase.
Switch clockwise/counterclockwise: Switch/back to the next/previous menu item
Operating State
Standby
Searching Network
Low Battery
Charging
PTT Transmitting
PTT Receiving
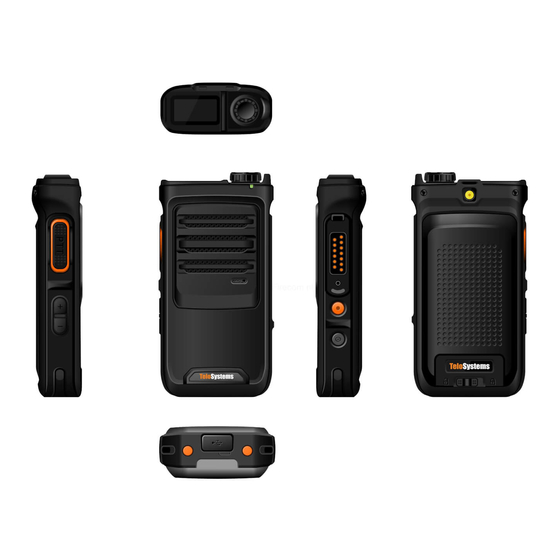
Channel Switch
OLED Screen
LED Indicator
Speaker
PTT Button
MIC
Volume Button
WiFi Connection
Go to the Settings > WiFi interface. Enable the WIFI option (single click to revert the status),
Switch to find the right access point you want to connect to, single click the right access
point then input the password in (Single click to input lowercase, double click to input
uppercase). Switch to select inputting characters. Click "√" to confirm / exit the password
inputting.
GPS Location
Go to the Settings > Location interface, single click to enable or disable GPS location.
Date & Time Configuration
Go to the Settings > Date&Time interface, single click to configure time display format.
Bluetooth Connection
Go to the Settings > Bluetooth interface, Switch to choose "PTT Button", single click
to enable Bluetooth connection, after Scanning for a while, switch and find the right
device name, single click to confirm bonding to the Bluetooth button, others Bluetooth
device please choose "Headset" with the same operation.
Cellular Data Connection
Go to the Settings > Cellular data interface, single click to revert enable or disable
cellular data connection.
Flashlight
Go to the Settings > Flashlight interface, single click to turn on/pff the flashlight.
or Press the Vol- and Programmable button at the same time to turn on/off it.
Battery Percentage
Go to the Settings > Battery percentage interface, single click to show / hide the battery
percentage status on the display screen.
M6 Settings
Go to the Settings > M6 Settings interface, single click the channel switch to choose
"Headset" or "Remote Speaker Mic" mode.
Language
Go to the Settings > Language interface, switch and single click to choose the right
language.
Factory Reset
Go to the Settings > Reset interface, under the interface "Are you sure about recovery?",
switch the options, choose "Yes" to reset and "No" to exit.
System Information
Go to the Settings > About interface, find the device and SIM card information including
Operation System Version, IMEI Code, Battery Percent, SIM Name, SIM Level, SIM Type.
System Update
Go to Settings > System Update interface, single click to check updates.
Indication
Green (Blinking)
Green (Fast Blinking)
Red(Blinking)
Red(Steady)
Red(Steady)
Green(Steady)
Flashlight
Accessory Connector
Programmable/
Emergency Button
Power Button
Battery Cover Lock
Charger Docking Port
USB Port
Push-To-Talk Application
Go to the PTT item, single click to enter in the PTT application interface. Switch between
different groups to execute instant communication.
Before Use
1.Release the battery cover lock,
2. According to the indication,
insert the SIM or SD card inside
move the battery cover away.
the SIM or SD card slot.
3.Put the Battery into the slot.
4.Lock the battery cover.
Battery Cover
Lock
SIM Card Slot
SD Card Slot
Charging
Using Desktop Charger
Connect the Desktop Charger and
the Power Adapter with an USB
Data Cable.
Red light on the desktop charger
To USB Part
On Desktop
indicates battery charging in
Charger
progress.
Green light on the desktop charger
indicates fully charged.
USB Data Cable
Telo Systems
Tel: +86-755-86950766
E-mail: support@telosystems.com
Add:4/F, Chuangye Building, Seven-Star Park,
Yu'an 2nd Road, Bao'an District, Shenzhen, China
www.telosystems.com
Using USB Data Cable
Connect the LTE handheld and power
adapter using the USB Data Cable.
Red light on the LTE handheld
indicates battery charging in
To USB
Power
progress.
Adapter
Green lights on indicates fully
charged.
USB Data Cable
Notice:
Always use Telo Original batteries and chargers. The warranty does not cover damage
caused by non-Telo batteries and/or chargers.
WARNING: DO NOT USE THE ABOVE TWO CHARGING METHODS SIMULTANEOUSLY.
Cautions
Risk of explosion, fire or chemical burns if battery is disassembled, crushed, stricken,
trampled, short-circuited, incinerated or exposed to high temperature over 60℃.
Don't use damaged or weeping battery.
Keep the battery dry and out of Children's reach.
Properly dispose of failure batteries in accordance with local regulations.
Although your device is quite sturdy, it is a complex piece of equipment and can be
broken. Avoid dropping, hitting, bending, or sitting on it.
Make sure the charger/USB port, microSD card/SIM card slot covers are properly seated,
with no foreign objects obstructing the seals.
Do not use the charger/USB port for charging, data transmission, etc. until the phone
is completely dry.
Do not store the device under any circumstance containing electronic erosive material.
Avoid to pull the device up by holding the antenna or accessories.
Please power off and unload the battery before cleaning the device.
To USB
Using dry and clean lint-free cloth or hairbrush to keep the device and charger docking
Power
Adapter
port clean.
Avoid to use any chemical agent including detergent, alcohol, aerosol spray or oil
preparations as cleaning solution.
Dry your device completely after cleaning and before using it again.
To Device
USB Port
Advertisement

Summary of Contents for Telo Systems TE390
-
Page 1: Quick Start Guide
Tel: +86-755-86950766 Thanks for choosing our product! E-mail: support@telosystems.com Charger Docking Port This Quick Start Guide Only applicable to: TE390. Add:4/F, Chuangye Building, Seven-Star Park, Before using the product, please read the Quick Start Guide to fully USB Port Yu'an 2nd Road, Bao'an District, Shenzhen, China benefit from it. - Page 2 -Consult the dealer or an experienced radio/TV technician for help. The SAR limit of USA (FCC) is 1.6 W/kg averaged over one gram of tissue. Device types TE390 (FCC ID: 2ANY6-TE390) has also been tested against this SAR limit. The highest reported SAR values for head, body-worn accessory are 0.61 W/kg, 0.88 W/kg respectively.
- Page 3 For 5150-5250 and 5725-5850 frequency band, Operations in the 5150-5250 and 5725-5850 band are restricted to indoor usage only. Any emission is maintained within the band of operation under all conditions of normal operation. The max. frequency stability is less than 20ppm.
Need help?
Do you have a question about the TE390 and is the answer not in the manual?
Questions and answers