Table of Contents
Advertisement
Advertisement
Table of Contents

Related Manuals for Blade 9930

Summary of Contents for Blade 9930
- Page 1 User manual ®...
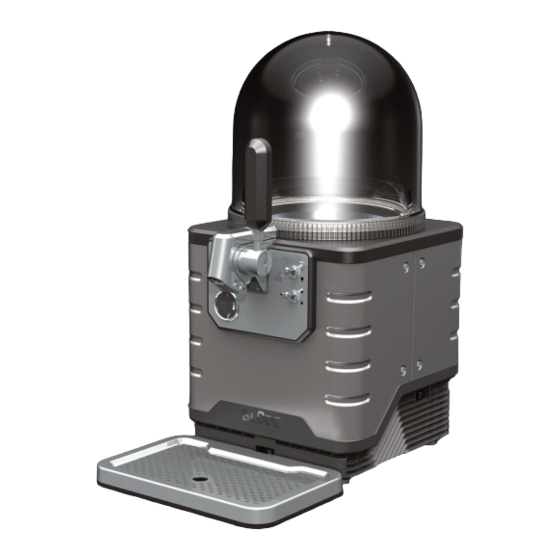
- Page 3 Your appliance will serve your needs for many years to come provided you handle and maintain it with due care. We wish you a lot of pleasure with your Blade countertop draught system. ®...
-
Page 4: Table Of Contents
3.3 Electrical installation....... . . 11 3.4 Set-up and assembly of the appliance ....11 3.5 Connecting the Blade appliance to the power supply . . . 12 ®... -
Page 5: Safety
Safety Safety This section contains important safety instructions for handling Blade ® countertop draught system appliance. This appliance complies with the prescribed safety regulations. Improper use can however result in personal injury and/or appliance damage. 1.1 Danger of electric current! -
Page 6: Fundamental Safety Precautions
Safety This appliance incorporates an earth connection for functional ► purposes only. If the appliance does not function properly and before cleaning ► remove the plug from the mains. Protect the appliance against climatic influences such as damp or ► direct sunlight. -
Page 7: Consumer Information
Safety Do not lift the appliance by the tap handle. ► Do not clean the appliance or accessories in a dish washer. ► Do not use a water jet for cleaning. The appliance is not suitable for ► installation in an area where a water jet could be used. You can clean your appliance with a slightly damp cloth and dry it ►... -
Page 8: General
General General 2.1 Information on this user manual This user manual is a component of the Blade countertop draught system (subsequently ® referred to as the ‘appliance’) for Blade disposable beer kegs and features important ® information concerning start-up, safety, intended use and appliance maintenance. -
Page 9: Intended Use
For initial contact in the event of questions, complaints or repairs we have set up a service hotline for you. You will find the service hotline number for your country on the website: www.blade.shop. Experience has shown majority of all complaints on Blade countertop draught system ®... -
Page 10: Putting Into Operation
< 4° C 0° < to use. NOTE ► Only genuine disposable kegs made by Blade can be used. ® This guarantees the consistent quality of the beer. 3.2 Requirements for place of operation For safe and trouble free operation of the appliance it must be placed on a location that suits the following conditions: ■... -
Page 11: Electrical Installation
Putting into operation 3.3 Electrical installation For safe and trouble-free operation of the Blade countertop dispense appliance, ® the following instructions on electrical connection must be observed: ■ Before connecting the Blade countertop draught system appliance, compare ® the connection data (voltage and frequency) on the rating plate with those of your mains power supply. -
Page 12: Mounting The Drip Tray
Putting into operation 3.5 Connecting the appliance to the power supply The appliance is now connected to the power supply as follows: ■ Tilt the appliance around 30° to the right and feed the appliance side of the power cord into the socket located on the underside of the appliance (Figure 7+8). NOTE ►... -
Page 13: Preparing The Keg
Putting into operation NOTE ► Perform this assembly step prior to connecting the keg, as a certain amount of beer may escape in the subsequent process. 3.7 Preparing the keg The keg must now be prepared for connection. Please perform the following steps: ■... -
Page 14: Inserting The Keg Into The Appliance And Connecting It
Putting into operation 3.8 Inserting the keg into the appliance and connecting it The pre-cooled keg is now ready to be inserted into the appliance. Proceed as follows: ■ Carefully guide the keg into the cooling bowl, making sure to keep it vertical. The beer tube (L) must point exactly in the direction of the dispense tap and it must be easy to insert into the retainer groove (Figure 18). -
Page 15: Switching On The Appliance
Putting into operation 3.9 Switching on the appliance NOTE ► Each time prior to switching on, make sure that the appliance is properly set up and securely connected. ■ Place the dome onto the appliance. This also keeps the contents cool and makes it possible to light up the appliance (Figure 24). -
Page 16: Operation And Use
Operation and use Operation and use 4.1 Displays The front of the appliance features 2 indicator instruments: ■ The volume gauge (N) is automatically set to full when a new keg is installed and indicates the amount of beer remaining. The flow is measured and the indicator changes accordingly (Figure 30+31). -
Page 17: Indicator Light
Operation and use 4.2 Indicator light LED signal Display Status ■ LED OFF Keg locking switch is in upper position, no disposable beer keg is locked. Idle state (normal status). ■ Green blinking Keg locking switch is down and the locking box is moving to the close position to connect the air nozzle.(normal status). -
Page 18: Switches
Operation and use 4.3 Switches There are three toggle switches on the appliance. ■ The main switch (B) on the right of the appliance (Figure 34). ■ The keg locking switch (C) with indicator light (D) on the control panel (Figure 35). ■... -
Page 19: Removing Or Replacing The Empty Keg
Operation and use 4.5 Removing or replacing the empty keg NOTE ► The keg is empty in case the beer flow stops while the tap is open. ► If dome light is on when keg will unlock the light brightness will be reduced as long as the new keg is locked or dome light will switched off . -
Page 20: Handling Partially Empty Kegs
Operation and use 4.6 Handling partially empty kegs Partially empty kegs must not be unlocked and must remain in the appliance – which must itself remain switched on – to ensure that the correct pressure and cooling is maintained. Once a keg has been opened, the correct internal pressure and cooling must be maintained in order to prevent an escape of carbon dioxide that would impair the taste of the beer and increase the formation of foam when dispensing. -
Page 21: Cleaning And Maintenance
Clean the appliance according to the instructions as described in this section. 5.1 Safety precautions DANGER Observe the following safety precautions before starting to clean the Blade ® countertop draught system appliance: ► Switch off the appliance and pull the plug out of the mains socket before starting cleaning. -
Page 22: Regular Cleaning
Cleaning and maintenance CAUTION ► Do not use any scratching, abrasive or corrosive agents. Wipe the housing with a soft damp cloth. ► Do not use a water jet for cleaning. ► Do not clean housing parts such as the dome or the drip tray in the dishwasher. Otherwise, the high-gloss surfaces will gradually become dull and matt. -
Page 23: Troubleshooting
Unqualified repairs can lead to conside- rable danger for the user and cause serious damage to the appliance. 6.2 Proper packing of the appliance In the event of a warranty claim, pack the Blade countertop draught system appliance ®... -
Page 24: Trouble, Possible Causes And Remedies
■ The temperature The keg has probably If you leave the keg for at least 24 gauge shows the not been pre-cooled hours in the Blade appliance the ® beer is cold but long enough. entire keg will be cooled after a few glasses and the problem will be solved. -
Page 25: Storage
Storage / Disposal Storage If you do not intend to use the Blade countertop draught system appliance for a ® prolonged period, clean it as described in section 5 Cleaning and maintenance in order to prevent mold from building up. Mould is harmful to health. Store the appliance and all accessory parts in a dry, clean and frost-free place which is protected against direct sunlight. -
Page 26: Appendix
Appendix Appendix 9.1 Technical data Designation Beer Dispensing System Order No. 9930 Operating voltage See rating plate on your appliance Power consumption See rating plate on your appliance Max. operating pressure 2,4 + _ 0,4 bar Power cord 2 m (can be removed) -
Page 27: Warranty
Appendix 9.2 Warranty A warranty is granted for the Blade countertop draught system appliances in ® accordance with the statutory provisions of the country in which the appliance was purchased. This applies to all faults caused by material or manufacturing defects.
Need help?
Do you have a question about the 9930 and is the answer not in the manual?
Questions and answers