Advertisement
Quick Links
http://waterheatertimer.org/Sprinkler-and-watering-timers.html
http://waterheatertimer.org/Woods-timers-and-manuals-old.html#raindrip
Sprinkler Timer
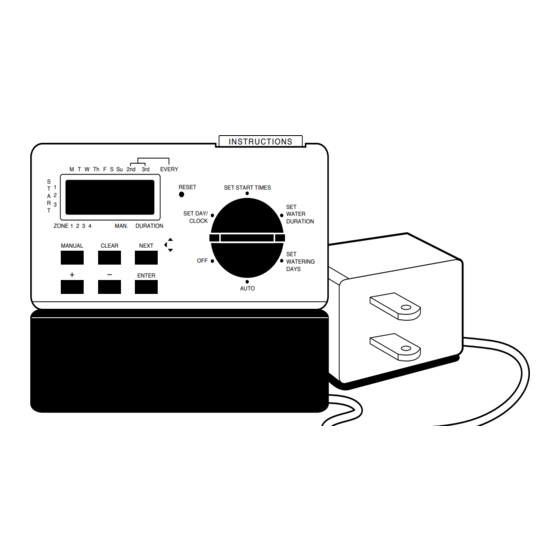
INSTRUCTIONS
M
T
W
Th
F
S
Su
2nd
3rd
EVERY
S
1
RESET
SET START TIMES
T
A
2
R
3
SET
T
SET DAY/
WATER
CLOCK
DURATION
ZONE
1 2 3 4
MAN.
DURATION
MANUAL
CLEAR
NEXT
SET
OFF
WATERING
DAYS
+
–
ENTER
AUTO
MODEL NUMBERS*
57114, 57116
57414, 57416
*WT2 VERSIONS
Installation and Operating Instructions
For WaterMaster
®
4 and 6 Zone Timers
Installation
Connecting Valve Wires to the Timer
1. Remove cover by sliding it down.
2. Determine which valve you want to connect to
which station. Connect each valve wire to its station
terminal (labeled 1-6) by inserting the bare wire.
3. Connect the common wire to the terminal screw
labeled "COM". (See Figure 3.)
Installing Batteries — For Program Back-Up
1. Install 2 AA (1.5 volt) alkaline batteries
in the battery compartment. (See Figure 4.)
CAUTION: Do not allow the battery to contact
the terminal strip.
2. With weak or no batteries, the program can
malfunction or be erased with power failure. If this happens, disconnect the
transformer, install fully charged batteries, plug in the transformer, and repro-
gram the timer.
Connecting the Transformer
1. With the cover off, find the two terminal
holes labeled "24V." Make sure the trans-
former is not plugged in. Insert one of
the two power leads from the transformer
into each terminal hole and turn the
screw with a Phillips screwdriver until
wire is secure. Do not overtighten!
2. Plug in transformer. (See Figure 5.)
WARNING: Do not link two or more timers
together using a common transformer.
3. Slide the cover back on until it snaps.
Thank you for purchasing a quality WaterMaster
years of satisfactory service, especially if proper installation and care is observed.
Please read the manual completely before installation, programming and opera-
tion. For ease of use, the manual is in step by step sequence of installing, setup
and operation.
The WaterMaster
away. WaterMaster
automatic watering program or override the automatic program for special
watering needs.
The WaterMaster
watering durations from 1 minute to 99 minutes each. You can water your yard
up to 3 times every day. Each start time will operate all stations in sequence.
You may use one of two watering schedules. One schedule will water on specific
days of the week. The other will water by periods - every other day or every 3rd
day. The WaterMaster
to water all stations sequentially, or to manually water one station at a time.
Note: Illustrations in this booklet show only 4 station terminals & 4 stations on the
display. 6 station products are fitted with 6 station terminals & show 6 stations on
the display.
Note: Always check local plumbing and electrical codes for requirements when
installing the timer, transformer, and sprinkling system. Use only with household
current with an appropriate transformer matching your voltage and plug type.
Help
Before returning this timer to the store, contact Orbit
1-800-488-6156.
Listings
The timer is tested to UL-1951 standard and is ETL
national models are CETL
Trademark Notice
WaterMaster
®
Step 1—Setting Clock Time and Day of Week
1. Turn dial to
COM
1
2
3
4
N.A. N.A. N.A
2. Press and release
pen or pencil. Display briefly shows all
functions then 12:00 PM with blinking
day of week indicator.
To zone valve
3. Press
NEXT
Figure 3
indicator to the current day of week.
(See Figure 6.)
2 AA batteries
4. Press
ENTER
Indicator stops blinking and time begins
COM
1
2
3
4
N.A. N.A. N.A.
24V
24V
blinking.
(See Figure 7.)
Figure 4
5. Press the + or – button to set the current
time of day. For faster setting press and
hold + or – button. Press
Step 2—Setting Watering Cycle Start Times
Note: A cycle start time is the time of day that the timer begins watering the first sta-
tion, and all other programmed stations will then follow in sequence. There are not
separate start times for each station. If you enter more than one cycle start time, all
COM
1
2
3
4
N.A. N.A. N.A.
24V
24V
stations programmed to operate will water again (in sequence).
1. Turn dial to
shows Start Time 1
in the left corner and -:— blinking.
Transformer
2. Press + or – button to select the first
cycle start time. For faster setting press
Figure 5
and hold + or – button.
3. Press
ENTER
4. Press
NEXT
5. Press
CLEAR
6. The WaterMaster
lapping start times. One start time will activate each station in sequence. You
cannot set a cycle start time for each station. Generally only one cycle start
time is required.
Introduction
®
timer. You will enjoy many
timer keeps your yard beautiful whether you are at home or
®
gives you convenience and flexibility, letting you use an
®
®
timer divides your property into four or six stations with
timer includes a manual override feature that allows you
®
®
´Technical Service at:
®
listed. Appropriate inter-
®
and CE
®
approved.
is a registered trademark of Orbit
Irrigation Products, Inc.
®
1
Programming
position.
SET DAY
/
CLOCK
button using a
RESET
F
M
T
W
Th
S
Su
2nd
3rd
EVERY
S
1
T
2
A
PM
R
3
T
ZONE
1 2 3 4
MAN.
DURATION
to advance the blinking
Figure 6
to record current day of week.
M
T
W
Th
F
S
S
1
T
A
2
R
3
T
ZONE
1 2 3 4
MAN.
Figure 7
to record current time of day.
ENTER
. Display
SET START TIMES
M
T
W
Th
F
S
Su
2nd
3rd
EVERY
S
1
1
T
AM
A
2
R
3
T
ZONE
1 2 3 4
MAN.
DURATION
Figure 8
to record first start time. (See Figure 8.)
and repeat steps 2 and 3 if additional start times are required.
to erase a start time.
®
Timer allows up to 3 start times per day. Do not set over-
Timer Location
1. Select a location that is near a standard electrical outlet. If this is not possible, a 16 gauge
electrical cord can be used to add length between the timer and the transformer (up
to several hundred feet). Avoid using an outlet controlled by an On/Off switch.
2. The timer should not be exposed to water or operated at temperatures below 14°
degrees or above 113° degrees Fahrenheit. (-10° c + 45° c)
Mounting the Timer
1. Screw a No. 8 screw at eye level leaving the screw
head extended out from the wall about 1/8 inch. Use
expanding anchors in plaster or masonry if necessary.
2. Slip the keyhole in the back of the timer over the
extended screw.
3. Screw a No. 8 screw through each of the two holes at
the bottom of the timer box into the wall. (See Figure 1.)
Wiring the Electric Valves
1. If the distance between the timer and
valves is under 700 feet, use WaterMaster
sprinkler wire or 20 gauge plastic jacketed
thermostat wire to connect the timer and
the valves. If the distance is over 700 feet,
use 16 gauge wire. The wire can be buried
in the ground; however, for more protec-
tion, wires can be pulled through PVC
pipe and buried underground. Be careful
to avoid burying the wires in locations
where they could be disturbed by digging
or trenching in the future.
2. Each valve has two wires. One wire is to be con-
nected as the common. All of the common wires for all the valves can be
connected together to one common wire going to the timer. The other valve wire
is to be connected to the specific station wire that is to control that valve.
(See Figure 2.)
3. All wires should be joined together using wire nuts, solder, or vinyl tape. For addi-
tional protection to waterproof connections, a WaterMaster
4. To avoid electrical hazards, only one valve should be connected to each station.
5. The rated output is 24 volts AC at less than 0.240 Amps. Do not use solenoids
that exceed these values.
Step 3—Setting Watering Durations for Each Station
You can assign each station an automatic watering period as short as 1 minute
and as long as 99 minutes.
SET DAY/
CLOCK
1. Turn dial to
SET WATER DURATION
Display shows minutes blinking
– – and station indicator
Station 1.
2. Press + or – button to select
desired duration for the station.
Su
2nd
3rd
EVERY
For faster setting press and hold +
or – button.
PM
3. Press
. Station indicator steps to Station 2. Display shows blinking – –.
ENTER
DURATION
(See Figure 9.)
4. Repeat steps 2 and 3 for stations 2 through 6 as applicable.
5. Press
to erase a station duration.
CLEAR
Step 4—Setting Watering Days
You decide which days of the week you want to water. You may choose to
water every day, every second day, every third day, or any combination of days
of the week.
1. Turn dial to
SET WATERING DAYS
2. Press
to move indicator to
NEXT
the day you wish to water.
SET START TIMES
3. Press
to record the day.
ENTER
(See Figure 10.) The indicator will
remain solid on the days assigned
to watering. The indicator will advance to the next day automatically and
blink after you press
ENTER
4. Repeat steps 2 and 3 for other days as desired.
5. Press
to make the highlighted day a non-watering day.
CLEAR
Installation
Keyhole
No. 8 Screw
Wall
Screwholes
Figure 1
®
Jacket
Specific zone wire
Common Wires
Solenoids
Valves
Figure 2
®
grease cap can be used.
2
Programming
.
M
T
W
Th
F
S
Su
2nd
3rd
EVERY
SET
S
on
1
WATER
T
DURATION
2
A
R
3
MINS
T
ZONE
1 2 3 4
MAN.
DURATION
Figure 9
F
.
M
T
W
Th
S
Su
2nd
3rd
EVERY
S
T
1
A
2
R
3
SET
T
WATERING
DAYS
ZONE
1 2 3 4
MAN.
DURATION
Figure 10
. To skip to the next day press
.
NEXT
Advertisement

Related Manuals for Orbit WaterMaster series


Summary of Contents for Orbit WaterMaster series
- Page 1 Help 57414, 57416 Figure 2 2. Each valve has two wires. One wire is to be con- Before returning this timer to the store, contact Orbit ® ´Technical Service at: *WT2 VERSIONS nected as the common. All of the common wires for all the valves can be 1-800-488-6156.
-
Page 2: Manual Operation
We Caution 1. Fuse needs replacing. reserve the right to inspect the defective part prior to replacement. Orbit ® In areas where heavy electrical equipment or lightning strikes are prevalent, an Irrigation Products, Inc.