
Summary of Contents for Vyrsa RAIN-PRO VYR PG-6045
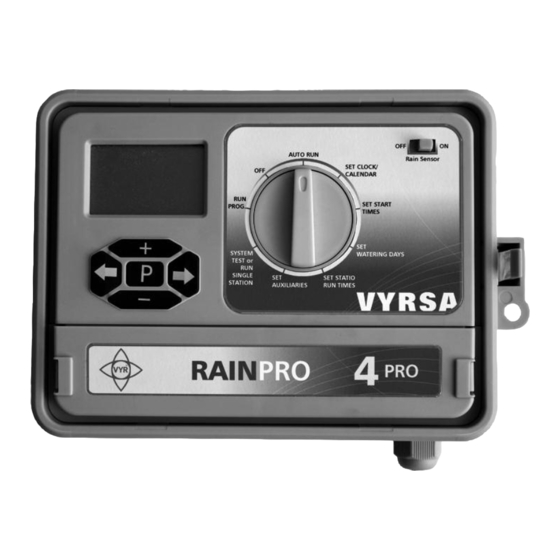
- Page 1 RAIN-PRO VYR PG-6045 Irrigation Programmer Installation Instructions, Programming and Operation.
- Page 2 Head Quarter Office Polígono Industrial N-1, Monte de la Abadesa, Parcela 3801, 09001 BURGOS, ESPAÑA. P.O. Box 313. Tel.: +(34) 947 26 22 26 Fax: +(34) 947 26 21 24 www.vyrsa.com e-mail:vyrsa@vyrsa.com ISO 9001:2000...
-
Page 3: Table Of Contents
NDEX INDEX SET UP • 1. Installation specifications ........... 1 •... -
Page 4: Set Up
1. INSTALLATION SPECIFICATIONS • INSTALLATION: Indoor/Outdoor. Waterproof case IP-65. • WORKING VOLTAGE: Input: AC 230V OR AC 110V, 35VA Output: AC 24V, 300 mA • Controller connection: AC24V: Providing power for both controller and electromagnetic valve. C: Common terminal: Common terminal for rain sensor and electromagnetic solenoid-valve. R: Rain sensor terminal, usually it will not to be connected with C terminal. -
Page 5: Technical Specifications
2. TECHNICAL SPECIFICATIONS - NUMBER OF STATIONS: Available in 4,6,9 or 11 stations configuration (with water pump or master valve). • PROGRAMS & STARTS: 6 separate programs, each of which has 6 start times. • RUNNING TIMES: 1 minute to 12 hours 59 minutes for each station. •... -
Page 6: Programming And Operating
ROGRAMMING AND PERATION 3. CONNECTION Install backup battery (Type: 6LR61),then connect to AC power. BATTERY SENSOR POWER FUSE MASTER VALVES TRANSFORMER COMMON VALV. 220V-24 VAC 4. SET TIME Turn dial to SET CLOCK / CALENDAR to set current time & correct day. Press + or - to adjust the hours. -
Page 7: Set Start Times
ROGRAMMING AND PERATION 5. SET START TIMES Turn the dial to SET START TIMES to set start time of irrigation, there are 36 start time can be used totally. PROG NO corresponding to each programmable group, START NO corresponding to schedule of each program. -
Page 8: Set Watering Days
ROGRAMMING AND PERATION 6. SET WATERING DAYS Turn the dial to SET WATERING DAYS, there are 6 groups to be set. The PROGNO 1 will display first. This is to set interval watering time for No.1 group. When week position lighting, press + or - setting or cancel the watering time of that week, after week moving, ODD will display as odd day and EVEN as even day, watering on odd day or even day can be selected. -
Page 9: Set Stations Run Times
ROGRAMMING AND PERATION 7. SET STATIONS RUN TIMES Turn the dial to SET STATION RUN TIMES to set running time for each station. Station No show relevant station. Press and + or - to set running time for selected station. -
Page 10: Set Auxiliaries
ROGRAMMING AND PERATION 8. SET AUXILIARIES Turn the dial to SET AUXILIARIES to set auxiliary function during irrigation which like: If each station need to be controlled by rain sensor, if each station work together with water pump, if need delay between pump and each station and delay among each station. •... -
Page 11: Set Auxiliaries
ROGRAMMING AND PERATION 8. SET AUXILIARIES • PUMP SET Press P return main menu to set next function. When Per 1 display, press P again to the status of station will running together with pump, press + or - to select station, after using then press + or - again to select ON or OFF ... -
Page 12: Test System
ROGRAMMING AND PERATION 9. TEST SYSTEM Turn the dial to SYSTEM TEST to set manual testing and function for each station. Press + or - and to select relevant station and running time. Pressing P again, the manual operation wasoperated immediately and will stopped after running once, then “single”... -
Page 13: Run Program Manually
ROGRAMMING AND PERATION 10. RUN PROGRAM MANUALLY Turn the dial to RUN PROGRAM enable one or more programs (Among 6 programs) to run a manual operation once. Press P button select programs No. and press + or - button to make relevant program ON or OFF, after 6 programs to be set, press button ,the program with ON will running and ... -
Page 14: Auto Run Mode
ROGRAMMING AND PERATION 12. AUTO RUN MODE Turn dial to AUTO RUN, this mean the controller will be automatic running status after setting. It will be operated automatically with watering parameter that to be installed from step No.2 to No.6. During automatic running, press will indicate current date, press ... -
Page 15: Customer Service
(5) years from the original date of manufacture. In case that VYRSA detects any defect during the warranty period on any of our products, VYRSA will repair or replace, at its option, the product or the defective part. -
Page 16: Solutions For Troubleshooting
USTOMER ERVICE 15. SOLUTIONS FOR TROUBLESHOOTING Make sure that the WATER DAYS and RUN TIMES are sellected. 1. The controller doesn´t start at Make sure that the PAUSE and JUMP modes are unsellected. the programmed running times. Make sure that the power in ON. Make sure that the cable or the positive or negative poles are not broken.
Need help?
Do you have a question about the RAIN-PRO VYR PG-6045 and is the answer not in the manual?
Questions and answers