Advertisement
Quick Links
DIRECTIONS FOR USE
CareSense Wireless
Your CareSense Wireless Advanced LCD Bed and Chair Monitor (CSM-BC400)
monitors a bed, chair, or room for occupancy. If a patient/resident attempts to leave
Advanced LCD Bed and
the bed or chair, the monitor sounds an alarm. When you hear the alarm, check the
patient/resident immediately.
Chair Monitor (CSM-BC400)
The CareSense Advanced Bed and Chair Monitor can be used to monitor both bed
and chair exits using the following CareSense sensor pads.
The pads listed below also allow the monitor to track the in-use time of the pad and
activate an alarm notification when the designated usage time for the pad (45 days
or 1 year) has expired.
Timed Corded Sensor Pads
• CSP-B45-TC10 (45 day 10" x 30" bed pad)
• CSP-B365-TC10 (1 year 10" x 30" bed pad)
• CSP-B365-TC20 (1 year 20" x 30" bed pad)
• CSP-C45-TC10 (45 day 10" x 15" chair pad)
• CSP-C365-TC10 (1 year 10" x 15" chair pad)
Timed Wireless Sensor Pads
• CSP-B45-TW10 (45 Day 10" x 30" Bed Pad)
• CSP-B365-TW10 (1 Year 10" x 30" Bed Pad)
• CSP-B365-TW20 (1 Year 20" x 30" Bed Pad)
• CSP-C45-TW10 (45 Day 10" x 15" Chair Pad)
• CSP-C365-TW20 (1 Year 10" x 15" Chair Pad)
The CareSense Wireless Advanced LCD Bed and Chair Monitor may also be used
with the following CareSense sensors:
PAD/
ALARM/
IN USE
SIGNAL LOST
LOW BATTERY
Standard Non-Timed Sensor Pads
• CSP-B45-NC4 (45 Day 4" x 30" Bed Pad)
• CSP-B45-NC10 (45 Day 10" x 30" Bed Pad)
• CSP-B365-NC4 (1 Year 4" x 30" Bed Pad)
• CSP-B365-NC10 (1 Year 10" x 30" Bed Pad)
Wireless Advanced LCD Bed and Chair Monitor
• CSP-B365-NC20 (1 Year 20" x 30" Bed Pad)
CSM-BC400
• CSP-C45-NC10 (45 Day 10" x 15" Chair Pad)
AC POWER
SENSOR PAD
STRAIN RELIEF
• CSP-C365-NC10 (1 Year 10" x 15" Chair Pad)
Toilet Seat Sensor Pad (TSP-TS-1)
When the patient/resident attempts to exit the toilet, removing their body weight
from the seat will activate the monitor alarm.
Easy Release Seat Belt
SAFETY INFORMATION
When the patient/resident attempts to exit the chair by unfastening the seat belt,
the monitor will alarm.
• CS-SB2054 (Buckle)
In these User Instructions, the word WARNING indicates a potentially hazardous
• CS-SB2054V (Velcro)
situation which, if not avoided, could result in death or serious injury.
The word CAUTION means a potentially hazardous situation which, if not avoided, may
Floor Mat/Cushion
result in minor or moderate injury. CAUTION also may be used to alert against unsafe
When the patient/resident attempts to exit the bed, and places their body weight on
practices.
the floor mat, the monitor will alarm.
WARNING
• CS-FMS-C2448 (wired mat)
• CS-FCS-C3668 (wired cushion)
Read and understand user instructions for using this monitor. Failure
• CS-FMS-W2448 (wireless mat)
to follow all instructions may result in serious injury or death to the
patient/resident.
Wireless Nurse Call Relay Monitor (CSM-WNCR1):
1. ALWAYS test the monitor before each use. NEVER use if the monitor
The Wireless Nurse Call Relay Monitor allows the caregiver to place this Wireless
fails to sound alarm in a test. ALWAYS retest the monitor if the
Advanced LCD Bed and Chair Monitor outside of the patient room for increased
unit is dropped.
common area alarm visibility. The Wireless Relay Monitor is placed next to and
2. NEVER use a monitor in place of visual monitoring by the caregiver.
connected to the patient station to signal to Nurse Call. See "Using the Monitor with
This monitor cannot prevent falls. The caregiver must make frequent
the Nurse Call Relay".
visual inspections of the patient/resident to ensure the monitor is
properly placed. Visual inspections by the caregiver are essential to
WARNING
reduce risk for falls.
3. NEVER use with a low battery. A low battery is indicated by a chirping
Although the CareSense Wireless Advanced LCD Monitor is able to
sound and flashing ALARM/LOW BATTERY LED, and the LCD will read
communicate up to 30 feet away from the patient/resident, it is recommended
that the monitor be placed in close proximity to the patient/resident.
"REPLACE BATTERY". Replace batteries immediately with four new AA
alkaline batteries.
Communication distance varies for each facility. Test at the desired
4. NEVER attempt to repair the monitor. Call Curbell at 800-235-7500 if
distance prior to putting the system into service.
the monitor fails to work.
5. Changes or modifications affecting compliance that are not expressly
WARNING
approved by Curbell could void the user's authority to operate
the equipment.
NEVER use this monitor in place of visual monitoring by a caregiver.
This monitor cannot prevent falls. The caregiver must make frequent
visual inspections of the patient/resident to ensure the monitor is properly
SPECIFICATIONS
placed. Visual inspections by the caregiver are essential to reduce the
risk of falls.
• Four AA alkaline batteries (Energizer Industrial
Power source
batteries or equivalent are recommended)
CAUTION
• AC adaptor (output: DC 6V 300 mA)
The CareSense Wireless Advanced LCD Bed and Chair Monitor System is
Approximate
Normal use: 4.5 months
intended for use only by trained healthcare professionals at healthcare
Battery Life
In storage: 36 months
facilities and not for consumer or residential use.
Chair: Attached Stainless Steel Clip
Bed: Bed Mounting Bracket (CSM-BMB)
Mounting
Wall: Wall Mounting Bracket (CSM-WMB)
Magnetic Mounting Bracket: (CSM-MMB)
UNPACKING THE MONITOR
Velcro Strap: (CSM-VS)
Dimensions
5.3" H x 3.5" W x 1.7" D
Make sure you have the following parts:
Weight
Approximately 9.6 oz (not including batteries)
1. Wireless Advanced Bed and Chair Monitor (CSM-BC400)
2. Four AA alkaline batteries.
Approximately 92 dB to 112 dB, +/- 5db at 10cm
distance, or 0 dB with volume off option. (note
3. Wall mount screws/sleeve
Volume
– facility environment may effect ability to hear
4. Velcro strap
monitor alarm, test before using)
5. One CareSense override key on chain
FCC Specifications
Receiver frequency 433.92 MHz +/- 0.5
If you ordered any additional parts, check for them:
Alarm Delay Settings
Corded: 0 to 4 seconds
1. Wall Mounting Bracket (CSM-WMB)
(approximate)
Wireless: 1.5 to 5.5 seconds
2. Magnetic Mounting Bracket (CSM-MMB)
3. Bed Mounting Holder (CSM-BMB)
4. AC Power Adaptor/Cord (CSM-AC)
5. Nurse Call Cable
6. Call Cord
7. Wireless Nurse Call Relay (CSM-WNCR1)
NOTE: Your monitor is shipped with a removable protective film overlay on the face.
NOTE: Contact Curbell at 1-800-235-7500 if any parts are missing
PAGE
1
PAGE
2
MAP773E CSM-BC400 DFU.indd 1
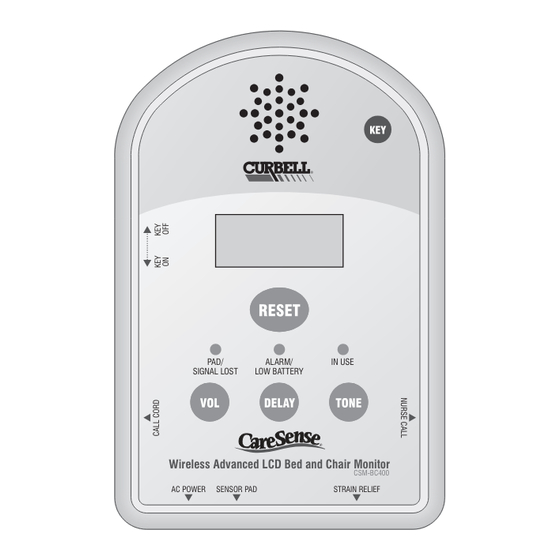
YOUR MONITOR
STRAIN RELIEF
tamper-resistance
override key
contact area
The monitor's strain relief helps prevent damage to the cord and input jack if
there is excessive tension on the cord. To use the strain relief, plug the sensor
pad/seat belt/floor mat cord intot he monitor and run it around the strain relief,
LCD screen
as in the illustration below.
key on/key off
reset button
tamper-resistance
setting switch
volume,
delay, and
LED status lights
tone buttons
PAD/
ALARM/
IN USE
VOLUME CONTROL
SIGNAL LOST
LOW BATTERY
jack for optional
call cord
The monitor is factory set at the highest volume. To adjust the volume, the
Wireless Advanced LCD Bed and Chair Monitor
switch on the left side of the monitor must be in the "KEY OFF" position, or if
CSM-BC400
Nurse Call jack
AC POWER
SENSOR PAD
STRAIN RELIEF
in the "KEY ON" position, requires first overriding with the CareSense key (see
"Tamper Resistance").
cord strain relief
To Turn Volume Up
AC jack
sensor pad/
1. Press and hold the VOLUME button to turn up. The LED will read "VOL. "
seat belt/
floor mat jack
and show bars on the bottom indicating the volume level, 1 bar indicates
the lowest sound level and 7 bars the highest (see illustration below).
velcro strap loop
When the volume is set to zero, the LED will read "VOL. OFF".
2. Release the button when desired volume is reached.
optional use wall
mounting clip
mounting hole
battery cover
To Turn Volume Down
wireless
programming
1. Press and release the VOLUME button, then press and hold button to turn
button
down. The LED will read "VOL. ".
2. Release button when desired volume is reached.
PAD/
NOTE: Volume may not be adjusted when in the alarm mode.
SIGNAL LOST
TONE SELECTION
Tone Selection allows the caregiver to select between one of four tone options.
battery cover thumbscrew
To change tones, press and release the TONE button located on the face of the
POWERING THE MONITOR
monitor until desired tone is selected. LED will read "TONE" with between one
and four note symbols signifying each of the four tone options.
Wireless Advanced LCD Bed and Chair Monitor
The CSM-BC400 is battery powered, with the ability to plug into AC power using
AC POWER
the CSM-AC AC power adaptor/cord (sold separately) to minimize battery drain/
replacement.
Installation of four AA alkaline batteries is required, even when using the AC power
connection. The batteries serve as a backup in the event of a power outage.
NOTE: Once batteries are installed, the monitor needs to be either syncronized to a
DELAY CONTROL
wireless pad (and kept within approximately 30 feet of each other) or have
a corded pad plugged into it within five minutes, otherwise a PAD/SIGNAL
The DELAY button controls the amount of time between when the patient removes
LOST notification will occur.
themself off of the pad and when the monitor alarms. This function can reduce
false alarms if, for example, the patient momentarily shifts off the pad, and then
back onto the pad within the set delay time (between 0-4 seconds).
PAD/
INSTALLING THE BATTERIES
SIGNAL LOST
To adjust the delay time, the switch on the left side of the monitor must be in
the "KEY OFF" position, or if in the "KEY ON" position, requires first overriding
1. Unscrew and remove the battery cover.
with the CareSense key (see "tamper resistance").
2. Install the four included AA batteries. Make sure they are oriented correctly (see
NOTE: The delay function does not work with the floor mat/cushion. The alarm
the illustration below).
will always occur at 0 seconds delay regardless of the delay setting.
3. Replace the battery cover and tighten the screw.
The delay time is factory set at 0 seconds. To change the delay time, follow the
Wireless Advanced LCD Bed and Chair Monitor
below instructions:
NOTE: The delay time range settings differ between the wireless pads (1.5 to
AC POWER
5.5 seconds) and the corded sensors (0 to 4 seconds). Environment
and distance between monitor and pad may effect delay time.
note the orientation
Test before using.
of the positive and
To Increase Delay Time
negative ends of
the batteries
1. Press and hold button to increase time. LCD will read "DELAY
PAUSE ON/OFF
indicating the number of delay seconds (see illustration).
2. Release button when desired delay time is reached.
To Decrease Delay Time
1
. Press and release button, then press and hold button to decrease delay time.
The LCD will read "DELAY
2. Release button when desired delay time is reached
TURNING THE MONITOR OFF
When you want to place the monitor out of use for any given period of time, remove
all cords from the monitor and press the RESET button to cancel the alarm. The
monitor will automatically be placed in a sleep mode
NOTE: The pad will remain programmed to the monitor unless it is either
RESET BUTTON
sychronized to another pad or the monitor has a corded pad plugged into it.
Therefore, if placing the monitor out of service for extended periods, removal
The RESET button provides the following two functions:
of the batteries is recommended.
• Cancels the alarm
• Displays the number of life days remaining on the pad (see "Identifying
PAD/
the remaining Life of the Pad and Low Pad Notification/Replacement").
SIGNAL LOST
NOTE:
To perform either of the above functions, the switch on the left side
of the monitor must be in the "KEY OFF" position, or if in the "KEY
ON" position, requires first overriding with the CareSense key (see
"Tamper Resistance").
Wireless Advanced LCD Bed and Chair Monitor
PAGE
3
AC POWER
FEATURES
PAUSE FEATURE
This optional setting prevents the monitor from alarming for 30 seconds when
pressing the Reset button while, for example, the caregiver takes the patient
out of bed.
1. Turn the PAUSE ON/OFF switch located in the battery compartment to ON to
enable the monitor to operate the Pause feature.
PAUSE ON/OFF
2. The patient/resident should be positioned on the pad or have the seat belt
fastened
3. Press the RESET button to prevent it from alarming for 30 seconds. The LCD
will read "STANDBY XX SEC." indicating the number of seconds remaining
in the pause mode.
4. During the 30 second Pause Mode period, the patient/resident may be
removed from the pad or the seat belt can be unfastened without activating
an alarm. If the patient/resident is placed back on the pad or the seat belt
is fastened, the monitor will reactivate.
NOTE: If the sensor cord is removed during the pause mode, the monitor
will alarm when the 30 seconds have expired (no cord removal
alarm will occur with the floor mat/pad).
5. When the 30 seconds have expired:
• If the patient/resident has not been placed back on the pad/seat belt
refastened, the monitor will go into a sleep mode.
• If the patient/resident has been placed back on the pad/seat belt
refastened, the monitor system will reactivate.
NOTE: When the PAUSE switch is in the OFF position, the RESET button will
only serve to cancel the alarm.
TAMPER RESISTANCE
This optional setting allows the caregiver to place the monitor in a tamper
resistant mode by turning the switch on left side of monitor from KEY OFF to KEY
ALARM/
IN USE
ON. When in the KEY ON mode:
LOW BATTERY
• The Reset/Pause, Volume, Delay, and Tone controls on the monitor will not
function unless first overridden by the CareSense Key. This is accomplished
by positioning the KEY icon on CareSense Key over the matching KEY icon
on the top right face of the monitor (see illustration below) and holding it
over the icon until one of the control buttons is pressed.
CSM-BC400
SENSOR PAD
STRAIN RELIEF
• If the alarm has been activated, the alarm may be canceled as soon as the
CareSense Key is positioned over the KEY icon on the monitor (there's no
need to press RESET button to cancel the alarm).
NOTE: When the switch is in the KEY OFF position, the Reset/Pause, Volume,
Delay, and Tone controls on the monitor are fully operational (no
caregiver key is required to override).
CALL CORD USE
ALARM/
IN USE
PAD/
ALARM/
IN USE
LOW BATTERY
SIGNAL LOST
LOW BATTERY
When connected to the monitor, a Nurse Call Cord allows the patient/resident to
activate the monitor alarm and, if Nurse Call is connected, place a call to the
Nurse's Station (works with "normally open" nurse call systems only).
• 1⁄4" call cord plug is inserted into the monitor receptacle labeled "CALL CORD"
• The monitor alarms only when the call cord button is depressed (the LCD
Wireless Advanced LCD Bed and Chair Monitor
CSM-BC400
will read "NURSCALL ALARM")– when the button is released, the monitor
AC POWER
SENSOR PAD
STRAIN RELIEF
alarm will cease. Nurse Call, if connected, will remain on until it is reset at
CSM-BC400
the patient station.
SENSOR PAD
STRAIN RELIEF
• If the Call Cord is removed from the monitor, the monitor will alarm, and a
call will be placed to the Nurse's Station (if connected). The LCD will read
"CALLCORD LOST". The alarm may be cancelled by pressing the RESET
button or reinserting the Call Cord jack into the monitor. Nurse call, if
connected, will remain on until reset.
XX SEC."
XX SEC."
ALARM/
IN USE
LOW BATTERY
CSM-BC400
PAGE
4
PAGE
5
SENSOR PAD
STRAIN RELIEF
TESTING THE MONITOR
USING THE MONITOR WITH CHAIR AND BED PADS
WARNING
CORDED CHAIR AND BED PAD USE
ALWAYS test monitor before each use. NEVER use if the monitor
This section applies to the following corded chair and bed pads:
fails to sound its alarm in testing.
• CSP-B45-TC10
NEVER use if the monitor cannot be securely mounted to the
• CSP-B365-TC10
wheelchair, headboard, or door bracket.
• CSP-B365-TC20
• CSP-C45-TC10
• CSP-C365-TC10
1. Visually inspect the monitor for physical damage. If damage is noted, remove
it from service.
Install the Pad and Monitor
2. Make sure the monitor is securely mounted to the wheelchair, headboard, wall
1. Write the "Put into Use Date" on the pad
bracket, or magnetic bracket.
3. Connect the sensor to the monitor. If you are using the monitor with a wireless
2. Position the sensor pad where the buttocks of the patient/resident will be placed (see the diagram on the sensor pad), with the pad stem coming out the back of the chair
or side of the bed. In some circumstances, the pad may be placed under air or foam chair or mattress pads. However, we cannot guarantee that the products will work
pad/mat, synchronize to the monitor (see "Wireless Chair and Bed Pad Use" or
correctly in all circumstances, and strongly encourage a thorough testing of the products in this manner prior to use with a patient.
"Wireless Floor Mat Use")
3. Plug the sensor pad cord into the monitor's Sensor Pad jack.
4. Plug the AC power cord into an outlet (optional for battery backup and to
minimize battery replacement).
4. Run the sensor pad cord around the strain relief (see "Using the Strain Relief").
5. When placing pressure on the pad or when fastening the seat belt, the following
5. Plug in the Nurse Call cord (see "Using the Monitor with Nurse Call"), Call Cord (see "Call Cord Use"), and/or the AC power cord if applicable.
will occur confirming that the cord is connected/pad is synchronized and the
batteries have been installed properly:
Test the Pad Before Use
• The monitor will beep (if the volume is on) and the red ALARM/LOW BATTERY
See "Testing the Monitor."
LED will flash two times simultaneously.
• The LCD will read "IN USE"
Put the Monitor into Service
• The green IN USE LED will blink approximately every two seconds
1. Mount the monitor where access is convenient to the caregiver, such as on the wheelchair, bed or on the wall.
NOTE: When using the floor mat or floor cushion, the IN USE LED will not blink
2. Position the patient/resident on the sensor pad.
and the LCD will not read "IN USE" when operational (as when used with
3. When pressure is applied to the pad, the monitor will beep (if the volume is on) and the red ALARM/LOW BATTERY LED will flash two times simultaneously. Then the
a pad or the seat belt). Follow step 6 to insure proper function.
LCD will read "IN USE", and the green IN USE LED will blink approximately every two seconds confirming that the cord is connected and the batteries have been
6. When doing one of the following:
installed properly.
• Bed, Chair or Toilet Seat Pad – pressure is being applied and released
NOTE: If there is any other visual or audible alarm, see the LED/LIGHT ALARM INDICATORS and TROUBLESHOOTING sections of this manual. For further assistance, read the
• Seat Belt – the seat belt is fastened
directions printed on the sensor pad or call Curbell toll-free at 1-800-235-7500.
• Floor Mat/Cushion – step onto the mat/cushion
• Call Cord – press the call cord button
The following will occur, confirming that the unit is operational:
WIRELESS CHAIR AND BED PAD USE
• The monitor will alarm (if volume is on)
• The red ALARM/LOW BATTERY and side LEDs will flash
This section applies to the following wireless chair and bed pads:
• The LCD will read "ALARM"
• CSP-B45-TW10
• CSP-B365-TW10
• Nurse Call will alarm (if connected)
• CSP-B365-TW20
7. To cancel the alarm, press the RESET button and reset Nurse Call at the Patient
• CSP-C45-TW10
Station (if connected).
• CSP-C365-TW10
NOTE: If there is any other visual or audible alarm, see the LED/LIGHT ALARM
INDICATORS and TROUBLESHOOTING sections of this manual. For further
Activate/Install the Transmitter
assistance, read the directions supplied with the sensor pad, mat, cushion,
The pad must first be connected to a wireless transmitter (CSP-TW-TX1), and the transmitter must be turned on.
or seat belt or call Curbell toll-free at 1-800-235-7500.
1. Check the date written on the Transmitter. If it has expired or is close to expiring, it is advised not to use it, and dispose of it and replace it with a newer transmitter.
2. Make sure the transmitter is connected to the cord inside the pocket.
3. Secure the transmitter inside the pocket
Synchronize the Pad to the Monitor
1. Press the wireless programming button located on the back of the monitor (see illustration on page 3) until the IN USE LED on the face of the monitor blinks three times and
the monitor beeps three times simultaneously, and the LCD reads "PROGRAM MODE" indicating that it is now in the programming mode.
The monitor will remain in the "programming mode" for 25 seconds. If no activity occurs within this 25 second period, the monitor will immediately exit the programming mode.
2. Place pressure on the sensor pad and then release pressure to synchronize the pad with the monitor. The following will occur indicating that the monitor and pad are now
successfully synchronized to each other and ready for use:
• The monitor will sound a long beep
• When pressure is placed on the pad, The red LEDs will blink two times, then the LCD will read "IN USE" and the green IN USE LED will blink approximately every two
seconds indicating that they are functioning properly.
Install the Pad
1. Write the "Put into Use Date" on the pad
2. Position the sensor pad where the buttocks of the patient/resident will be placed (see the diagram on the sensor pad), with the pad stem coming out the back of the chair
or side of the bed. In some circumstances, the sensor may be placed under air or foam chair or mattress pads. However, we cannot guarantee that the products will work
correctly in all circumstances, and strongly encourage a thorough testing of the products in this manner prior to use with a patient/resident.
Test the Pad Before Use
See "Testing the Monitor."
Put the Monitor into Service
1. Mount the monitor where access is convenient to the caregiver, such as on the wheelchair, bed, or on the wall.
2. Plug in the Nurse Call cord (see "Using the Monitor with Nurse Call"), Call Cord (see "Call Cord Use"), and/or the AC power cord, if applicable.
3. Position the patient/resident on the sensor pad.
4. When pressure is applied to the pad, the monitor will beep (if the volume is on) and the red ALARM/LOW BATTERY LED will flash two times simultaneously. Then the
LCD will read "IN USE", and the green IN USE LED will blink approximately every two seconds confirming that the cord is connected and the batteries have been
installed properly.
NOTE: If there is any other visual or audible alarm, see the LED/LIGHT ALARM INDICATORS and TROUBLESHOOTING sections of this manual. For further assistance, read the
directions printed on the sensor pad or call Curbell toll-free at 1-800-235-7500.
PAGE
6
PAGE
7
wireless pad
velcro
transmitter
on/off switch
PAGE
8
4/20/10 2:03 PM
Advertisement

Subscribe to Our Youtube Channel
Related Manuals for Curbell CareSense CSM-BC400

Summary of Contents for Curbell CareSense CSM-BC400
- Page 1 STRAIN RELIEF • Seat Belt – the seat belt is fastened directions printed on the sensor pad or call Curbell toll-free at 1-800-235-7500. • CSP-C365-NC10 (1 Year 10" x 15" Chair Pad) NOTE: When the PAUSE switch is in the OFF position, the RESET button will •...
- Page 2 Nurse Call at the Patient Station (if connected) to allow time for The system requires a 1/4" mono nurse call jack and/or an adaptor for compatibility (Call Curbell) set off a continual alarm: Test the Seat Belt Before Use continued use until the pad is replaced.
Need help?
Do you have a question about the CareSense CSM-BC400 and is the answer not in the manual?
Questions and answers