
Subscribe to Our Youtube Channel
Related Manuals for Radiation Alert AM-7149


Summary of Contents for Radiation Alert AM-7149
- Page 1 Radiation Alert® Area Monitor ® S.E. International, Inc. P.O. Box 39, 436 Farm Rd. Summertown, TN 38483 USA 1.800.293.5759 | 931.964.3561 | Fax: 1.931.964.3564 www.seintl.com | radiationinfo@seintl.com...
-
Page 2: Table Of Contents
Contents Chapter 1: Introduction Precautions Chapter 2: Quick Start Chapter 3: General Operation The General Operation Screens The Main Screen The System Info Screen Display of Alarms Chapter 4: Selecting Base Units of Measurement Chapter 5: Connecting Relays and Triggers Chapter 6: Setting The Alarm Levels The Set Alarm Levels Screen The Set Indicators Screen... -
Page 3: Chapter 1: Introduction
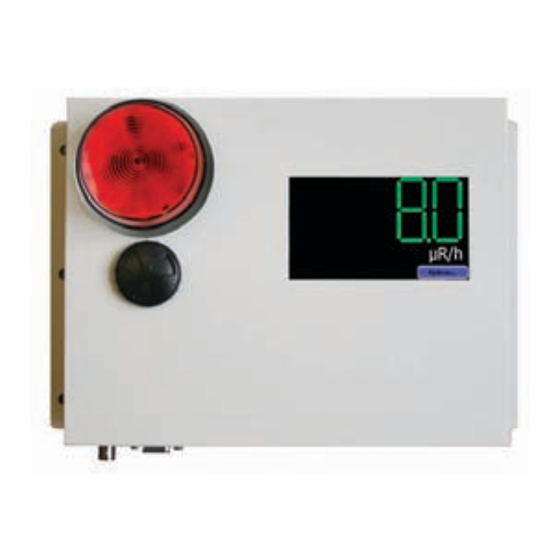
Chapter 1: Introduction The Radiation Alert® Area Monitor is one of the most user friendly, all inclusive, state of the art radiation area monitors available. The easy to use interface is an intelligent resistive touch screen display featuring a large 5 digit LED readout. -
Page 4: Chapter 2: Quick Start
Chapter 2: Quick Start If you are using an external detector, ensure that the unit is powered off before connecting the detector to the Area Monitor with the included C to C cable. (If your Area Monitor has an internal detector, skip this step and proceed to step 2.) Note the Maximum Cable Lengths for GM Probes is 100ft and for Scintillation Probes is 50ft... -
Page 5: Chapter 3: General Operation
The General Operation Screens The Radiation Alert® Area Monitor has two separate screens for general operation of the unit; The Main Screen and the System Info Screen. In order to enter the System Settings, press "System". The Default Passkey is 1234. -
Page 6: Chapter 4: Selecting Base Units Of Measurement
80 µR/h, the displayed value will be 0.1 mR/h. Chapter 5: Connecting Relays and Triggers DB-9 Relay Connector The Radiation Alert Area Monitor can interface with external triggers and external strobes/horns via the DB-9 relay connector, located on the bottom of the unit. See “Appendix C: Relay and Triggers Technical Info”... -
Page 7: Chapter 6: Setting The Alarm Levels
Chapter 6: Setting The Alarm Levels The Set Alarm Levels Screen Figure 6(1) The Set Alarm Levels Screen is used to set the levels at which the three alarms are triggered. From the Calibration Settings screen, tap the “Alarms…” button to open the Set Alarm Levels Screen. Tap the radio button next to the alarm type to be set. -
Page 8: Chapter 7: Ethernet Configuration
Chapter 8: Area Monitor PC Software The Area Monitor Server Software enables users to remotely monitor and configure the Radiation Alert Area Monitor via USB or Ethernet, view the area monitors in real time, export collected data, and change the settings of the unit. - Page 9 Server IP Address Shows the IP address for the computer with the Area Monitor Server Software installed. Hide Unconnected In the event that you have lost a network connection or change the serial number of the area monitor connected to the software, the Area Monitor Server will lose the connection to the previous serial number of the area monitor and create a new area monitor in the software window.
-
Page 10: Help Menu
Help Menu Open Help File Opens a searchable help file for answering basic questions about the use of the software. About RSA Area Monitor Server Software Opens a window that shows the version number of the software, technical support contact, and the location of the files on your computer that are created when each new area monitor is added or changed in the software. -
Page 11: Deleting Units From Area Monitor Server Software
In other words, the rate is hovering around the set alarm level. Radiation Warning after Acknowledge button click The Status has five different states; OK, Monitor Failure Detected, Radiation Warning, Critical Radiation Alert, and Lost Communication. -
Page 12: How To Send Alerts Via Email And Text Message
How to Send Alerts Via Email and Text Message The Radiation Alert® Area Monitor has the ability to send alert messages via text or email in the event an alert is triggered. There are two different forms of alert settings. One for the software, which requires the software to be running on the computer connected to the Area Monitor. -
Page 13: Hardware Alerts
Hardware Alerts To set the Hardware Alert, in the main window of the Area Monitor Server Software, click on the View menu and select “Calibration and Settings”. From the Calibration and Settings window, click the “Hardware Alert Settings” to open the “Area Monitor Alerts” window. Where as the “Software Alert Rules”... -
Page 14: Chapter 9: Calibration Settings
Chapter 9: Calibration Settings The Area Monitor Calibration Screens The Radiation Alert® Area Monitor has five separate screens for calibration of the detector in use with the unit. Each of these can be accessed via the Calibration Settings Screen: The Set High Voltage Screen, The Set Threshold Screen, The Set Dead Time Screen, and The Set Cal Constant Screen. -
Page 15: The Set Threshold Screen
Note that the High Voltage has a maximum of 1200 volts. If a value higher than this is set, 1200 V will instead be applied The Set Threshold Screen Figure 4(4) The threshold sets the minimum size a detector pulse must be, in units of mV, in order to be registered as a count. -
Page 16: The Set Cal Constant Screen
The Set Cal Constant Screen Figure 4(6) The Calibration Constant is a conversion factor used to convert the detector’s count rate into units of exposure or dose rate. From the calibration Settings screen, tap the “Cal Constant…” button to open the Set Cal Constant screen. Use the keypad to enter the desired Cal Constant. -
Page 17: Chapter 10: Unit Conversions
Chapter 10: Unit Conversions Radiation Measurement Units Several different units are used to measure radiation, exposure and dosage. Roentgen is the amount of X-radiation or gamma radiation that produces one electrostatic unit of charge in one cc of dry air at 0° C and 760 mm of mercury atmospheric pressure. One thousand milliroentgen (1,000 mR)= 1R. -
Page 18: Chapter 11: Glossary Of Common Terms
Chapter 11: Glossary of Common Terms Background Radiation Naturally occurring radiation is always present. It includes high energy gamma rays and particles from the sun and outer space and alpha, beta, and gamma radiation emitted from elements in the earth. CPM (counts per minute) The unit of measurement usually used to measure alpha and beta radiation. -
Page 19: Appendix A: Technical Specifications
Five digits, numerals 1.35in tall Operating Ranges • AM-7149: 0.2 - 16,000 mR/hr (2.0 - 160,000 µSv/hr) Using an Internally Mounted LND 7149 Energy Compensated GM Detector. External mounting also available • AM-7128: 15µR/hr – 200 mR/hr (0.2 - 2000 µSv/hr) Using an Internally Mounted LND 7128 Energy Compensated GM Detector. -
Page 20: Appendix B: Limited Warranty
Appendix B: Limited Warranty WARRANTOR: S.E. International, Inc., P.O. Box 39, 436 Farm Road, Summertown, TN 38483-0039, USA, (931) 964-3561 ELEMENTS OF LIMITED WARRANTY: S.E. International, Inc., warrants for 1 year the included detector and for 1 year all materials and craftsmanship in this product to be free from all defects with only the limitations set out below. -
Page 21: Appendix C: Relays And Triggers Technical Info
Appendix C: Relays and Triggers Technical Info DB-9 Relay Connector The Radiation Alert Area Monitor can interface with external triggers and external strobes/horns via the relay connector, located on the bottom of the unit. The connector can accomodate three seperate relays via the one connector. - Page 22 Calibration Database Application Please fill out this form and send it back to us if you would like to be notified of the NIST calibration renewal for your instrument to: S.E. International, Inc. P.O. Box 39, 436 Farm Rd. Summertown, TN 38483 1.800.293.5759 | 931.964.3561 | Fax: 1.931.964.3564 www.seintl.com | radiationinfo@seintl.com NAME...
Need help?
Do you have a question about the AM-7149 and is the answer not in the manual?
Questions and answers