
Related Manuals for connexx RP-3000BT

Summary of Contents for connexx RP-3000BT
-
Page 1: Instruction Manual
Receiver System RP-3000 (Instruction Manual) A/B/C (BT/DVD/CD/MP3/SD/USB/AM/FM/CLOCK) BEFORE USING PLEASE READ THIS MANUAL CAREFULLY... -
Page 2: Compatible Discs
COMPATIBLE DISCS 4.72" 4.72" 4.72" 4.72" ACCESSORIES 1 X Instruction manual 1 X Remote control 1 X FM-Antenna (Pig Tail) One composite audio/video cable 6 X Mounting Screws Wire Harness for DC power and speakers DC Power extension (Red and Black wire) wires Optional AC/DC Adapter 2 X Batteries... -
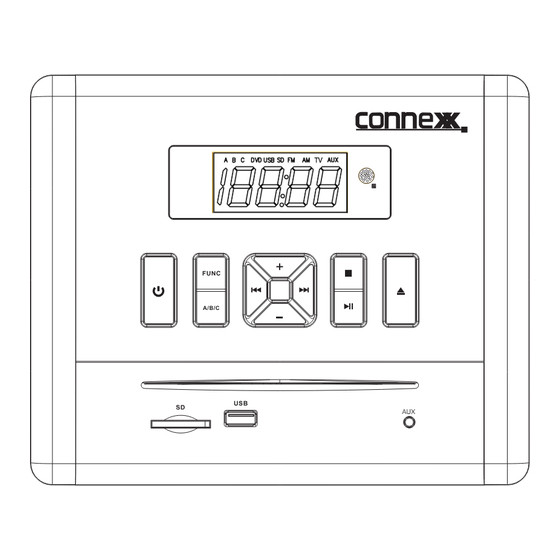
Page 3: Location Of Controls
Location of Controls A/B/C Function button Standby button Tune-/Previous button Audio channel switch Reset button (NOTE) Volume - button SD card slot Disc loader USB port Tune+ / Next button Play/ Pause button Stop button Eject button Volume+ button Remote sensor LED display NOTE 4:This reset button is under screw cover.when unit is frozen for some reason,remove the left side screw cover,use a paper clip and reset. - Page 4 DVD/USB/SD/RADIO/TV/AUX ICONS DISPLAY MOUNTING AND CUT OUT INSTRUCTIONS The 6X mounting screws are in the owner’s manual bag. Note: ·Remove screw caps and carefully take mounting covers off. ·Connect and test hareness and wiring before wiring. ·Screw the unit in place, replace screw caps.
-
Page 5: Hdmi Output
REFERENCE DRAWING FOR REAR CABINET AUX TV (OUTPUT) Wire harness for 12V DC power and 6 speakers Automotive antenna socket (AM/FM/) CVBS(2 Video output) Aux (L/R) TV audio input HDMI OUTPUT... -
Page 6: Basic Operations
Wire harness for 12V DC power & 6 speakers guide diagram Carefully read wiring diagram: the wrong connections reversing polarity (positive and negative power wiring) can cause distortation and / or damage the power amplifiers. Basic Operations TIME SETUP 1.Press to enter standby mode, press and hold CADJ/MEMO button on the remote control to enter time setup interface. -
Page 7: Disc Playback
DISC PLAYBACK 1.One disc is inserted, unit will automactically shift to DVD mode and begin playback. 2.Press button to eject the disc. 3.Press buttons to go through the menu and press ENTER button to confirm the selections. 4.Press PREV and NEXT button to skip to the previous or next chapter / track.. 5.Press REV and FWD buttons to search through the chapter/track backward and forward at different speed. - Page 8 REFERENCE DIAGRAM AND KEY FOR REMOTE CONTROL SEARCH+ SEARCH- CADJ/ ME O TITLE POWER MENU PREV NEXT STOP SETUP SEARCH- CADJ/MEMO NUMBER KEYPAD A/B/C EJECT DISC FUNC SUBTITLE VOL+ SEARCH+ ENTER / PAIR VOL- AUDIO MUTE REPEAT TONE ANGLE...
- Page 9 POWER Press this button to shut off power and enter standby mode, press it again to activate. TITLE Press this button to access the DVD menu. MENU Press this button to switch the menu mode. For a DVD, press MENU to open the menu during playback. PREV Press this button to skip back to the previous selection.
- Page 10 15. SUBTITLE Press this button to select different subtitle languages if applicable. Press this button to play fast forward, each time it is press, the speed with which it fast forward. Continue pressing it to return back to normal playback speed. Press this button to rewind.
-
Page 11: Technical Specifications
For your convenience, we have enlisted some points to solve problems, you may encounter while using the CONNEX RP3000BT. No Sound *Make sure the connections are secure between player and speakers. *Make sure the correct input is selected on the monitor. No Picture *Make sure the connection are secure between RP3000BT and the monitor. -
Page 12: Fcc Warning
FCC Warning: This equipment has been tested and found to comply with the limits for a Class B digital device, pursuant to Part 15 of the FCC Rules. These limits are designed to provide reasonable protection against harmful interference in a residential installation. This equipment generates uses and can radiate radio frequency energy and, if not installed and used in accordance with the instructions, may cause harmful interference to radio communications.
Need help?
Do you have a question about the RP-3000BT and is the answer not in the manual?
Questions and answers