Advertisement
Quick Links
I n s t r u c t i o n M a n u a l
Here's LAD WEATHER
official site!
lad-weather.com
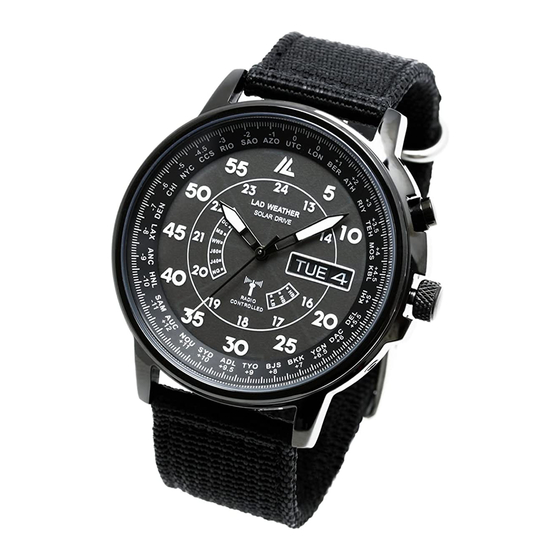
1 But t on s and Display
■Buttons
Minute hand
Button A
Hour hand
Crown
LB
Position 2
Position 1
Second hand
Button B
*Please use something thin to press button B. Please be
careful not to hurt yourself or scratch the case.
■Display
Calendar
Time Zone
LB
Transmission station/
Battery remaining
Reception result
Display
Description
Result
OK
Successful
Reception result
NG
Failed
DC
Germany
MS
U.K.
Transmission station
WW
U.S.
J60
Japan
J40
HB
Fully charged
Battery remaining
NB
Enough charged
LB
Low Battery
2 How to set up
This watch receives radio wave information to
correct time automatically.
In order to receive properly, please see how to
initialize.
IMPORTANT: If you pull out the crown to the position
2, you need to calibrate the zero position of hands.
Please see [3 Zero calibration] how to calibrate.
① Day and Date
1.
Pull the crown to the Position 1.
Please note the crown may be already in
Position 1 (not pushed fully).
2.
Turn the crown to the front/back to set
date/day.
3.
Push the crown and proceed to step ②.
Day of the week
Display
Day
(English/Spanish)
Sunday
SUN
/
DOM
Monday
MON
/
LUN
Tuesday
TUE
/
MAR
Wednesday
WED
/
MIER
Thursday
THU
/
JUEV
Friday
FRI
/
VIER
Saturday
SAT
/
SAB
② Battery recharge
This watch needs to be charged enough to adjust
time automatically.
Expose the watch to light source at least 1 and a
half hours to have it enough charged.
*When the battery is low, second hand moves
once in 2 seconds to save battery.
③ Zero position confirmation
1.
Due to some reasons, the hands may be out
of zero position. Please confirm hands are in
proper position, when you find the watch is
not accurate.
2.
Press button A, and see red hand shows either
OK or NG (Chart 1).
Chart
1
3.
If the hand shows some-
where else, zero calibration
is needed. Please see [3 Zero
calibration].
OK and NG are on the
left side of the dial.
④ Time zone confirmation
1.
At time of factory shipment, time zone is set
to LON, LAX or TYO. (It depends on the
marketplace.)
Chart
2
2.
Press button B and see
where red hand shows
(Chart 2).
3.
Please see [4 Time zone]
City codes are on
outer side of dial
to change time zone.
⑤ Radio wave reception
After this watch receives radio wave, time will be
adjusted automatically.
Radio station will be chosen automatically,
according to the time zone set up.
If you want to start reception soon, please see [5
Radio wave reception].
3 Z er o ca lib r at io n
IMPORTANT: Please try zero calibration when
the watch shows wrong time.
1.
Pull the crown to Position 1. The watch is still
working.
2.
Set the date/day to the 1 day prior to today .
(For example, when you calibrate on 25th
Tuesday , please set 24th Monday .)
Turn the crown to the front/back to set
date/day.
3.
Pull the crown to Position 2. The watch stops.
4.
Press button A to move second hand forward.
Please set it up straight.
Chart
3
5.
Turn the crown away
from you to move minute
LB
and hour hands forward.
Please set them up
Set all hands straight up to
straight, too. (Chart 3)
6.
When all 3 hands reach to 12 o clock position,
please see date changes to today.
(In the example of 25th Tuesday, the watch
will temporary show 25th Monday.)
If the date is not changed, please move
minute and hour hands forward and set them
up straight again.
7.
Push the crown to the normal position.
8.
The watch adjusts itself. Please do not press
any buttons until it s finished.
*Hands may keep rotating up to 12 minutes.
Note: Please try radio wave reception again, after
zero calibration is fully finished.
Please see [5 Radio wave reception].
LB
12 o'clock.
Advertisement

Subscribe to Our Youtube Channel
Related Manuals for Lad Weather LAD017


Summary of Contents for Lad Weather LAD017
- Page 1 Battery remaining Enough charged Low Battery ③ Zero position confirmation (For example, when you calibrate on 25th Here's LAD WEATHER Tuesday , please set 24th Monday .) official site! 2 How to set up 1. Due to some reasons, the hands may be out Turn the crown to the front/back to set lad-weather.com...
- Page 2 4 T im e z o n e 5 R adio w ave rece pti on 6 So l a r ba t t ery 7 Pow e r sa v i ng m o de When you change time zone, you can check the [ Automatic reception ] This watch works with solar rechargeable battery.
- Page 3 Transmission stations in Japan (J40, J60) 9 R a d i o w a v e s t a t i o n s T r o u b l e s h o o t i n g - Near or on the furniture made of metals. Two time signal radio stations are located on Mt.
Need help?
Do you have a question about the LAD017 and is the answer not in the manual?
Questions and answers