Table of Contents
Advertisement
Due to our policy of continuous improvement, product specifications and
details are subject to change without notice. Please contact BRIVIS on
1300 BRIVIS (1300 274847 ) or visit brivis.com.au for further information.
Thank you very much for purchasing your Brivis Air Conditioner.
Please read this manual carefully before operation and retain for
future reference. To be read in conjunction with the User Manual
accompanying the Air Conditioner.
Advertisement
Table of Contents

Subscribe to Our Youtube Channel
Related Manuals for Brivis GYKQ-52e

Summary of Contents for Brivis GYKQ-52e
- Page 1 Due to our policy of continuous improvement, product specifications and details are subject to change without notice. Please contact BRIVIS on 1300 BRIVIS (1300 274847 ) or visit brivis.com.au for further information. Thank you very much for purchasing your Brivis Air Conditioner.
-
Page 2: Table Of Contents
Remote Control Specifications Function Buttons Indicators On LCD Replacement of Batteries System Operation Auto Mode Operation Cooling / Heating Operation Fan Only Operation Dry Operation (Dehumidifying) Fan Speed Adjusting Air Flow Direction Timer Operation TURBO Sleep Mode... -
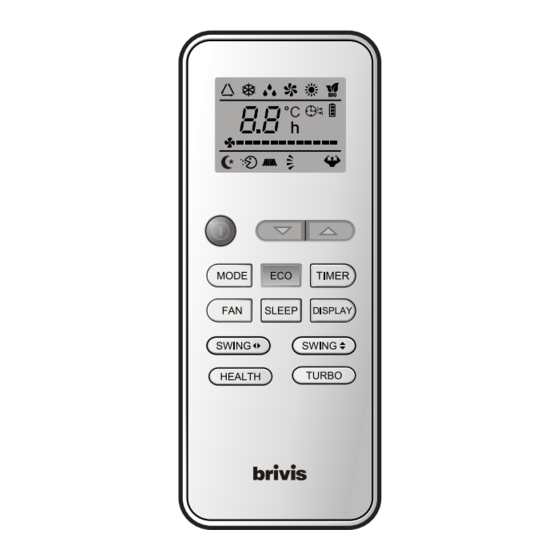
Page 3: Remote Control Specifications
Remote Control Specifications Function Buttons Button Function Model GYKQ-52e (TEMP UP) Press to increase temperature / time setting. Rated Voltage 3.0V (2x AAA 1.5 Volt Batteries) (TEMP DN) Press to decrease temperature / time setting. Signal Receiving Range (ON/OFF) Press to start or stop operation. -
Page 4: Indicators On Lcd
Replacement of Batteries Indicators On LCD Remove the battery cover plate from the rear of the remote controller, by sliding it in the direction of the arrow. Symbols Meaning Install the batteries (+ and -) as shown on the Remote Controller . Reinstall the battery cover by sliding it into place. -
Page 5: System Operation
System Operation Cooling / Heating Operation HEAT COOL When the appliance is off (standby): 1. Press the "ON / OFF" button to turn on appliance. The appliance 1. Press the MODE button to select COOLING and HEATING mode. will begin to operate. 2. -
Page 6: Dry Operation (Dehumidifying)
Dry Operation (Dehumidifying) Adjusting Air Flow Direction SWING SWING In periods of high humidity this mode removes excess moisture ADJUSTING VERTICAL AIR FLOW from the room, in order to prevent mould and mildew. Continuous Circulation 1. To adjust the direction of the air flow vertically for more even air Press the MODE button to select Dry mode. -
Page 7: Timer Operation
Timer Operation Press the TIMER button to set the auto-on and auto-off time of the unit. In this mode the appliance automatically sets the operation to To set the Auto-on time TIMER achieve energy savings. In COOLING mode, the temperature setting will increase 2 above the set temperature. -
Page 8: Turbo
Sleep Mode Sleep 1. Press the "ON / OFF" button to turn on appliance. 2. Set the desired mode and temperature setting as per basic operations. 3. Press the "SLEEP" button, the appliance will run in "SLEEP" mode: For Cooling: Allows the set temperature to increase and decrease over a 10 hour period at pre-set time intervals to maintain your comfort while saving energy (see graph below).
Need help?
Do you have a question about the GYKQ-52e and is the answer not in the manual?
Questions and answers