
Related Manuals for Amped Wireless AWP48W


Summary of Contents for Amped Wireless AWP48W
- Page 1 BASIC WIFI SMART PLUG MODEL:AWP48W PLEASE READ CAREFULLY BEFORE OPERATING THIS EQUIPMENT KEEP IT IN A SAFE PLACE FOR FUTURE REFERENCE...
-
Page 2: Fcc Statement
CAUTION RISK OF ELECTRIC SHOCK DO NOT OPEN CAUTION: TO REDUCE THE ELECTRIC SHOCK, DO NOT REMOVE THE COVER (OR BACK). NO USER SERVICEABLE PART INSIDE, REFER SERVICING TO QUALIFIED SERVICE PERSONNEL. DANGEROUS VOLTAGE:The lighting flash with arrowhead symbol within an equilateral triangle is intended to alert the user to the presence of uninsulated “dangerous voltage”... -
Page 3: Fcc Notice
FCC NOTICE: This equipment has been tested and found to comply with the limits for a Class B digital device, pursuant to Part 15 of the FCC Rules. These limits are designed to provide reasonable protection against harmful interference in a residential installation. - Page 4 washbowl, kitchen sink, laundry tub, in a wet basement, or near a swimming pool. 6. Clean only with dry cloth The appliance should be cleaned only as recommended by the manufacturer. 7. Do not block any ventilation openings. Install in accordance with the manufacturer’s instructions.
- Page 5 moisture, does not operate normally, or has been dropped. 15. Power source This product should be operated only from the type of power source indicated on the marking label. If you are not sure of the type of power supply to your home, consult your appliance dealer or local power company.
- Page 6 20. Service Do not attempt to service this product yourself as opening or removing covers may expose you to dangerous voltage or other hazards. Refer all servicing to qualified service personnel. 21. Replacement parts When replacement parts are required, be sure the service technician uses replacement parts specified by the manufacturer or those that have the same characteristics as the original parts.
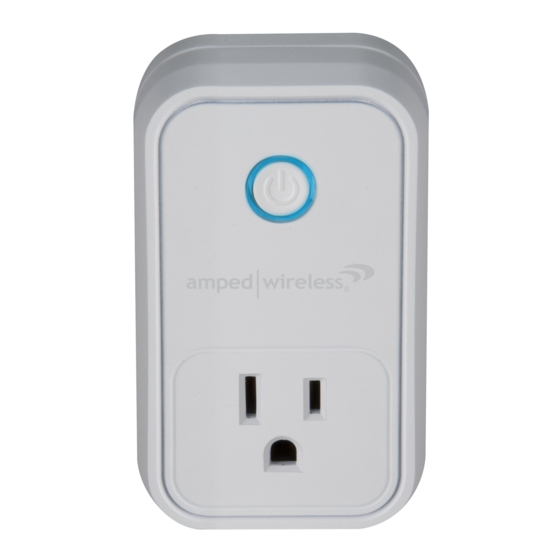
- Page 7 PREPARATION Smooth and rapid Wi-Fi network (2.4 GHz only) Smart Life APP and account One Smart Device: smart phone or tablet (not included) SMART SOCKET OVERVIEW Power ON/OFF Button LED Ring Press the power button to power on, the LED ring will turn red. Press the power button again to power off the LED ring will turn off.
- Page 8 SMART LIFE APP 1. Search "Smart Life" on Apple APP store or Google Play, download and install it. 2. Once installed successfully, the icon will appear as the figure below. Smart Life REGISTER SMART LIFE APP 1. Tap the Smart Life App icon to open. 2.
- Page 9 CONNECT SMART SOCKET BY SMART LIFE APP CONNECTION THROUGH EZ MODE 1. Click "Smart Life" App and log in. 2. When the below page appear, When the below page appear, click "Electrical outlet" to continue. click "Add device" to continue. 3.
- Page 10 5. The Smart Life is now connecting 4. The window will remind you to confirm the available smart outlets. the Wi-Fi information. Input the Wi-Fi password and tap "Confirm" to continue. 6. The available smart outlets will be shown as below when successfully connected. IMPORTANT! ONCE DEVICE ADDED, CLICK...
- Page 11 7. After renaming, tap "Share with family" and set as on screen instructions to share with family, then your family can control on their smart phone with Smart Life APP. Or you can set it later and tap "Done" to continue. 8.
- Page 12 CONNECTION THROUGH AP MODE 1. Click "Smart Life" App and log in. 2. When the below page appear, When the below page appear, click "Electrical outlet" to continue. click "Add device" to continue. 3. Press and hold the button for approx.15 seconds until the LED ring turns Blue and Red then it turns blue and blinking slowly, tap "AP Mode"...
- Page 13 4. Tap "Confirm indicator slowly blink" to continue. 5. The window will remind you to confirm the Wi-Fi information. Input the Wi-Fi password and tap "Confirm" to continue. 6. Tap "Connect Now" to skip to your 7. Select SmartLift-XXXX then return to APP. smart phone's wifi setting.
- Page 14 8. The Smart Life is now connecting the available smart outlets. 9. The available smart outlets will be shown as below when successfully connected. IMPORTANT! ONCE DEVICE ADDED, CLICK TO RENAME, OTHERWISE, IT CAN NOT BE CONTROLLED BY ALEXA VOICE CONTROL.
- Page 15 10. After renaming, tap "Share with family" and set as on screen instructions to share with family, then your family can control on their smart phone with Smart Life APP. Or you can set it later and tap "Done" to continue. 11.
- Page 16 HOME PAGE 1. After completely connection, the home page will appear as below. 2. Tap "+" at the right top corner to add more device, the connection procedures refer to the appear as below. previous two connection menthod, after successful addition, the interface will...
- Page 17 HOME PAGE 3. Tap "Scenes" at the bottom of the screen to create your own scene to suit your needs, For example, set your home to automatically turn on the lights and close. 4. Tap "+" to add your customized scene, here, tap "Good night", then you need to finish two steps, step1: add a condition, step2: add a task (if there is no device added, here will be empty, and you need to add a device before this operation).
- Page 18 HOME PAGE 5. Tap "Profiles" at the bottom of the screen to set your profile, create scenes, sharing device, receiving message, using integration(the third side software) to operate by voice control or other operations, tap "Experience Center" to experience the scene, tap "Scan QR Code" to scan the QR code on some of the smart product, tap FAQ to check the requent ask questions.
Need help?
Do you have a question about the AWP48W and is the answer not in the manual?
Questions and answers