
Related Manuals for Sideshift PT230 PONTOON

Summary of Contents for Sideshift PT230 PONTOON
- Page 1 PT230 PONTOON THRUSTER (PATENT PENDING) INSTALLATION/OPERATION MANUAL VOLUME 1.7, JULY 2016 Sideshift Inc. 130 Industrial Ave, Unit 303, Carleton Place, ON, Canada K7C 3T2 1.877.325.4787 +613.686.6011 INFO@SIDESHIFT.COM...
- Page 2 We also provide unlimited telephone support at 1.877.325.4787. Also see our website for helpful installation videos at sideshift.com/choose-sideshift/videos/videos/. This manual explains the mounting and operation of the PT230 Pontoon Thruster system. We recommend that you familiarize yourself with the complete manual before starting your installation.
-
Page 3: Safety Warnings
SIDESHIFT INSTALLATION GUIDE V1.7 Safety warnings WARNING: To prevent overheating when operating the Sideshift thruster, run for a maximum of 20-30 seconds at a time, then allow to cool for at least 10 seconds before further operation. WARNING: Ensure main ignition is turned off and motor control breakers are open when conducting maintenance and repair of the thruster. -
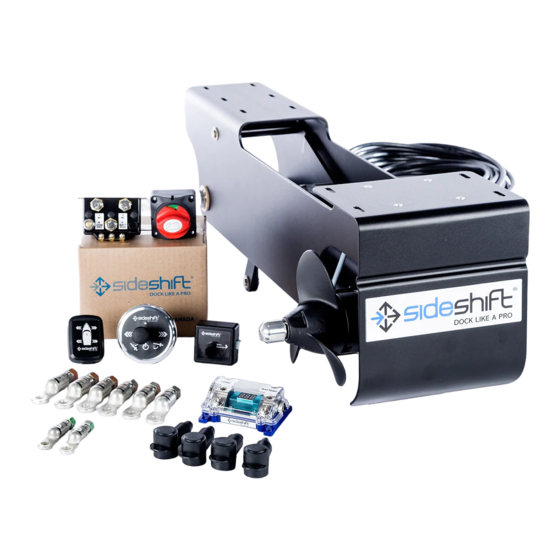
Page 4: Parts List
SIDESHIFT INSTALLATION GUIDE V1.7 Parts List Item Photo Purpose Thruster Kit Raise, lower and control Single Joystick thruster. Dual Wireless Joystick Controls bow and stern thruster from a single console for one- hand operation. - Page 5 SIDESHIFT INSTALLATION GUIDE V1.7 Wireless Control Module Wireless receiver and control interface between joystick and motor controller. Motor Controller Relays commands from joystick, delivering high current from battery to motor. Anti-seize Prevents screw and bolt threads from seizing, facilitating easier assembly and disassembly.
- Page 6 SIDESHIFT INSTALLATION GUIDE V1.7 Terminal protectors Protects terminals from moisture and prevents shorts. Compression terminals Connects cables to motor controller. Select size according to wire gauge used. Wireless Remote Controls thruster remotely...
- Page 7 SIDESHIFT INSTALLATION GUIDE V1.7 INSTALLATION INSTRUCTIONS – PT230 PONTOON THRUSTER Sideshift thrusters can be installed with the boat in water or on land, although land- based installation is easier. To get an overview of the installation process you can view the pontoon thruster installation video on-line at sideshift.com/choose-sideshift/videos/videos/.
- Page 8 SIDESHIFT INSTALLATION GUIDE V1.7 Step-By-Step Instructions: STEP 1: DETERMINE THE DISTANCE BETWEEN MOUNTING CROSS MEMBERS The unit has pre-drilled mounting slots to accommodate either 16” or 24” centers. In some installations it will be necessary to drill the thruster mounting plate as seen below, to fit centers other than 16” or 24” using a...
- Page 9 SIDESHIFT INSTALLATION GUIDE V1.7 NOTE: You will require a helper for Step 2 NOTE: The thruster should be positioned directly under the bow for best performance. The thruster can be mounted further back on the boat where it is less visible, but performance will be affected.
- Page 10 SIDESHIFT INSTALLATION GUIDE V1.7 STEP 3: FEED WIRES AND AIR L INE THROUGH DECK 1. Determine a location for the motor control box, ideally in a dry storage area close to the bow on the helm side of the boat.
- Page 11 SIDESHIFT INSTALLATION GUIDE V1.7 NOTE: The air line prevents pressure buildup on the motor seals due to temperature changes. The air line must not be crimped, and must be positioned so that the open end is in a dry location...
- Page 12 SIDESHIFT INSTALLATION GUIDE V1.7 INSTALLATION INSTRUCTIONS – ELECTRICAL Schematic – PT230...
- Page 13 SIDESHIFT INSTALLATION GUIDE V1.7 Due to the high current draw, Sideshift thrusters must be supplied with a dedicated starter-type battery for each thruster. WARNING: High currents can result in reduced voltage supply to the thruster if improper cable, connectors and/or assembly procedures are used.
- Page 14 SIDESHIFT INSTALLATION GUIDE V1.7 NOTE: If in doubt of which cable gauge to use, call Sideshift for technical advice. Instructions: STEP 1: CUT BATTERY CABLE TO LENGTH 1. Cut two lengths of marine battery cable of suitable length to reach from batteries to controller.
- Page 15 SIDESHIFT INSTALLATION GUIDE V1.7 STEP 4: CONNECT THRUSTER TO MOTOR CONTROLLER NOTE: Motor power cable polarity is not identified. If thrusters operate in opposite direction from joystick, reverse cable connections on motor controller. 1. If thruster power cables are too long, cut them to length. Be sure that they are neatly routed, and comfortably reach the motor controller terminals.
- Page 16 SIDESHIFT INSTALLATION GUIDE V1.7 How To Install Compression Terminals STEP 1: STRIP 1” (2.5 CM) OF INSULATION FROM EACH END OF CABLES NOTE: Take care when stripping insulation to avoid damaging conductor. If some strands are removed the compression terminal will not make a good connection possibly resulting in performance reduction, a fire hazard or the cable pulling out of the compression terminal.
- Page 17 SIDESHIFT INSTALLATION GUIDE V1.7 Installing Joystick on Console 1. Locate a position on the console of the boat suitable for the joystick. Check under the selected position on the console to ensure a minimum area of at least 4” diameter and a minimum three inches obstruction-free below the area of the joystick equipment.
- Page 18 SIDESHIFT INSTALLATION GUIDE V1.7 7. Plug the power cable into the back of the joystick 8. Run a thin bead of marine sealant in the groove around the underside perimeter of the joystick, insert into the 2 ½” cutout and press in place.
- Page 19 SIDESHIFT INSTALLATION GUIDE V1.7 NOTE: The joystick and wireless key fob are preprogrammed for operation. No pairing or programming is required. OPERATING THE THRUSTER WARNING: The thruster is equipped with an overload protection circuit. Should the thruster encounter an obstruction when being retracted or deployed, the unit will shut down a continuous alarm will sound.
-
Page 20: Operating The Wireless Remote
SIDESHIFT INSTALLATION GUIDE V1.7 WARNING Retract the thruster only when the boat is at slow speed or completely stopped OPERATING THE WIRELESS REMOTE 1. For operation of the wireless key fob the joystick must be turned on and the thruster in the fully down position. - Page 21 SIDESHIFT INSTALLATION GUIDE V1.7 Failure mode Alarm Action Thruster arm Solid beep Clear obstruction or slow obstruction Thruster will power-off down when deploying or retracting thruster Power off and back on to joystick Operate as normal Thruster arm not Flashing blue light on ...
-
Page 22: Maintenance
Motor Unit Sideshift thrusters are designed to be very low maintenance. The unit is sealed and requires no lubrication. Air Line Check the condition of the air line regularly. Check line on the outside and inside of the boat to ensure it is not kinked, pinched or damaged in any way that might block it or cause a leak. - Page 23 SIDESHIFT INSTALLATION GUIDE V1.7 Note * It can take 2 hours after charging for the terminal voltage to properly reflect the charge level. Note ** Over-charging can damage the battery and cause hydrogen gas to form which is an explosion hazard and can lead to serious injury and fire.
-
Page 24: Troubleshooting
SIDESHIFT INSTALLATION GUIDE V1.7 TROUBLESHOOTING Use the following charts to troubleshoot problems with Sideshift thrusters. - Page 25 SIDESHIFT INSTALLATION GUIDE V1.7...
- Page 26 SIDESHIFT INSTALLATION GUIDE V1.7...
-
Page 27: Warranty
Register your warranty at https://sideshift.com/register-warranty/ All Sideshift Inc. products are warrantied to be free from defects due to faulty workmanship or defective materials for a period of two years. Products failing within the warranty period should be returned to Sideshift assembled and complete with a copy of the original invoice. -
Page 28: Specifications
SIDESHIFT INSTALLATION GUIDE V1.7 SPECIFICATIONS PT230 Pontoon Thruster Parameter PT230 Power (HP) Voltage (VDC) Start Current (A) Housing Length (in) 34.0 Thruster Arm Length (in) 35.0 Housing Width (in) 12.0 Propeller (in) Recommended boat size (ft.) <35.0 Actuator deployment/retraction time (sec.)
Need help?
Do you have a question about the PT230 PONTOON and is the answer not in the manual?
Questions and answers