Table of Contents
Advertisement
Quick Links
SBC300 Session Border Controller
User Manual V1.0
Shenzhen Dinstar Co., Ltd.
th
Address: 9
Floor, Guoxing Building, Changxing Road, Nanshan District, Shenzhen, China
Postal Code: 518052
Telephone: +86 755 61919966
Fax: +86 755 26456659
Emails: sales@dinstar.com, support@dinstar.com
Website: www.dinstar.com
Advertisement
Table of Contents

Subscribe to Our Youtube Channel
Related Manuals for Dinstar SBC300


Summary of Contents for Dinstar SBC300
- Page 1 SBC300 Session Border Controller User Manual V1.0 Shenzhen Dinstar Co., Ltd. Address: 9 Floor, Guoxing Building, Changxing Road, Nanshan District, Shenzhen, China Postal Code: 518052 Telephone: +86 755 61919966 Fax: +86 755 26456659 Emails: sales@dinstar.com, support@dinstar.com Website: www.dinstar.com...
- Page 2 Preface Welcome Thanks for choosing SBC300 Session Border Controller! We hope you will make full use of this rich-feature device. Contact us if you need any technical support: 86-755-26456110/112. About This Manual This manual gives introduction to the SBC300 device, and provides information about how to install, configure or use it.
-
Page 4: Table Of Contents
Attentions for Installation ......................7 Preparations about Installation Site ....................7 Installation Tools ..........................7 Unpacking ...........................8 2.2 Installtion of SBC300 ...........................8 Put SBC300 into Shelf .........................8 Connect SBC300 to Network .......................8 How to make RJ45 Network Cable ....................8 Troubleshooting about Network Connection ................9 3 Configurations on Web Interface .................. - Page 5 Device Name ..........................54 Web Configuration ........................54 Network ............................. 55 Port Mapping ..........................56 Static Route ..........................57 User Manager ..........................58 Date & Time ..........................60 Upgrade ............................. 60 Backup & Restore ........................61 SBC300 Session Border Controller Copyright©2011-2018 Dinstar...
- Page 6 Double-device Hot Standby ..................... 62 License............................. 62 Certificate ..........................62 3.7 Maintenance ............................63 Login Log ..........................63 Operation Log ..........................63 Security Log ..........................63 Log Management ........................64 Tools ............................64 4 Abbreviation ........................66 SBC300 Session Border Controller Copyright©2011-2018 Dinstar...
-
Page 7: Production Introduction
It is able to process up to 300 concurrent SIP sessions and transcode 100 concurrent calls. Meanwhile, it allows encrypted sessions via TLS and SRTP. Apart from traditional codecs like G.729, G.723, G.711 and G.726, SBC300 also supports the transcoding of iLBC, AMR and OPUS. -
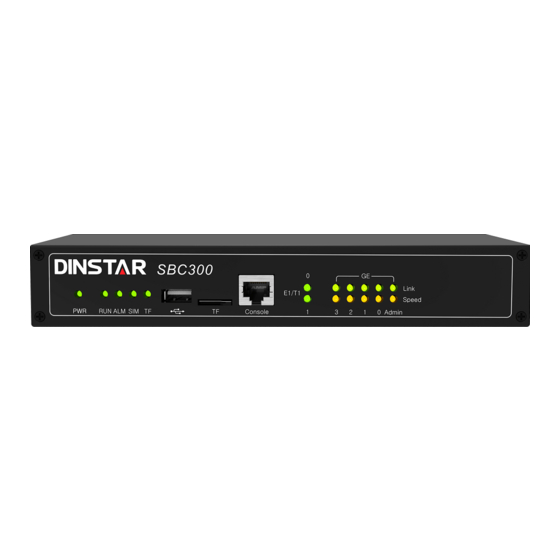
Page 8: Product Appearance
The network port is not connected, or is connected abnormally GE/Admin Network port works at 1000Mbps Speed Indicator (Yellow) Network port works 10/100Mbps E1/T1 E1/T1 Status Indicator Reserved Reserved SIM Card Indicator Reserved Reserved TF Card Indicator Reserved Reserved SBC300 Session Border Controller Copyright©2011-2018 Dinstar... -
Page 9: Functions And Featurres
4* 10/100/1000M Base-T Ethernet ports (GE0-GE3 for services) 1* 10/100/1000M Base-T Admin port (for management) E1/T1 Ports: 2* E1/T1, RJ48C 1* USB 2.0 1* TF Card Slot Serial Console SBC300 Session Border Controller Copyright©2011-2018 Dinstar... -
Page 10: Capabilities
SIP registration rate limiting SIP registration scan attack detection SIP call scan attack detection SIP anti-attack SIP Header manipulation SIP malformed packet protection Multiple Soft-switches supported QoS (ToS, DSCP) SBC300 Session Border Controller Copyright©2011-2018 Dinstar... -
Page 11: Voice
Dynamic load balancing and call routing Flexible routing engine Call routing based on prefixes Call routing based on caller/called number Regular Expression Call routing based on time profile SBC300 Session Border Controller Copyright©2011-2018 Dinstar... -
Page 12: Maintenance
Operating Temperature: 0 ℃ ~ 45 ℃ Storage Temperature: -20 ℃ ~80 ℃ Humidity: 10%-90% Non-Condensing Dimensions (W/D/H): 226× 146× 39mm Unit Weight: 0.85 kg Compliance: CE, FCC SBC300 Session Border Controller Copyright©2011-2018 Dinstar... -
Page 13: Installation
Attentions for Installation Before you install the SBC300 device, please read the following safety guidelines: To guarantee SBC300 works normally and to lengthen the service life of the device, the humidity of the equipment room where SBC300 is installed should be maintained at 10%-90% (non-condensing), and temperature should be 0 ℃... -
Page 14: Unpacking
Connect SBC300 to Network SBC300 has five network ports, namely the gigabit network port for services (from GE0 to GE3) and the gigabit network port for network management (Admin). It is advised to connect GE0, GE1, GE2 or GE3 to the IP network. -
Page 15: Troubleshooting About Network Connection
Step6.Test the usability of the network cable. Troubleshooting about Network Connection When the SBC300 device has been connected to gigabit Ethernet, but the SPEED and LINK indicators on the front panel of the device are still dull, it can be concluded that network connection fails. - Page 16 Step3: If the laptop or PC can visit a website normally, it can be concluded that the network cable is usable but the network port of SBC300 is faulty. Step4: If the laptop or PC cannot visit a website, it can be concluded that the network cable is unavailable.
-
Page 17: Configurations On Web Interface
First Use At the first time that the SBC300 device is put in use, please connect the device’s Admin port to a PC by using a network cable, and then modify the IP address of the PC to make it at the same network segment with of the default IP address of the Admin port. -
Page 18: Log In Web Interface
Note: At the first time that the SBC300 device is used, only the Admin port is allowed to visit the Web interface (other network ports are disabled). If you want to connect the SBC300 device through other network ports, please connect the Admin port to a PC and log into the Web interface of the device, and then enable GE0, GE1, GE2 and GE3 ports on the SecurityAccess Control page. -
Page 19: Introduction To Web Interface
If you forget the IP address after modification and cannot log in the Web interface, please use a serial cable to connect the Console port of SBC300 with a PC. Enter the ‘en’ mode and input ‘show interface’ to query the IP address. -
Page 20: Configuration Flows
3 Configurations on Web Interface To add configurations To edit/modify configurations To delete configurations 3.3 Configuration Flows The following is the general configuration flows of SBC300: Log in Web Interface Configure IP Address of GE0/GE1/GE2/GE3 Configure from top to buttom based... - Page 21 Figure 3-5 System Status Table 3-2 Calls Statistics CPS (Calls Per Second) The number of new calls going through SBC300 every second at current time Peak CPS The peak CPS (calls per second) since SBC300 is booted up Current Calls The number of on-going calls at current time Max.
-
Page 22: Access Network Status
NTP. Access Network Status Terminal users are registered to SBC300 through access network. The status of access network is always “true”, which means the access network is normal and available. On the OverviewAccess Network Status page, detailed information about access network, including the status, name, CPS (Calls Per Second), number of registered users, ASR (Answered Success Ratio), number of calls that are being transcoded, number of current calls as well as number of total calls, are shown. -
Page 23: Access Trunk Status
The total number of legal calls since the device is booted up Note: Calls are grouped into inbound calls and outbound calls. Inbound calls go from terminal users to SBC300, while outbound calls are exactly the opposite. Inbound calls and outbound calls have their own statistics of ASR, number of transcoded calls, number of current calls and number of total calls. -
Page 24: Core Trunk Status
As for ASR, if the invite message of a call is successfully responded, we consider the call as a successful/answered call. Calls are grouped into inbound calls and outbound calls. Inbound calls go from terminal users to SBC300, while outbound calls are exactly the opposite. Inbound calls and outbound calls have their own statistics of ASR, number of transcoded calls, number of current calls and number of total calls. -
Page 25: Calls Status
As for ASR, if the invite message of a call is successfully responded, we consider the call as a successful/answered call. Calls are grouped into inbound calls and outbound calls. Inbound calls go from core network to SBC300, while outbound calls are exactly the opposite. Inbound calls and outbound calls have their own statistics of ASR, number of calls that are being transcoded, number of current calls and number of total calls. -
Page 26: Register Status
The number of RTP messages that received or sent. The statistics is collected every five seconds Peer IP The peer IP address and peer RTP port Register Status On the Overview Register Status page, the registration statuses of terminal users on SBC300 are displayed. SBC300 Session Border Controller Copyright©2011-2018 Dinstar... -
Page 27: Attack List
IP Addr./NAT (destination): the IP address and NAT address of core network’s SIP trunk Addr./NAT Attack List On the Overview Attack List page, the source, IP address and interface of attacks to SBC300 are shown. Figure 3-11 Attack List Table 3-11 Attack List... -
Page 28: Service
On the Service Media Detection page, you can choose to enable/disable ‘Use called to match sessions’ and ‘RTP Detection’. If ‘RTP Detection’ is enabled, the SBC300 device will monitor the RTP packets of each call and will disconnect the call after it finds that no RTP packets are sent or received during the detection time. -
Page 29: Number Profile
Number profile does not support ‘Regular Expression’ currently. Click , and you can add a number profile. Figure 3-14 Add Number Profile SBC300 Session Border Controller Copyright©2011-2018 Dinstar... -
Page 30: Time Profile
The description of the time profile Configure the starting date and ending date of a period; Date You are allowed to configure multiple periods Workday Choose one or more working days (from Monday to Sunday) SBC300 Session Border Controller Copyright©2011-2018 Dinstar... -
Page 31: Rate Limit
SIP trunk or a core SIP trunk, the SBC300 device will refuse the calls and registration requests from this number. SBC300 Session Border Controller... - Page 32 3 Configurations on Web Interface If a number is put on whitelist and the white list is adopted, the SBC300 device will accept the calls and registration requests from this number. Figure 3-17 Blacklist Figure 3-18 Whitelist Table 3-16 Blacklist & Whitelist The name of the blacklist.
-
Page 33: Codec Profile
3 Configurations on Web Interface Codec Profile SBC300 supports such codecs as G729, G723, PCMU, PCMA, ILBC_13K, ILBC_15K, OPUS and AMR. You can group these codecs and adjust their priority according to your needs. Figure 3-19 Edit Codec Profile Table 3-17 Codec Group The name of the codec group. -
Page 34: Number Manipulation
The prefix that will be deleted after it matches a caller/callee number. For example, if the prefix is set as 678 and the caller number is 67890000, then the caller number will be changed into Delete Prefix 9000; The prefix supports regular expression; SBC300 Session Border Controller Copyright©2011-2018 Dinstar... -
Page 35: Number Pool
Note: During number manipulation, ‘Delete Prefix’ and ‘Delete Suffix’ are carried out first, followed by ‘Add Prefix’ and ‘Add Suffix’. If ‘Condition’ is also set, SBC300 will match the condition based on the result of the abovementioned rules. If a number manipulation rule is used on the Service Access Network page, the Service Access SIP Trunk page or the Service ... -
Page 36: Sip Header Manipulation
When the SIP headers of the messages related to calls passing through access network, access SIP trunk and core SIP trunk are not consistent with those required, you need to set rules to manipulate original SIP headers. SBC300 Session Border Controller Copyright©2011-2018 Dinstar... - Page 37 Source ID: the original content of SIP message, it can be any parameter included in SIP message. Match: equal when the source ID is equal to the set value, the operation rule is activate. SBC300 Session Border Controller Copyright©2011-2018 Dinstar...
-
Page 38: Sip Header Passthrough
Table 3-21 SIP Header Pass The name of the ‘SIP header passthrough’ profile. It cannot be modified after the ‘SIP Name header pass’ profile has been added successfully The description of the ‘SIP header passthrough’ profile Description SBC300 Session Border Controller Copyright©2011-2018 Dinstar... -
Page 39: Access Network
Record-Route, Refer-To, Referred-By, Auto-Defined。 Access Network On the Service Access Network page, you can configure the parameters of access network, which will be used when terminal users are registered to softswitch through the SBC300 device. SBC300 Session Border Controller Copyright©2011-2018 Dinstar... - Page 40 Select a transport protocol for the access network. It can be UDP, TCP or TLS Protocol The access network’s SIP listening port on the Ethernet interface of SBC300 SIP Port Select a network protocol for the access network. It can be IPv4 or IPv6.
- Page 41 The QoS tag of meida messages Near-end NAT defaults to disabled. If it is enabled, the contact IP address contained in SIP messages sent out by SBC300 will be turned into the outbound IP address of public Near-end NAT network.
- Page 42 Timeout The minimum time allowed for terminal’s registration. That is to say, if the ‘expires’ MinRegister value in the REGISTER message is smaller than this minimum time, SBC300 will refuse Interval the register request. If a terminal is in private network and sends out messages through NAT, the registration NAT Expire time responded by SBC300 will automatically turned into the time configured here.
-
Page 43: Access Sip Trunk
By default, the INVITE request, REGISTER request and SESSION DISCONNECT request are accepted. Access SIP Trunk Access SIP trunk can realize the connection between access network and SBC300. On the Service Access SIP Trunk page, you can configure the parameters of access SIP trunk. SBC300 Session Border Controller... - Page 44 Name been added successfully Description The description of the access SIP trunk The SBC300 device’s Ethernet interface configured to connect the access SIP trunk. It Interface can be eth0, eth1, eth2, eth3 or VLAN Transport Select a transport protocol for the access SIP trunk. It can be UDP, TCP or TLS The access SIP trunk’s SIP listening port on the Ethernet interface of SBC300...
- Page 45 3 Configurations on Web Interface Near-end NAT defaults to disabled. If it is enabled, the contact IP address contained in SIP messages sent out by SBC300 will be turned into the outbound IP address of public Near-end NAT network. If NAT is enabled, you need to fill in the outbound IP address of public network.
- Page 46 If ‘Require’ is selected, the callee side of a call passing through the access SIP trunk also needs to support session timer. Configure the duration of the session. During the duration, SBC300 will send ‘reinvite’ Session Expires messages to keep activating the session.
-
Page 47: Core Sip Trunk
Core SIP Trunk Core SIP trunk can realize the connection between SBC300 and the core network. On the Service Core SIP Trunk page, you can configure the parameters of core SIP trunk. SBC300 Session Border Controller... - Page 48 3 Configurations on Web Interface SBC300 Session Border Controller Copyright©2011-2018 Dinstar...
- Page 49 The QoS tag of media messages Near-end NAT defaults to disabled. If it is enabled, the contact IP address contained in SIP messages sent out by SBC300 will be turned into the outbound IP address of public Near-end NAT network.
- Page 50 3 Configurations on Web Interface There are three DTMF modes, including SIP Info, Inband, RFC2833; If the DTMF mode of an core SIP trunk differs from that of access network, SBC300 will convert it through DSP Select a SIP header manipulation rule for inbound calls of the core SIP trunk. If a call...
- Page 51 If ‘Require’ is selected, the callee side of a call passing through the core SIP trunk also needs to support session timer. Configure the duration of the session. During the duration, SBC300 will send ‘reinvite’ Session Expires messages to keep activating the session.
-
Page 52: Routing Profile
Backup: if the status of the first SIP trunk is ‘True’, the call will be always routed by the first SIP trunk. If the status of the first SIP trunk is ‘False’, the call will be routed by the next available SIP trunk. SBC300 Session Border Controller Copyright©2011-2018 Dinstar... - Page 53 The number profile set for matching the route. If the caller number or the called number of a call matches with a number in this profile, the call will be routed by the route. This Number Profile parameter is optional to fill in. Make reference to 3.4.3 . SBC300 Session Border Controller Copyright©2011-2018 Dinstar...
- Page 54 Caller number or called number can also be manipulated when a call comes into an access network, access SIP trunk or core SIP trunk. In this section, number is manipulated after a call has finished choosing a route. SBC300 Session Border Controller Copyright©2011-2018 Dinstar...
-
Page 55: Security
In the Security section, you can configure the system security strategies, anti-attack strategies and access control strategies. System System security is mainly used to prevent SBC300 from being attacked by various DOS/DDOS floods, so as to ensure stable running of the device. Figure 3-29 System Security Table 3-27 System Security If ‘Attack Log’... -
Page 56: Access Control
3 Configurations on Web Interface If this parameter is enabled, SBC300 will drop TCP packages, and the peer device cannot learn whether the ports of SBC300 are closed or not. TCP-Flood is a kind of DDOS attack. It can send a mass of TCP requests to occupy the system resources of the target device and then to make the target device crash. -
Page 57: Security Policy
By default, GE0, GE1, GE2 and GE3 are not allowed to access the Web interface. The SSH port of SBC300 defaults to 22. If you select the checkbox on the right of GE0, GE1, GE2 or GE3, it means the selected port.is allowed to access the SSH of SBC300. - Page 58 Description successfully added. Remote IP: when the packet traffic sent by remote IP exceeds the configured traffic threshold (KBPS) or the CPU usage exceeds the configured threshold, SBC300 will execute the preset action. Detection Local port: when the packet traffic received by local port exceeds the configured traffic threshold (KBPS) or the CPU usage exceeds the configured threshold, SBC300 will execute the preset action.
- Page 59 2. SIP Security Figure 3-33 SIP Security Strategy Click to add a strategy to prevent attacks from SIP-based devices. Click to delete a strategy, while click to modify the strategy. SBC300 Session Border Controller Copyright©2011-2018 Dinstar...
-
Page 60: System
& password as well as time zone & current time. You can also upgrade software versions, backup or restore configuration data, and update license and certificate. Device Name On the System System Management page, you can configure the name of the SBC300 device. Figure 3-35 Device Name Web Configuration... -
Page 61: Network
VLAN on the page. Figure 3-37 Network Port Figure 3-38 Modify Port Infomation Click to add a VLAN and click to modify the information of each network port or VLAN, while click to delete a VLAN. SBC300 Session Border Controller Copyright©2011-2018 Dinstar... -
Page 62: Port Mapping
To ensure the security of the LAN (local-area network), SBC300 will reject the connection request from the wide- area network (WAN). Port mapping allows a client in the wide-area network to visit the SBC300 device in the local- area network. -
Page 63: Static Route
Transport Choose TCP, UDP or TCP\UDP Protocol Remote The interface of the client in the wide-area network, which is to visit the SBC300 Interface device in local-area network1 Remote Port The port of the client in the wide-area network, which is to visit the SBC300... -
Page 64: User Manager
User Manager On the System User Manager Password page, you can modify administrator’s password for logging in the SBC300 device. Factory defaults for administrator’s username and password are ‘admin’ and ‘admin@123#’ which are also used to log in SSH. - Page 65 Web interface, specify their roles and allocate permissions to them. Figure 3-43 Add User and Assign Permissions Table 3-33 User List Username The name of the user, which is used to log in the SBC300 device Password The password for the user to log in the SBC300 device Confirm...
-
Page 66: Date & Time
NTP Server server. Upgrade On the System Upgrade interface, you can upgrade the SBC300 to a new version. But you need to restart the device for the change to take effect after executing upgrade. Figure 3-45 Software Upgrade SBC300 Session Border Controller... -
Page 67: Backup & Restore
Service Config, Certification File and Network Config, and then click Backup Restore Choose a backup file, and then click Restore. Factory Click Factory Settings, and the configurations of the SBC300 device will become factory Settings settings. SBC300 Session Border Controller Copyright©2011-2018 Dinstar... -
Page 68: Double-Device Hot Standby
Two SBC300 devices can be connected with each other through the ‘Admin’ port for the sake of hot standby. That is to say, the two SBC300 devices work in the active/standby mode. When the active device fails, it changes to the standby state while the standby device changes to the active state and take over the functionality of the failed device. -
Page 69: Maintenance
3.7 Maintenance Login Log The logs tracing the logins of the SBC300 device can be viewed on the Maintenance Login Log page. You are allowed to set query criteria to view the logs that you want. Figure 3-50 Login Log Operation Log The logs tracing the operations carried out on the Web interface can be queried on the Maintenance ... -
Page 70: Log Management
Traceroute is used to determine a route from one IP address to another. Instruction for using Traceroute: Step1.Enter the IP address or domain name of a destination device in the input box of Traceroute, and then click Traceroute. SBC300 Session Border Controller Copyright©2011-2018 Dinstar... - Page 71 On the following interface, you can capture data packages of the available network ports. You can also set source IP, source port, destination IP or destination port to capture the packages that you want. SBC300 Session Border Controller Copyright©2011-2018 Dinstar...
-
Page 72: Abbreviation
4 Abbreviation Abbreviation SBC: (Session Border Controller) SIP: (Session Initiation Protocol) DTMF: (Dual Tone Multi Frequency) NAT: (Network Address Translation) VLAN: (Virtual Local Area Network) SBC300 Session Border Controller Copyright©2011-2018 Dinstar... - Page 73 4 Abbreviation SBC300 Session Border Controller Copyright©2011-2018 Dinstar...
Need help?
Do you have a question about the SBC300 and is the answer not in the manual?
Questions and answers