Table of Contents
Advertisement
Quick Links
Advertisement
Table of Contents

Related Manuals for Ecolibrium Solar EcoFoot2+

Summary of Contents for Ecolibrium Solar EcoFoot2+
- Page 1 Installation Guide EcoFoot2+® 10-Degree Ballasted Racking System Document No. ECO-002_850 Rev 1.6, January 2018 Sales: 740-249-1877 Sales@EcolibriumSolar.com Field Support: 866-488-6794 FieldSupport@EcolibriumSolar.com www.ecolibriumsolar.com...
-
Page 2: Revision History
Revision History Revision Description of Changes Date Initial EcoFoot2+ Release 2014-August-18 Updated for UL1703 2014-November-25 Module Removal Addendum 2015-January-08 Updated for UL2703 2017-January-10 Updated for Compatible Modules and Reformatting 2017-April-13 Updated for Grounding Method, Product Logo and 2017-May-24 Trademark Notice Updated UL2703 Fire Rating language 2018-January-05 Mid-Support Span Addendum B Added... -
Page 3: Table Of Contents
• Ensuring safe installation of all electrical aspects of the entire system Legal Notices ©2017 Ecolibrium Solar®, Inc. Ecolibrium Solar® and EcoFoot2+® are registered trademarks of Ecolibrium Solar, Inc. Page 3 of 12 Ecofoot2Plus_Install_Guide_V1.6-FINAL January 5, 2018, ES10560 ecolibriumsolar.com... -
Page 4: Disclaimer Of Liability
The information in this manual is believed to be reliable, but does not constitute an expressed and/or implied warranty. ECOLIBRIUM SOLAR reserves the right to make changes to the product, specifications, data sheets and this manual without prior notice. This document is not prescriptive regarding safety and does not purport to address all the safety concerns that may arise with its use. - Page 5 Wind Zone: EcoFoot2+ is designed to mount photovoltaic modules on flat roof surfaces with a maximum pitch of 7 degrees in areas with extreme wind conditions. Please contact Ecolibrium Solar for clarification or assistance. Installation Requirements: EcoFoot2+ is ballasted photovoltaic racking designed as a system which requires all EcoFoot2+ components, the specific module, and ballast placement prescribed in the PE stamped design.
-
Page 6: Core Components
EcoFoot2+ Core Components ® EcoFoot2+ Base Clevis Pin Clamp- Lower Deflector Clamp- Upper Page 6 of 12 Ecofoot2Plus_Install_Guide_V1.6-FINAL January 5, 2018, ES10560 ecolibriumsolar.com... -
Page 7: Installation Instructions
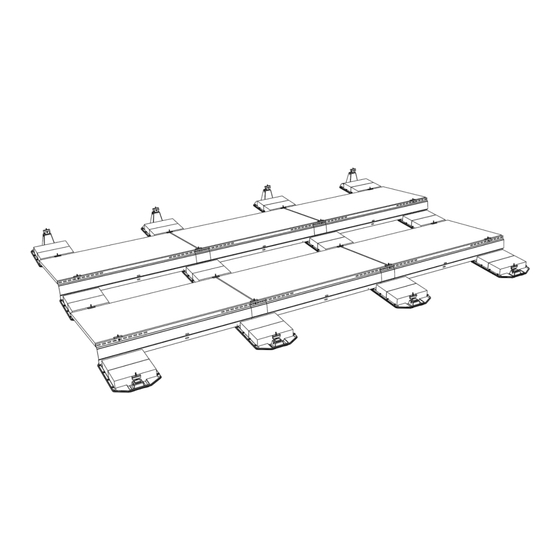
EcoFoot2+ ™ Installation Instructions Place module onto EcoFoot2+® Base (A). Using a 1/2" Chalk lines on roof denoting two outside edges of the deep socket, torque Nuts (F) to 14 ft-lbs. Space modules EcoFoot2+® according to project drawing. Place 1/2“apart using the alignment marks on the Clamps. EcoFoot2+®... -
Page 8: Ballast Block Placement
Place Ballast (not included) as required per Place Deflectors (E) into slot on EcoFoot2+® Base and PE Certified Ballast Plan provided. attach to Rocker using Nut (F) provided. Using a 1/2" Tip: See note below for ballast block placement. In deep socket, torque Nut (F) to 14 ft-lbs. -
Page 9: Addendum A Module Removal
ADDENDUM A Module Removal Note: If a module is to be removed from an array, the following steps must be taken. Determine module to be removed Identify and mark the module to be removed. Install ground lug on adjacent modules Install a WEEB Lug 6.7 on both modules adjacent to the module to be removed. -
Page 10: Addendum B Universal Support Brackets Installation
ADDENDUM B Universal Mid Support Brackets are a non-standard item and only used in heavy load conditions with light-duty panels. The design team at Ecolibrium Solar will indicate use when required. Installing Lower Universal Mid-Support Install on low side of module at the module midpoint. - Page 11 Installing Upper Universal Mid-Support Install 2 brackets on high side of module frame, positioned 1/3 in from each corner. To install, pull brackets onto module return flange until fully seated as shown below. Installing the Wind Deflector Page 11 of 12 Ecofoot2Plus_Install_Guide_V1.6-FINAL January 5, 2018, ES10560 ecolibriumsolar.com...
-
Page 12: Addendum C Grounding & Bonding
½” from any edge. One Ground Lug is required for every 400 modules connected within an array. Ecolibrium Solar recommends using #6 copper ground wire in conjunction with WEEB grounding devices such as the WEEB-LUG-6.7 or WEEB DSK516. Lugs are a single use component.
Need help?
Do you have a question about the EcoFoot2+ and is the answer not in the manual?
Questions and answers