Advertisement
Quick Links
SURFACE MOUNTING INSTRUCTIONS
1. First remove cover by unscrewing four bolts holding
cover to the can.
2. Remove Xenon bulb by pulling bulb directly outward
from bulb socket.
3. Place all parts in a secure location until reassembly.
4. Select a mounting location for the Xenon Wall Light.
Fixture should be within reach of 110V power, located
approximately 9 inches above the surface to be lit, and
situated at the best location along the mounting surface
for the illumination task.
5. Xenon Wall Light has four surface mounting brackets that
will allow the can to be securely affixed to almost any
surface with the four mounting screws provided.
Installations in drywall will require proper wall anchors.
Place can onto the mounting surface and mark the position
of the four mounting screws. For wiring to the immediate
back of Xenon Wall Light, mark hole for incoming wire.
Remove can and drill pilot holes for screws and wire.
Reposition can, and securely fasten the can to the mount-
ing surface by firmly tightening four mounting screws.
RECESSED MOUNTING INSTRUCTIONS
1. First remove cover by unscrewing four bolts holding cover
to the can.
2. Remove Xenon bulb by pulling bulb directly outward from
bulb socket.
3. Place all parts in a secure location until reassembly.
4. Place Xenon Wall Light upside-down on a towel (soft
surface) and strike four surface mounting brackets with
a hammer to remove.
5. Select a mounting location for the Xenon Wall Light.
Fixture should be within reach of 110V power, located
approximately 9 inches above the surface to be lit, and
situated at the best location along the mounting surface
for the illumination task.
6. Xenon Wall Light has flanges that will allow the can to
be securely affixed to almost any surface with the four
mounting screws provided. Installations in drywall will
require a wood backing behind drywall. Place can in a
round hole of 5" diameter and mark the position of the
four mounting screws. Remove can and drill pilot holes
for the screws. Reposition can in hole and securely
fasten the can to the mounting surface by firmly tight-
ening four mounting screws.
WIRING INSTRUCTIONS
CAUTION! Only qualified electricians, or people familiar with
household electrical circuits, should bring 110V power to the
fixture. Wiring may require an inspection by the local build-
ing department. Check with your local building department
before installation.
CAUTION! Before bringing 110V power to the fixture, make
sure incoming wire is not "hot" and all power coming to the
wire is off.
CAUTION! All connections must be made in accordance with
this instruction manual, current NEC, and all local building
codes. Minimum 90˚C supply conductors.
CAUTION! Use RTV silicone and water-tight fittings on all
connections to fixture.
1. Remove reflector by unscrewing one bolt at bottom of
reflector, and gently lifting reflector and bulb socket out
of the can.
2. Through one of the two NPT fittings provided, bring in
110V power wiring. If 110V wire will not conveniently
enter one of the two NPT fittings provided, simply
unscrew the can, rotate can 180 degrees, and reinstall.
Can is entirely symmetrical, and 180 degree rotation will
not affect mounting holes.
3. Secure wire to fixture with the appropriate strain relief
(not provided).
4. Strip 1/3" (8mm) of the insulation off each incoming 110V
power wire. Connect white incoming 110V wire (neutral
wire) to push-in connector on white wire from trans-
former. Connect black incoming 110V wire to push-in
connector on black wire from transformer. Connect
ground wire to push-in connector on green wire screwed
into can. Push all wires firmly down into connectors, so
that uninsulated wire is not exposed.
5. Reinstall reflector, bulb and cover.
RELAMPING
CAUTION! If Xenon Wall Light has recently been operating,
glass lens, bulb and fixture are HOT! Turn Off fixture and
allow unit to cool for 15 minutes.
CAUTION! Always make sure there is NO power coming to
the fixture, or 110V power wiring, before relamping!
1. Remove cover by unscrewing four bolts holding can
to cover.
2. Remove Xenon bulb by pulling directly outward from the
bulb socket.
3. Replace with an 18 watt, 12 volt, wedge base Xenon bulb
only (NSL model number XEN-12-18W). Push bulb directly
into socket until bulb base is firmly seated.
4. Make sure gasket is properly in place on top of can.
Place cover on can with Louver or Scoop openings
pointing toward the illumination surface. Secure cover
to can by reinstalling the four screw bolts provided.
5. Re-energize the 110V to the fixture. If bulb does not light,
check for a loose bulb in socket by repeating steps #1
through #4 above. If bulb still does not light, retry steps
#1 through #4 above with a new Xenon bulb.
SWITCH
HOT WIRE
TRANSFORMER
110V
NEUTRAL
110V
GROUND
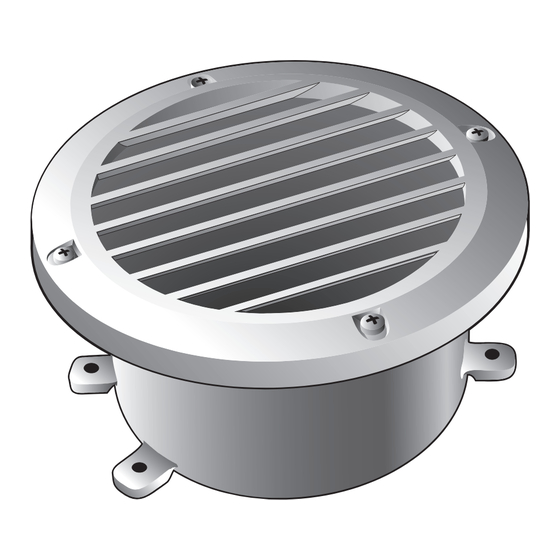
Cover Bolts
Cover
Xenon Bulb
Gasket
Reflector
Recessed
Mounting
Screws
Surface
Mounting
Brackets
TO BULB
SOCKET
12V
Advertisement

Subscribe to Our Youtube Channel
Summary of Contents for NSL Xenon
- Page 1 6. Xenon Wall Light has flanges that will allow the can to Cover Bolts SURFACE MOUNTING INSTRUCTIONS be securely affixed to almost any surface with the four mounting screws provided. Installations in drywall will 1. First remove cover by unscrewing four bolts holding require a wood backing behind drywall.
- Page 2 Louver, Scoop & Prism cover designs can flange, and poor cover-to-can seal (see below). Poor cover seal will allow water/moisture into fixture White, Bronze, Black and Aluminum colors resulting in LED and Xenon failure. XENON STEP LIGHT Without Concrete Cap With Concrete Cap...
Need help?
Do you have a question about the Xenon and is the answer not in the manual?
Questions and answers