Table of Contents
Advertisement
Quick Links
www.nkrowing.com.au
COX-BOX
SYSTEM
TM
INSTALLATION, MAINTENANCE AND
TROUBLESHOOTING GUIDE
Thank you for purchasing this NK CoxBox. PLEASE take a moment to review these instructions before
installiation & use. Your CoxBox system should provide you with years of trouble-free service, but we are
always here to help if a problem arises. To order parts or accessories or obtain technical support, please
call 02 6258 9380. You may also e-mail questions to our support representatives at info@nk.com.au or
visit NK online at www.nk.com.au
The Most Relied-Upon
Pocket Weather Instruments
in the World
Making Work & Play
Easier & Safer
1
Advertisement
Table of Contents

Subscribe to Our Youtube Channel
Related Manuals for NK CoxBox

Summary of Contents for NK CoxBox
- Page 1 Thank you for purchasing this NK CoxBox. PLEASE take a moment to review these instructions before installiation & use. Your CoxBox system should provide you with years of trouble-free service, but we are always here to help if a problem arises. To order parts or accessories or obtain technical support, please call 02 6258 9380.
-
Page 2: Recalling The Memory
Also review the “Troubleshooting” section for help pinpointing the problem. If you still are having problems, please contact our Repair Department on 02 6553 2473 or write to info@nk.com.au Additional Information Never attempt to repair the Cox-Box unit yourself. The units are specially sealed to make them watertight. - Page 3 • Under normal conditions, a fully charged battery should last at least 4 hours. If your unit is not providing this much operational time, it may be time to return it to NK to have new batteries installed. We expect our batteries to need replacement after three years of normal full-season use.
-
Page 4: Daily Maintenance
3. Check the inside of the rubber plug on the wiring harness for any dirt. Inspect the wires leading to the plug for any nicks or cuts. If these exist, contact NK about repairing them. 4. Apply silicone grease to the outside of the rubber plug on the Cox-Box. This helps to minimize the damage done by repeatedly removing the unit from the boat. -
Page 5: Battery Life
• If your Cox-Box unit is more than three years old, the battery performance will decrease. Simply return the unit to NK for a new battery replacement. If you would like to determine the age and/or repair history of a unit, please send an e-mail to info@nk.com.au... - Page 6 If you know your unit’s batteries are older than three years, we recommend that the unit be returned to NK for new batteries and servicing. We can often check our records to determine the age of...
- Page 7 • Use the Socket Maintenance Kit (NK Part No. 0242) to clean any imbedded dirt or debris from the sockets and inject a small amount of Nyogel into the sockets to prevent corrosion and ensure good electrical contact.
- Page 8 · If your CoxBox unit is more than three years old, the battery performance will decrease. Simply return the unit to NK for a new battery replacement. If you're not sure how old your unit is, give the Service Department at NK a call and they can research your unit's serial number to tell you when it was last serviced.
- Page 9 SOCKET MAINTENANCE KIT – NK PART 0242 – NK developed this kit to make it easy for you to care for the metal connectors inside your Cox-Box P5 connector as well as the P2 connectors on the NK speakers. The kit includes a...
-
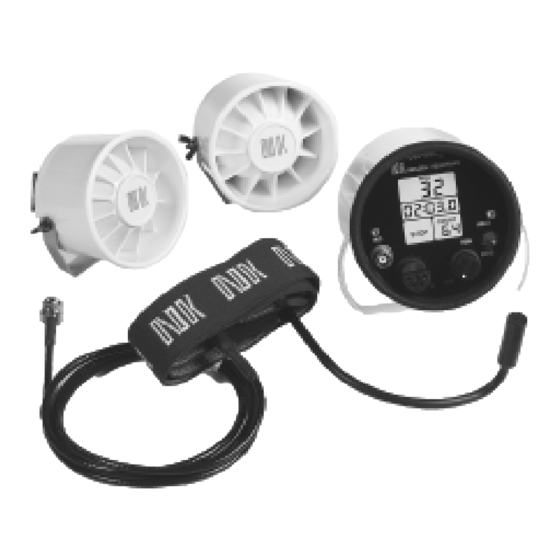
Page 10: Installing Your System
INSTALLING YOUR SYSTEM Check that you received everything required. If you purchased a complete CoxBox system you should have received the following items: Carrying bag .......................(1) CoxBox (or Cox Vox) control unit ...............(1) microphone......................(1) charger ........................(1) speakers ................(as ordered 2 or 3) mounting cup ....................(1) - Page 11 www.nkrowing.com.au PLEASE NOTE: The sensor must be installed at the CENTRE of the seat travel. If the sensor is too close to either end of the seat travel, the COX BOX may indicate ONE-HALF the correct stroke rate.It is essential that the holes in the magnet assembly pass directly over the holes in the sensor.
- Page 12 Decide where you want to secure the cup and mark off the surface using the cup as a template. Drill two pilot holes for the #8 x ½” panhead screws and secure the cup. Do NOT over tighten the screws! This new NK Gear Bag is a great replacement for your old black Cox- Box Carry Case.
-
Page 13: Airline Travel
With increased airport security, traveling with your Cox-Box is trickier than ever. We recommend you check the Cox-Box in with your luggage. Include product literature that explains what the Cox-Box is. Brochures can be obtained from NK, or product literature can be printed from the website. You certainly do want to try to carry them onto an airplane. - Page 14 Nielsen-Kellerman’s All New Modular Harness System You want to spend your time on rowing, not repairs. The unique engineering of NK’s modular harness • Fully molded and sealed ensures improved durability and flexibility. design to stand up to the harsh demands of rowing and environmental exposure.
-
Page 15: Customer Care
NK repair agent; normal wear and tear; failed batteries. NK wants you to be an NK customer for life, so we take care of you even beyond the terms of the normal product warranty with our Customer Care Program. Trade-in any NK display unit, no matter the age or condition, and receive a generous discount on the replacement product. -
Page 16: Contact Info
Contact Info: Delivery Address (Please send all parcels to this address) Nielsen Kellerman Australia Pty Ltd 'Remo' 206 Cowans Lane Oxley Island NSW 2430 AUSTRALIA Email: info@nk.com.au Web: www.nk.com.au Phone: 02 6553 2473 Fax: 02 6553 2544 Marc Douez David McGrath...
Need help?
Do you have a question about the CoxBox and is the answer not in the manual?
Questions and answers