
Summary of Contents for Nu-Heat neoAir
- Page 1 Underfloor heating user guide neoAir UNDERFLOOR HEAT SOLAR © Nu-Heat 2017 HEATING PUMPS THERMAL...
- Page 2 & after your project Nu-Heat Know-How For expert advice call us on 01404 549770...
-
Page 3: Table Of Contents
Holiday mode Optional features explained Adjusting the optional settings Factory reset Mode Select Pairing the neoAir to UH8RF as HW Timer Mode 2 – time clock operation Optional features explained Optional settings – features table Setting the switching times Optional wireless boiler control... -
Page 4: Welcome
Welcome Congratulations, you are the owner of a Nu-Heat warm water underfloor heating system, designed and supplied by Nu-Heat UK Ltd., the largest supplier of domestic underfloor systems in the UK. This manual is provided to help you understand how the system operates and the correct settings required to get the most from your heating. -
Page 5: About The Nu-Heat System
If there is poor flow or none at all, wiring box. There may be additional switches located check that the stop-cock for the at each underfloor heating wiring box property is fully open. which also need to be on. For more information visit www.nu-heat.co.uk... -
Page 6: Operation
4-6°C lower than the are set at different times throughout However, the neoAir incorporates comfort setting, although again, this the day. If the property is to be Optimum Start, a self-learning feature can be experimented with. -
Page 7: Systems With Programmable Thermostats
A 7-day mode is also available. HOT WATER CONTROL OPTION neoAir can be configured as a timer to control your hot water. See page 16 for details of how to set this up. For more information visit www.nu-heat.co.uk... -
Page 8: Optional Control From A Smartphone
Store, Google Play Store or Amazon App Store and register an account. PAIRING THE NEOAIR THERMOSTATS The next step is to pair each neoAir to the neoHub+, starting with the neoAir located nearest to the neoHub+. To add a neoAir, follow these steps: From the neoApp, select... -
Page 9: Setting Up Neoair
Display will return to the main screen. Wireless communications coverage Where building size or construction results in inadequate wireless coverage, this can be extended by use of a neoPlug (available from Nu-Heat). For more information visit www.nu-heat.co.uk... -
Page 10: Mode 1 - Thermostat Operation
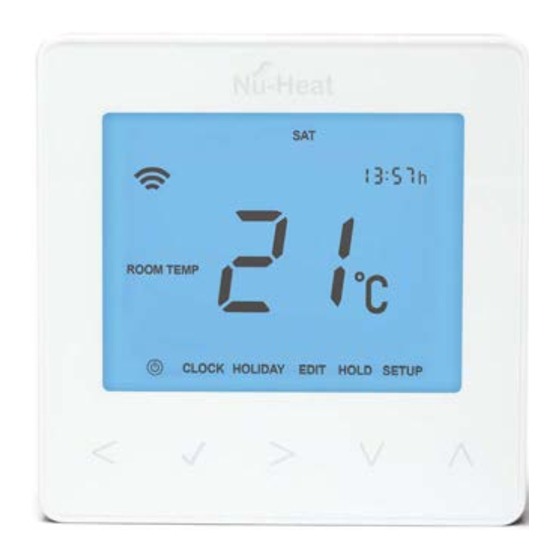
Mode 1 – thermostat operation Main menu navigation Comms symbol Battery symbol Floor limit symbol Temperature format Frost symbol Temperature (current) Flame symbol Cool on (not used) Floor temp/Room temp Clock Set* Holiday left Key lock indicator Hold left Programme indicator *SET = Displayed when changes are being made to the program schedule or current set point. -
Page 11: Temperature Display
Temperature display The neoAir can be configured for different sensor options such as remote air sensor or floor sensor. The display will clearly indicate which sensor is being used by showing either ROOM TEMP FLOOR TEMP before the actual temperature value. -
Page 12: Temperature Control
ON/OFF each time is pressed. In this mode, the neoAir will display the frost icon and will only turn the heating should the room temperature drop below the set frost temperature (see pages 13–14). If the heating is turned whilst in frost mode, the flame symbol will be displayed. -
Page 13: Power On/Off
POWER To turn the neoAir off completely, scroll to the icon and hold the for approximately 4 seconds until the display goes blank. -
Page 14: Optional Features Explained
OPTIONAL FEATURES EXPLAINED The following settings are optional and in most cases need not be adjusted. DESCRIPTION SETTING EXPLANATION FEATURE Pairing Used to add zone to neoHub+ Used to connect the thermostat to the neoHub+ Switching differential 00 = 0.5˚C Allows you to increase the switching 01=01˚C (default) differential of the thermostat. -
Page 15: Adjusting The Optional Settings
The thermostat will revert to the main display screen for the selected mode. Note: Factory reset will cancel all parameters that were entered during the set-up and pairing operations. These processes must be repeated after factory reset is completed. For more information visit www.nu-heat.co.uk... -
Page 16: Mode Select
Mode Select The neoAir can either be used as a thermostat or a time clock. Thermostat mode is the default setting. To change between THERMOSTAT TIME CLOCK modes, follow these steps: Use the < / > keys to scroll to... -
Page 17: Mode 2 - Time Clock Operation
7 Day Program Mode – Each day has 4 on/off switching times that can be programmed independently. 24 Hour Mode – All days are programmed with the same on/off switching times. For more information visit www.nu-heat.co.uk... -
Page 18: Setting The Switching Times
Setting the switching times To program the switching times, follow these steps: Use the < / > keys to scroll to EDIT and press Use the < / > keys to select day/period of the week Press to confirm selection will now flash and the current time will be displayed. -
Page 19: General System Checks
The gauge should read and ballcock in the loft. For more information visit www.nu-heat.co.uk... -
Page 20: General Sequence Of Operation
General sequence of operation Every time heat is required in a room the following sequence is initiated: If the heating is in an on period and the room requires heating, the room thermostat will call for heat :– A flame symbol will appear on zone will open, indicated by the button For standard systems with conventional the display. -
Page 21: Seasonal Adjustments
Each room/zone can be set to frost protection individually. Please refer to the instructions (Frost Protection on page 11), which detail how the thermostat can be put into a hold mode and the required frost protection temperature adjusted. For more information visit www.nu-heat.co.uk... -
Page 22: Geo-Location
Neo adjusts the temperature in your home. Privacy • Neither Nu-Heat nor Heatmiser ever knows or stores your home location or your current position. • Only your mobile phone knows your home location and your current position. -
Page 23: System Adjustments
Adjust the temperature by pushing the button to the left or right. Press the button again to confirm the change. Direct-mounted pump module (d1) To increase the temperature: Turn the control head anticlockwise For more information visit www.nu-heat.co.uk... -
Page 24: Servicing Requirements
(page 18) for further-information. CLASS CLASS Energy efficiency (ErP) The neoAir is rated as Class I under Section 5.2.1.2 Temperature control, of EU Commission Delegated Regulation No. 811/2013. Product support For further information on the operation of your underfloor heating system and also troubleshooting help, please visit the Nu-Heat website at nu-heat.co.uk.
Need help?
Do you have a question about the neoAir and is the answer not in the manual?
Questions and answers