Advertisement
409S Stainless Steel
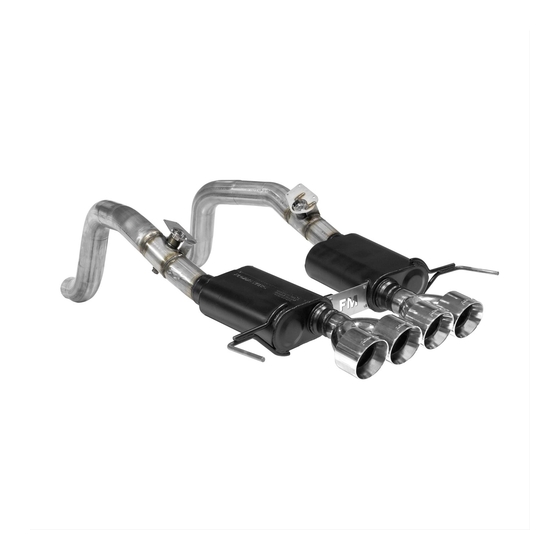
PACKING LIST
Qty
Description
1
Left Muffler
1
Right Muffler
1
Parts kit
1
Laser Cut Spacer
4
¼-20x3/4 Button Head HW238
4
¼-20 Hex Nut
4
¼ Split Lock Washer
Before you begin, please understand that the installation of this system requires significant
disassembly of the rear fascia.
Part #
15188S
15189S
PK837
HA1626
HW101
HW301
1)
Before you begin, please understand that the installation of this system
requires significant disassembly. The entire lower rear bumper fascia
(Blue portion in photo) must be removed. Because this is a painted body
panel, you may want to consider covering it with masking tape for the
disassembly/assembly process to prevent any scratches. Note: Do not
turn the vehicle ignition on anytime during the removal/assembly
process
2)
Begin by removing the rear license plate. Next, along the bottom of the
bumper fascia there are several screws that secure the lower edges.
Remove all of these screws (save all fasteners for reassembly).
3)
On outside ends of each side of the bumper fascia there are small, plastic
vertical grates that must be removed. These are held in place by small
clips. Use a small screwdriver to carefully pop these out. At the bottom,
where the red and black panels touch, they clip together. Use a small flat
blade screwdriver to carefully separate them.
Installation Instructions for:
SYSTEM #817754
2014-17 CHEVROLET CORVETTE
6.2L ENGINE · AXLE-BACK SYSTEM
NOT INTENDED FOR VEHICLES W/ DUAL MODE OPTION
Advertisement
Table of Contents

Related Manuals for Flowmaster Outlaw Series


Summary of Contents for Flowmaster Outlaw Series
- Page 1 Installation Instructions for: SYSTEM #817754 2014-17 CHEVROLET CORVETTE 6.2L ENGINE · AXLE-BACK SYSTEM NOT INTENDED FOR VEHICLES W/ DUAL MODE OPTION 409S Stainless Steel PACKING LIST Description Part # Left Muffler 15188S Right Muffler 15189S Parts kit PK837 Laser Cut Spacer HA1626 ¼-20x3/4 Button Head HW238 ¼-20 Hex Nut...
- Page 2 On each side of the bumper fascia there is a thin horizontal red reflector that must be removed. It is held in place with clips. Use a small flat blade screw driver to very carefully pop out these two reflectors. Once the reflectors are removed, you will see two hex bolts that secure the fascia to the bumper frame.
- Page 3 Using the three hex head screws removed in the step above install the butterfly actuators onto the valves in the new Flowmaster muffler assemblies. Tighten the three screws securely. Once the actuators have been installed onto the muffler assemblies, the system can be reinstalled on the vehicle. Position one muffler at a time, up over the axle into the clamped connection.
Need help?
Do you have a question about the Outlaw Series and is the answer not in the manual?
Questions and answers