Table of Contents
Advertisement
Quick Links
I. GENERAL INTRODUCTION
This instrument is a multifunctional meter which allows you to measure the amount of electricity used by an appliance.
It is ideal for uses such as air conditioners, refrigerators, and various types of office equipment.
It allows you to enter two electricity prices for two different time periods to calculate the total cost of an
appliance's power consumption, and to monitor the electricity usage. It can detect energy overloads and
record the highest amperage, voltage and wattage.
To operate this instrument, you should read the manual first and adjust the settings. Then plug the instrument in to a
standard AC outlet. Finally, connect the plug of the appliance to be monitored into the socket of the instrument.
Features:
• Energy monitor and consumption tracking
• Maximum amperage, voltage and wattage readings
• Energy cost calculation
• Energy cost prediction
OPERATING INSTRUCTIONS
Power Meter PRO
Model PM3100
Read this owners manual thoroughly before use and save.
Power Meter PRO
• Energy usage time
• Clock
• Overload warning
• Dual price adjustment
1
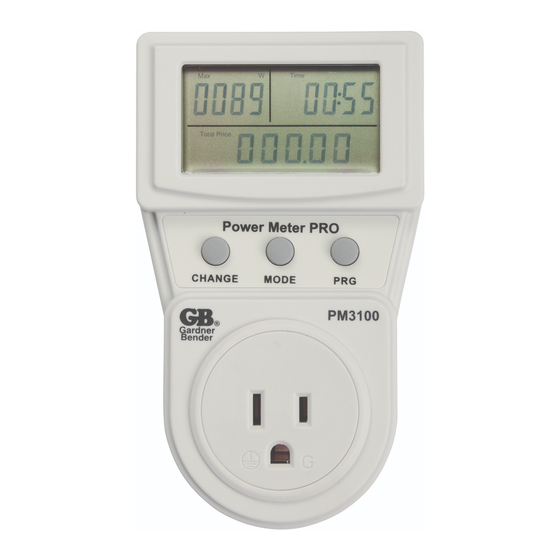
1. Screen
2. "CHANGE" Button
3. Socket
4. "MODE" Button
5. "PRG" Button
Advertisement
Table of Contents

Summary of Contents for GB PM3100
-
Page 1: Operating Instructions
OPERATING INSTRUCTIONS Power Meter PRO Model PM3100 Read this owners manual thoroughly before use and save. Power Meter PRO 1. Screen 2. "CHANGE" Button 3. Socket 4. "MODE" Button 5. "PRG" Button I. GENERAL INTRODUCTION This instrument is a multifunctional meter which allows you to measure the amount of electricity used by an appliance. - Page 2 I I. SCREEN AND BUTTONS A. "CHANGE" Button Press this button to scroll through the following readings on the Energy Monitor area: • Wattage • Maximum Line Voltage • Current Overload Threshold • Maximum Wattage • Load Current • Wattage Overload Threshold •...
- Page 3 IV. SWITCHING AMONG DIFFERENT MODES Pressing MODE switches the Cost/Price area and kWh/Time area among different modes in a circulation pattern. The following Illustrations show the process. Pay attention to the symbols and units on the two areas. V. SETTING T1 , T2 AND THE PRICES Setting the start time and terminal time of Tl 1.
- Page 4 VI. SETTING CLOCK 1. Press MODE until the clock is shown on the screen. 2. Perform steps 2 through 6 of the Setting the start time and tenninal time of Tl section. VII. SETTING CURRENT OR WATTAGE OVERLOAD THRESHOLD 1. Press CHANGE until the current or wattage overload threshold is shown on the screen. 2.
- Page 5 Before use, verify the instrument's operation by measuring a known voltage. Make sure all relevant ground connections are good and secure. Do not position the instrument so that it is difficult to operate the disconnecting device. 10. Never attempt to repair or service the instrument. 11.
Need help?
Do you have a question about the PM3100 and is the answer not in the manual?
Questions and answers