Table of Contents
Advertisement
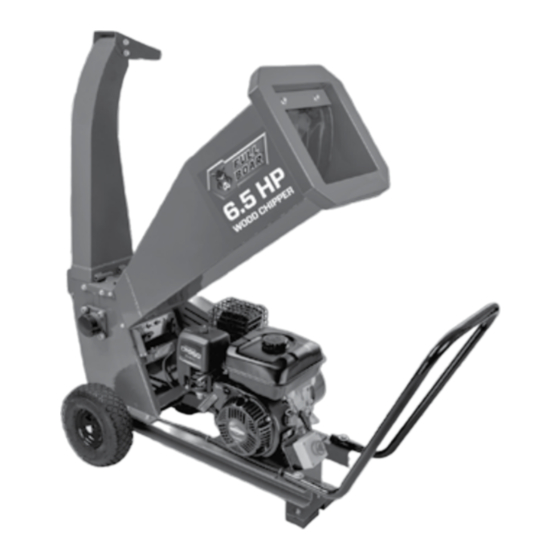
KNOW YOUR PRODUCT
6.5HP PETROL
WOOD CHIPPER
• 208CC BRIGGS & STRATTON
ENGINE CR950 (13R2)
• 50MM MAX. CUTTING DIAMETER
INSTRUCTION MANUAL
WARNING: Read all safety warnings and instructions before use. Failure
to follow the warnings and instructions may result in electric shock, fire and/or
serious injury. Save these instructions for future reference.
0418
Advertisement
Table of Contents

Summary of Contents for Full Boar FBPWC-208
- Page 1 KNOW YOUR PRODUCT 6.5HP PETROL WOOD CHIPPER • 208CC BRIGGS & STRATTON ENGINE CR950 (13R2) • 50MM MAX. CUTTING DIAMETER INSTRUCTION MANUAL WARNING: Read all safety warnings and instructions before use. Failure to follow the warnings and instructions may result in electric shock, fire and/or serious injury.
-
Page 2: Specifications
SPECIFICATIONS - MODEL NO. FBPWC-208 Wood chipper specifications: Engine specifications: Max. cutting capacity Ø: 50mm green material, Make: Briggs & Stratton CR950 (13R2) 30mm dry material Power: 6.5HP Blades: 2, 178mm long Type: OHV 4 Stroke, air cooled Working speed: 3,500rpm (under load) - Page 3 KNOW YOUR PRODUCT (cont.) 1. Discharge chute cover 15. Discharge chute 2. Hopper inlet 16. Axle 3. Muffler 17. Hex key 4. Hopper 18. Spanners x 2 5. Fuel tank 19. Spark plug tool 6. Oil filler cap 20. T-Bolt & washer x 4 7.
-
Page 4: Table Of Contents
TABLE OF CONTENTS SPECIFICATIONS............Page 02 KNOW YOUR PRODUCT........... Page 02 INTRODUCTION............Page 05 SAFETY INSTRUCTIONS........... Page 05 ASSEMBLY..............Page 09 PRE-OPERATION CHECK.......... Page 13 OPERATION............... Page 15 MAINTENANCE............Page 20 TRANSPORT & STORAGE.......... Page 24 TROUBLESHOOTING..........Page 25 CONTENTS..............Page 26 DESCRIPTION OF SYMBOLS........ -
Page 5: Introduction
INTRODUCTION Congratulations on purchasing a Full Boar petrol wood chipper. It has been designed for shredding garden material such as trees, branches, hedge cuttings, leaves and general woody garden material. It is best suited for branches up to 50mm diameter green and 30mm diameter dry. - Page 6 GENERAL SAFETY WARNINGS (cont.) ¥ Improperly stored fuel could lead to accidental ignition. Fuel improperly secured could get into the hands of children or other unqualified persons. How to prevent it: ¥ Shut off engine and allow it to cool before adding fuel to the tank. ¥...
- Page 7 GENERAL SAFETY WARNINGS (cont.) 3) Petrol tool use and care a) Do not force the petrol tool. Use the correct petrol tool for your application. The correct petrol tool will do the job better and safer at the rate for which it was designed. b) Do not use the petrol tool if the switch does not turn it on and off.
- Page 8 WOOD CHIPPER SAFETY WARNINGS 6) Only operate the machine in open space (e.g. not close to a wall or other fixed object) and on a firm, level surface; 7) Do not operate the machine on a paved or gravel surface where ejected material could cause injury; 8) Before starting the machine, check that all screws, nuts, bolts, and other fasteners are properly secured and that guards and screens are in place.
-
Page 9: Assembly
WOOD CHIPPER SAFETY WARNINGS (cont). Maintenance and storage a) When the machine is stopped for servicing, inspection, or storage, or to change an accessory, shut off the power source, disconnect the spark plug wire from the spark plug (electric unit disconnect from supply), make sure that all moving parts have come to a complete stop and, where a key is fitted remove the key. - Page 10 ASSEMBLY (cont). KNOW YOUR PRODUCT 3. Slide the axle through the hole in the base frame (9) and out the other side (fig. 3). Note: The circlip on the axle (16) will prevent the wheel (12) touching the base frame (9).
- Page 11 ASSEMBLY (cont). Foot Mounting Bracket Parts required: Foot mounting bracket (8) and M8 Foot mounting bracket fasteners x 2 (22) 1. Align the holes in the foot mounting bracket (8) with those in the base frame (9) and secure in place using the two bolts and nuts from the foot mounting bracket fasteners (22).
- Page 12 ASSEMBLY (cont.) Discharge Chute Parts required: Discharge chute (15) and T- bolt x 2 (20) 1. Place the discharge chute (15) in position on the rear of the base frame (9) and slide it across so that the pins of the frame engage the hinges on the discharge chute (15), (fig.
-
Page 13: Pre-Operation Check
PRE-OPERATION CHECK Adding Oil Note: The wood chipper is shipped without oil and must be filled before starting. Engine sump capacity 600ml. (Use SAE30 or 10W30 oil). 1. Be sure to check that the wood chipper is on a level surface with the engine stopped. 2. - Page 14 PRE-OPERATION CHECK (cont.) Adding Fuel WARNING! Keep away from cigarettes, smoke and sparks when refuelling the engine. Always refuel in a well-ventilated location. WARNING! Be careful not to spill fuel when refuelling. Spilled fuel or fuel vapour may ignite. If any fuel is spilled, make sure the area is dry before starting the engine. WARNING! Do not over fill the fuel tank.
-
Page 15: Operation
OPERATION Starting the Engine (fig 17,18,19) WARNING! Ensure you have filled the engine sump with engine oil before starting the engine. The dipstick must indicate the oil level is at maximum for the unit to start. WARNING! Prior to starting the engine ensure the hopper (4) is empty. Ensure you wear safety gloves, safety glasses and earmuffs when the wood chipper is in use. - Page 16 OPERATION (cont.) Stopping the Engine 1. Move the throttle lever fully right towards the ..indicator (fig. 20), move the engine on/off switch to the OFF position (fig. 21) and fuel lever left, closed position (fig. 22). Fig. 20 Fig. 22 Fig.
- Page 17 OPERATION (cont.) 1. Feed the material to be shredded into the hopper inlet (2). CAUTION! Stay clear of the discharge chute opening the chips that are expelled can hurt you or may cause serious injury (fig. 24). 2. Once the material makes contact with the blades it will be pulled into the machine, no need to push it in.
- Page 18 OPERATION (cont.) Discharge Chute Cover (fig. 25) The discharge chute has an adjustable cover (1), this is used to direct where the chippings are expelled 1. Loosen, do not remove, the four bolts. 2. Adjust up or down as required. Note: In the upper most position the chippings will fall further away.
- Page 19 OPERATION (cont.) 3. To allow access to the blade shaft remove the two nuts from the blade shaft cover (14) (fig. 28 ). Fig. 28 4. Rotate the blade shaft as required using the 17mm spanner (fig. 29). Fig. 29 5.
-
Page 20: Maintenance
MAINTENANCE ¥ The engine should be cool enough to touch before performing any maintenance. ¥ Inspect and maintain the wood chipper before each use. If the wood chipper has been used previously, it must be inspected and maintained before each subsequent use. ¥... - Page 21 MAINTENANCE (cont.) 5. There are two blades and these are each fixed to the rotating drum with four screws. To remove the blades first clean out any debris and build up of material from the screw heads. Rotate the blade shaft to position the first blade, allowing you to access screws (fig.
- Page 22 MAINTENANCE (cont.) Drive Belt (fig. 35-39) If the drive belt is damaged, it should be replaced. Ensure that the drive belt tension is maintained at all times. If worn, slipping may occur (this is usually noticeable by a squealing noise) or slowing and or stopping of the blades when the machine is under load. 1.
- Page 23 MAINTENANCE (cont.) Belt tension adjustment ¥ Adjust the engine position so that when you press hard in the middle of the drive belt it should deflect approximately one belt thickness. Fig. 39 Belt replacement ¥ Adjust the engine position so that the engine can be moved sufficiently allowing the drive belt to be removed/installed over the drive pulleys.
-
Page 24: Transport & Storage
TRANSPORTING & STORAGE Moving the Wood Chipper ¥ When transporting a short distance, it is advised that you use the transport handle (7). ¥ Do not overfill the fuel tank (5) (there should be no fuel in the filler neck). ¥... -
Page 25: Troubleshooting
TROUBLESHOOTING Symptom Possible Cause Suggested Solution The engine does not The closure between The safety interlock will not start the hopper or discharge allow power to the wood chipper. chute and housing has Tighten the T-bolts in a clockwise not been closed direction. -
Page 26: Contents
CONTENTS 1 x FBPWC-208 Petrol wood chipper 1 x Hopper 1 x Discharge chute 1 x Transport Handle 1 x Foot mounting bracket 2 x Wheels 1 x Axle 4 x T-bolts & washers 2 x M8 Bolts & nuts 2 x M10 Bolts, nuts &... -
Page 27: Description Of Symbols
DESCRIPTION OF SYMBOLS Cubic Centimeters Revolutions per minute Ø Decibel level Diameter Warning! Regulator compliance mark. Wear hearing protection. Read these instructions carefully. Wear protective gloves. Wear eye protection. Keep hands away from rolling Be aware of thrown objects. parts. Wear a breathing mask. -
Page 28: Warranty
WARRANTY YOUR WARRANTY FORM SHOULD BE RETAINED BY YOU AT ALL TIMES. IN ORDER TO MAKE A CLAIM UNDER THIS WARRANTY YOU MUST RETURN THE PRODUCT TO YOUR NEAREST BUNNINGS WAREHOUSE (see www.bunnings.com.au or www.bunnings.co.nz for store locations) WITH YOUR BUNNINGS REGISTER RECEIPT. PRIOR TO RETURNING YOUR PRODUCT FOR WARRANTY PLEASE TELEPHONE OUR CUSTOMER SERVICE HELPLINE: Australia 1800 069 486 New Zealand 0508 069 486...
Need help?
Do you have a question about the FBPWC-208 and is the answer not in the manual?
Questions and answers