Table of Contents
Advertisement
Advertisement
Table of Contents

Related Manuals for Conductive Labs The NDLR

Summary of Contents for Conductive Labs The NDLR
- Page 1 User Manual v1.1 FW 1.01...
- Page 2 P a g e...
- Page 3 7. Do not open or insert anything into the instrument that may cause a fire or electrical shock. 8. Always contact Conductive Labs LLC if you have an issue. You will invalidate your warranty if you open and remove the cover.
- Page 4 The NDLR’s trials and tribulations. To the Team: Darryl McGee - The NDLR Design, PCB Layout and Hardware Design, Procurement, Web Site Dev Steve Barile - The NDLR Design, Firmware and Hardware Design, Video Production, Graphic Design Volunteer Consultants…...
- Page 5 COPYRIGHT @ CONDUCTIVE LABS LLC 2018. ALL RIGHTS RESERVED. All documentation, images, software, firmware, user interface, industrial design and hardware design is protected by copyright law and international treaties. The firmware is licensed (not sold), and its use is subject to a License Agreement. Unauthorized use, copying or distribution of any of the above material or any of its components may result in severe criminal or civil penalties, and will be prosecuted to the maximum extent under the law.
- Page 6 P a g e...
-
Page 7: Table Of Contents
Rhythm Editor ............................43 Tips and Tricks ............................45 Appendix ..............................47 MIDI CC (Control Change) Implementation ................... 47 Specifications ..........................51 A Very Basic MIDI NoteOn/Off Review ..................52 How The NDLR Picks Notes ......................53 P a g e... -
Page 8: Welcome
On the following pages are all the nuts and bolts of The NDLR. There’s a lot of depth to The NDLR, and with all those synths you are planning to hook up, the complexity level of some setups will be beyond what this manual will cover. -
Page 9: Quick Start
2. Connect your favorite synth to the 5 pin MIDI ‘A’ out Or connect The NDLR to your PC using USB and launch a soft synth. 3. Set Motif 1’s MIDI channel and port on The NDLR (Settings 1 menu) to the same MIDI channel and port as your synth. -
Page 10: Product Features
9 Modulation Sources - 3 LFOs + 5 preset modulators + MIDI in mod controls 33 Modulation Destinations - nearly all The NDLR parameters + 127 MIDI CC’s Separate and global on/off for each modulation slot for all 4 parts ... -
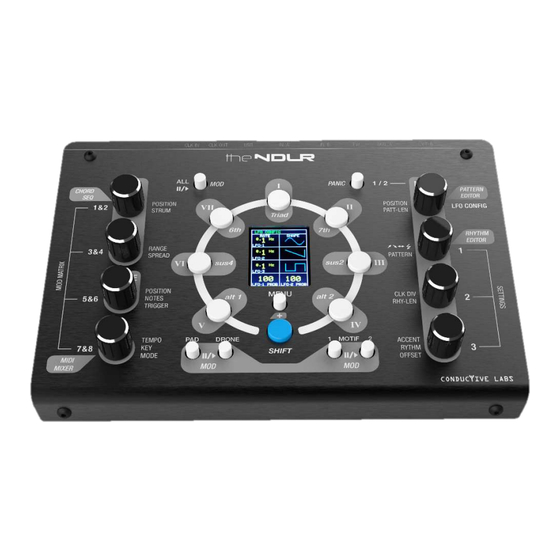
Page 11: Hardware Overview
This can provide as much time as you need to read the firmware version or serial number. Shift + Menu (during boot-up) – Pressing the blue Shift button + MENU button while The NDLR is booting up will bring you to the Boot Menu. This menu has four global parameters to set, such as "Reset The NDLR"... - Page 12 The Motif 1/2 button is found above the right-side encoders. Chord Buttons Pressing a Chord button at any time will change all the notes that The NDLR is sending out for all four parts. The chord degree, sonority, name and type are indicated just above Play/Pause state indicators toward on the bottom of the screen.
-
Page 13: Rear Panel Connections
Pressing down on the encoder engages the encoder’s built-in button. Left Encoders - On the left side of The NDLR the top two encoders control the Pad options. The third encoder controls the Drone options and the fourth encoder controls Tempo, Key and Mode options. - Page 14 There are 2 MIDI 5-pin OUT jacks. These jacks are used to connect The NDLR to MIDI enabled synths, a computer, or a tablet. Each of The NDLR’s 4 parts can be assigned to either of the 2 MIDI out ports on any of 16 channels in Settings 1 menu.
-
Page 15: Screen Review
MIDI jacks). Screen Review The NDLR has a color screen that not only allows you to see what you’ve configured, but to visualize what’s happening in real time. Below we’ll walk through all the screen combinations, provide labels and explanations for the more complex visualizations. -
Page 16: Center Sub Screens
Key Mode: Tempo Just below the Top Stripes are the current Key and Mode (e.g. “C – Major”). Just below the Sub Screen box is the BPM (beats per minute) and tempo indictor. The tempo will blink Blue on every ¼... - Page 17 Drone Sub Screen –This area shows the Drone note Position, Notes and Trigger. The top row shows the current MIDI channel. Next row is a graphic that has 5 boxes that correspond to 5 octaves. The third row has 3 boxes that correspond to which combination of notes are played: root, 5th and octave.
- Page 18 Tempo – Key – Mode Sub Screen – This area shows the Key name, the Key/Mode notes, and the tempo (BPM). The Key and Tempo shown is the same in the main screen area. The Mode name is shown on the main screen next to the Key.
-
Page 19: Menus
Menus To enter a menu press the MENU button just below the display. To select any of the eight menus press on the encoder knob (which is also a button) that corresponds with the menu desired. The menus are labeled along the outside edge of the encoders. - Page 20 The NDLR Control MIDI channel (Settings 3 menu). MIDI CC#’s 70-74 – inbound MIDI values from The NDLR Control MIDI channel (Settings 3 menu). Mod Destinations: KEY & MODE Chord - DEGREE & TYPE Pad - POSITION, RANGE, VELOCITY, & ON/OFF Drone - POSITION, TYPE, TRIGGER, &...
- Page 21 LFO Config – Encoder 5 LFO Configuration - This menu is to set the LFO values Left side: 1-3. LFO 1-3 Rates can be set in seconds which IS NOT sync’d to the Tempo or set in beats which IS sync’d to the Tempo. The available not sync’d rates are 0.4s to 4.8s (increments of 0.2s) then 5.0s to 40.0s (increments of 1.0s).
- Page 22 MIDI notes for the Pad. Right Side: 1. MIDI channel for NDLR Control – inbound MIDI channel to control The NDLR with CC messages and “NoteOn” (on all in- ports). These are generally not sent through to the MIDI out- ports.
- Page 23 Settings Menu 2/3 – This menu is mostly Velocities Left side: 1. Humanize adds some random variation to the velocities used in the Accent option. 2. Clock In PPQ is fixed to 24 PPQ in ver 1.0. 3. Clock Out sets to PPQ for the CV clock – 1,2,4, & 24. 4.
-
Page 24: Editors (Shift + Menu)
Use a polyphonic synth for the PAD part. The NDLR can play lots of notes in a chord, so lots of voices can be used if you have a synth that is massively poly. The PAD can play from 1 note up to 49 notes. -
Page 25: Hardware Synth Connections
Hardware Synth Connections The most basic setup is The NDLR and two hardware synths. There are two MIDI outputs on The NDLR, so connect each synth to an output. Settings 1 menu is where the MIDI channels are set for The NDLR. - Page 26 (blue), synths that can play more than one patch at a time. A MIDI controller keyboard can be added to control The NDLR or can be used as a transposed keyboard. Settings 1 menu is where the MIDI channels are set for The NDLR.
-
Page 27: Software Synth Connections
The NDLR can use AC power (indefinitely). For older 40 pin iPads the “Camera Connection Kit” is a great way to connect The NDLR to an iPad. Note: these solutions are solid, but the devices may need to be plugged in in a certain order. The best known process is, plug in the Camera Connection dongle first, then The NDLR. - Page 28 This makes it easy to connect The NDLR to individual synths on the iPad without needing virtual MIDI channel splitting, etc… 1. Plug The NDLR to the iPad. 2. Open the soft synth. 3. Choose a MIDI Port and Channel: NDLR PORT 1, NDLR PORT 2, NDLR PORT 3, or NDLR PORT 4, channels 1-16.
-
Page 29: Midi Controllers And Midi Message Flow
MIDI channel. Note: The NDLR is NOT a USB “Host Controller”, however if it is plugged into a USB host controller it can send and receive MIDI messages via USB on four separate USB MIDI Ports. This is useful for connecting to PC based soft synths (VSTs, AU…), DAWs, or soft controllers. - Page 30 The NDLR will transposes the inbound notes from the key of ‘C’ (white keys – C to B) into the Key and Mode that The NDLR is set for. The notes received will be passed through on the ‘KB Trans’ MIDI channel (Settings 1 menu) according to the MIDI Note & Message Thru Port Mapping table below.
- Page 31 If this should occur use the Shift-PANIC button that turns off all notes of all channels and all ports. If you use Panic while The NDLR is playing, it will just keep playing and the stuck notes will be gone.
-
Page 32: Part Descriptions
Part Descriptions Below we discuss each of The NDLR’s four parts: Pad, Drone, Motif 1, & Motif 2 in detail. The Pad plays all the notes of the chord at the selected Position and within the selected Range. An obvious synth patch choice for the Pad are a “strings”... - Page 33 chance for any Pad note to be played, 5) root only in bass octaves, root and 5ths above, 6) root only in bass octaves, 3rds or 7ths above. Pad Related Menu Options Poly-Chain (Settings 3 menu) Splits the consecutive notes in a Pad across 1, 2, 3 or 4 MIDI channels. If Poly Chain > 1 then consecutive MIDI channels start at the PAD MIDI channel (on the same port) and count up.
-
Page 34: Drone
Drone The Drone can be used to create a sustained or repeated note or tone-cluster. An obvious synth patch choice for the Drone is an infinite long modulated/evolving voice. The three controls for the Drone are Position, Notes, and Trigger. Setup MIDI Channel –... -
Page 35: Motif 1 & 2
Motif 1 & 2 The Motifs are the sequenced arpeggios of The NDLR. This is different from a sequencer in that the notes played come from a list of ascending notes based on the chord, Key and Mode selected. The Position setting chooses the starting point in that list. - Page 36 Rhythm Length This is the number of beats used in a Rhythm. Rhythm Length can have 4-32 beats. All Rhythms have 32 beats even if they are not counted. Accent The Accent chooses which velocity to use for the notes in the Pattern. The choices for Accent are: Rhythm Velocity (built into the Rhythm), Humanized Velocity (built-in Rhythm velocity + random variation), Motif Velocity (fixed velocity set in menu), and 7 assorted velocity patterns that replace the Rhythm or Motif velocity.
-
Page 37: Tempo - Key - Mode
It occurs every 4 beat but there really isn’t much of a notion of time signature in The NDLR. However, the Drone part has some cadences that pulse in 4/4, 3/4, and 5/4 which may not align with the blue beat indicator. -
Page 38: Modulation Matrix
Modulation Matrix The Mod Matrix enables routing Mod Sources to The NDLR parameters. It is spread across four menus, press the Menu button and click on encoders 1-4. Each menu has two modulation slots, one on the top and one on the bottom. Each slot has four values: Mod Source, Mod Destination, Mod Amount, & the Mod Destination’s current value. - Page 39 Random is a random value between the Destination value and the Mod Amount. The upper value is limited to the max value allowed for the Destination. SEQ (Pattern 1-40) is a value directly from the Pattern values. The values are limited to the min and max values allowed for the Destination. Chord patterns: 1-20 Scale patterns: 1-40 Chromatic patterns: 1-60...
- Page 40 Drone: POSITION, TYPE, TRIGGER, & ON/OFF Motif (1 & 2): POSITION, PATTERN LENGTH, VARIANT, PATTERN, CLOCK DIVIDE, ACCENT, RHYTHM, VELOCITY, ON/OFF, VELOCITY LOW, & HUMANIZE CC messages 1-127 – in this situation the Destination Value encoder is used to set the outbound CC message MIDI channel and port.
-
Page 41: Pattern Editor
Here are some details “behind the scenes” of how the pattern numbers map to the specific note numbers. The NDLR takes care of all the music theory and the buttons and knobs enable you to freely express. In the table below the top row are the CHORD Pattern numbers, the middle row the Note Values, assuming a C Maj triad is selected. - Page 42 Load/Save Patterns – Encoders 1 & 5 Patterns can be loaded and saved using encoders 1 and 5. The first 20 Patterns are fixed and the second 20 are writeable. To LOAD a Pattern rotate encoder 1 to select the Pattern number (1-40), then hold down the blue Shift button and press encoder 1 button.
-
Page 43: Rhythm Editor
Rhythm or Pattern lengths. The ping-pongs and random variations will also affect the note number. If a beat is a Rest it is not counted in the beats number. All of The NDLR buttons can be used while in the Rhythm editor including the Chord Degrees and Types and selecting the Motif. - Page 44 Clock Division – Encoder 6 To change the Motif’s Clock Division rotate encoder 6 (see Clock Division for more info). The Clock Division fraction (Ex. 1/4) is shown on the upper right hand side of the display in the DIV box. This box is rotated 90 degrees.
-
Page 45: Tips And Tricks
TIP: MIDI Out is NOT the same as MIDI Thru, unless there is a synth setting that say so. 3. When first getting familiar with The NDLR it’s a great idea to try only one Part (Pad, Drone, or Motif) at a time, plugged into one synth with a patch that has a very short attach and release (like a piano). - Page 46 External Clock 1. If The NDLR is set to use an external clock and there are no MIDI clock tick messages coming in from that clock, The NDLR will not play any notes. Also, notes can get stuck “on” if the MIDI clock tick messages stop while notes are playing.
-
Page 47: Appendix
Appendix A. MIDI CC (Control Change) Implementation NOTE: CC messages 75-79 (4Bh-4Fh) are used as inputs sources (#12-#16) to the Modulation Matrix GENERAL Target Range Range Description (Dec) (Hex) 0x1A Chord Degree I, II, III, IV, V ,VI, & VII 0x1B Chord Type Triad, 7... - Page 48 Target Range Range Description (Dec) (Hex) 0x1C Pad Position 1-100 0x1D Pad Strum NOT IMPLEMENTED AS of HW ver 1.0 0x1E Pad Range 1-100 0x1F Pad Spread NOT IMPLEMENTED AS of HW ver 1.0 0x33 Pad MIDI Port and 0-111 Ch1=0-6, Ch2=7-13, Ch3=14-20, Ch4=21-27, Ch5=28-34, Ch6=35-41, Channel Ch7=42-48, Ch8=49-55, Ch9=56-62, Ch10=63-69, Ch11=70-76,...
- Page 49 MOTIF 1 Target Range Range Description (Dec) (Hex) 0x23 Motif1 Position 1-10 0x24 Motif1 Pattern 1-16 Number of notes played from the Pattern starting at #1 Length 0x25 Motif1 Variation – Forward, backward, Ping-Pong, Ping-Pong (w/repeats), Odd-Even, & Pattern Play Random 0x26 Motif1 Pattern...
- Page 50 MOTIF 2 Target Range Range Description (Dec) (Hex) 0x2B Motif2 Position 1-10 0x2C Motif2 Pattern 1-16 Number of notes played from the Pattern starting at #1 Length 0x2D Motif2 Variation – Forward, backward, Ping-Pong, Ping-Pong (w/repeats), Odd-Even, & Pattern Play Random 0x2E Motif2 Pattern...
-
Page 51: Specifications
USB A to USB B connectors. The NDLR is a sophisticated MIDI controller, it does NOT make any sound on its own, it only sends MIDI messages and requires a sound module(s) to hear notes played. ... -
Page 52: A Very Basic Midi Noteon/Off Review
In order to get your NDLR (the conductor) setup, it has to be plugged into the synths with MIDI cables (the intercom) and both The NDLR’s 4 ‘parts’ and the synths need to be set to the same MIDI channels (the room numbers). -
Page 53: How The Ndlr Picks Notes
How The NDLR Picks Notes 53 | P a g e... - Page 54 54 | P a g e...
- Page 55 55 | P a g e...
Need help?
Do you have a question about the The NDLR and is the answer not in the manual?
Questions and answers