Table of Contents
Advertisement
Available languages
Available languages
Quick Links
HYDROCLEAN
®
INSTALLATION INSTRUCTIONS
VISIT OUR WEBSITE: WWW.NEXTBYDANCO.COM
to view an installation video, and get plumber's tips,
frequently asked questions and trouble shooting advice.
There are no special skills required to install this product.
If water line or toilet appear to be leaking after installation,
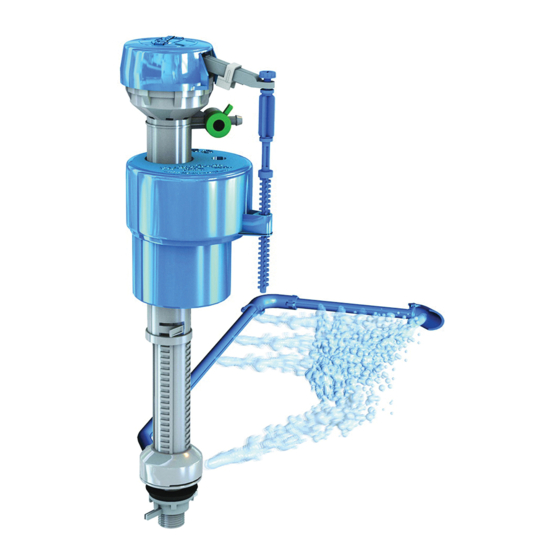
Thumb Screw
you should call a plumber immediately.
Float Lock™
NOTE: Save Instructions For Future Use
Refill Tube Port
To check for a leaky flapper, slide the
Mini-Valve
®
Float Lock to the off position after the tank
Fill Valve Float
is full of water. Do not use the toilet for 1 hour.
After the hour, recheck the water level
inside the tank. If the water level has dropped,
there is a problem with the flapper's seal.
Upper Valve Body
Whenever the main water supply to the building
Positive Locking
Mechanism
is turned off, debris can get into faucets,
aerators and toilet fill valves when the water is
Refill
turned back on. To prevent this problem,
Tube
engage HydroClean's patented Float Lock and
run the bath tub until the water is clear,
then disengage the Float Lock to fill the tank.
J-Tube Connection
Clip
Rubber Washer
Smart Nut
®
Flexible tubing may need
J-Tube
Sliding
to be cut to fit all tanks
Elbow
Flapper Installation
Limited Warranty
This Next by Danco product is warranted to be free from defective
materials and workmanship for the period of one (1) year after
initial installation unless otherwise specified in writing. Defective
1
units returned to Next by Danco will be replaced without charge.
This warranty applies only to the original purchase and installation
of Next by Danco products.
OFF
Subject to the "Exclusions" set forth below, Next by Danco
promises to the consumer to repair, or at the option of Next
by Danco to replace any part of this plumbing product which
proves to be defective in workmanship or materials under
normal use from the date of purchase. All costs of removal,
transportation and reinstallation to obtain warranty service shall
be paid by the consumer. During this Warranty, Next by Danco
will provide subject to the "Exclusions" section set forth below,
all replacement parts free of charge, necessary to correct such
defects.
EXCLUSIONS: THIS WARRANTY SHALL BE VOID IF THE PRODUCT
HAS BEEN MOVED FROM ITS INITIAL PLACE OF INSTALLATION;
IF IT IS HAS BEEN SUBJECTED TO FAULTY MAINTENANCE,
ABUSE, MISUSE, ACCIDENT, OR OTHER DAMAGES; IF IT WAS
NOT INSTALLED IN ACCORDANCE WITH NEXT BY DANCO'S
Mounting Arms
INSTRUCTIONS; OR IF IT HAS BEEN MODIFIED IN A MANNER
2
INCONSISTENT WITH THE PRODUCT AS SHIPPED BY NEXT BY
DANCO. NEXT BY DANCO SHALL NOT BE RESPONSIBLE OR
LIABLE FOR ANY DAMAGES CAUSED BY PRODUCTS THAT WERE
NOT MANUFACTURED NEXT BY DANCO OR DAMAGES CAUSED
BY IMPROPER INSTALLATION.
NEXT BY DANCO'S OPTION TO REPAIR, EXCHANGE, OR PROVIDE
A REFUND FOR THE PRODUCT UNDER THIS WARRANTY DOES
NOT COVER ANY LABOR OR OTHER COSTS OF REMOVAL OR
INSTALLATION. NEXT BY DANCO SHALL NOT BE RESPONSIBLE
FOR AND DISCLAIMS ANY LIABILITY FOR SUCH COSTS OR
FOR ANY OTHER INCIDENTAL OR CONSEQUENTIAL DAMAGES,
INCLUDING WITHOUT LIMITATION COSTS OF INSTALLATION,
WATER DAMAGE, PERSONAL INJURY, ATTRIBUTABLE TO
A PRODUCT DEFECT OR TO THE REPAIR, EXCHANGE, OR
REFUND OF A DEFECTIVE PRODUCT, ALL OF WHICH ARE
EXPRESSLY EXCLUDED FROM THIS WARRANTY. IMPLIED
WARRANTIES, INCLUDING THAT OF MERCHANTABILITY OR
Cut collar for plastic flush valve
FITNESS FOR PURPOSE INTENDED ARE EXPRESSLY LIMITED
TO THE DURATION OF THIS WARRANTY. (SOME STATES OR
PROVINCES DO NOT ALLOW THE EXCLUSION OR LIMITATION
OF IMPLIED WARRANTIES, SO THIS EXCLUSION OR LIMITATION
MAY NOT APPLY.)
4
DO NOT USE IN-TANK TOILET BOWL CLEANERS CONTAINING
BLEACH, CHLORINE, ALCOHOL OR OTHER ORGANIC SOLVENTS.
USE OF SUCH PRODUCTS WILL RESULT IN DAMAGE TO TANK
3
ON
COMPONENTS AND MAY CAUSE FLOODING AND PROPERTY
DAMAGE. USE OF SUCH PRODUCTS WILL VOID THIS WARRANTY.
This warranty gives you specific legal rights. You may have other
statutory rights that vary from state to state or from province
to province, in which case this warranty does not affect such
statutory rights.
OPTIONAL/IF APPLICABLE
This warranty does not apply to local building code compliance.
Since local code requirements vary greatly throughout the
country, Distributors, Authorized Service Representatives, Dealers,
Installation Contractors, and users of plumbing products should
determine whether there are any code restrictions applicable in
any way to the product to insure local code compliance before
installation. Next by Danco makes no representation or warranty
regarding, and shall not be responsible for, any code compliance
HC 660 E/S 02/2015
1
PLUMBER'S TIP:
Shut water off, flush toilet to empty tank
and remove old flush valve.
PLUMBER'S TIP:
6
WARNING
Our Smart Nut should only be hand tightened
and should make 1-3 audible clicks to signal
it is tight. Wings are designed to bend if the nut
DO NOT USE IN-TANK DROP-IN TOILET
is overtightened, preventing leaks and cracking.
BOWL CLEANERS. Use of such products will
RESULT IN DAMAGE to tank components and MAY
CAUSE FLOODING and PROPERTY DAMAGE and
VOID WARRANTY.
DO NOT over tighten nuts or tank/bowl may crack.
OR
11
If you have installed the HydroClean fill valve,
there's no need to turn off the water at the supply.
NOTE: Refill Tube must be positioned above the
Simply, engage the Float Lock and flush the toilet.
overflow tube. DO NOT INSERT REFILL TUBE
DOWN THE OVERFLOW PIPE. This improper
installation violates the plumbing code and
2
could result in a leak.
PLUMBER'S TIP:
Taking the time to adjust
the Mini-Valve for the
OR
proper amount of water
DO NOT cut collar for brass flush valve
added to the bowl can
make your toilet up to
30% more efficient
OR
without effecting
flushing power.
Disengage the
Float Lock
Lightly bump tab
Positive Locking
while turning the
Mechanism
Upper Valve Body
clockwise
2
3
Remove the Smart Nut at the bottom of the valve. Familiarize
Tank sizes vary; lay J-tube along back of bottom of
yourself with the Positive Lock Mechanism and not how it
tank, with Sliding Elbow in back right-hand corner,
locks the valve into position. The click means the valve is
as shown. Place Valve in tank to estimate J-tube
unlocked and the height can now be adjusted. No need to
length needed.
adjust Valve height now. HydroClean adjusts after installation.
Cap
Overflow
Tube
7
8
Lightly bump tab while turning the upper valve
Adjust the valve height so that the top of the cap is
body clockwise 1/4 turn. Then adjust the valve
even with the top of the tank. This height should
up or down to the proper height.
allow the final float adjustment to be achieved with
the Thumb Screw. Lock Valve into place by turning
Upper Body counterclockwise.
Engage Float Lock
to turn off water to the valve
Metal/Copper
Metal Flanged
Flared Tubing
Tubing
Cone
Washer
13
12
DO NOT OVERTIGHTEN. We recommend replacing
If the building's water supply was turned off, make
sure the Float Lock is engaged before attaching the
an old, rigid metal water supply line with a flexible,
water supply to the tank.
braided supply line.
DO NOT USE PLUMBER'S PUTTY TO SEAL FITTINGS.
17
16
Slowly add water to the bowl until level no longer
Use a pencil to mark 1/8˝ below the water level in
rises. Wait 2 minutes for the excess water to runoff
the bowl, then flush the toilet. If the valve is still
down the drain.
filling the bowl after the water reaches the pencil
mark, you will need to adjust the Mini-Valve to
decrease the amount of water filling the bowl.
4
5
Before attaching J-tube, adjust length by pulling
Position valve inside of tank making sure the
J-tube through Sliding Elbow if needed. For small
Rubber Washer is seated as shown.
tanks, trim connection end carefully to fit. Push
J-tube onto bottom part of valve.
Top Of Tank
1˝ min
The C.L.
Line must
be at least
1˝ above
the top of
the overflow
tube.
9
10
If the Overflow Tube has a cap, remove it and
To install Refill Tube, attach Clip to top of Overflow
discard before installing the bowl Refill Tube.
Tube. Trim Refill Tube to length to prevent kinking
and connect to Refill Tube Port.
Flexible
Float
Connector
Lock
14
15
RECOMMENDED
Turn on the water and run the bath tub water to
If water was turned off at the toilet, disengage the
flush out and debris. When water is clear, disengage
Float Lock and turn the on water supply to fill the
Float Lock to fill tank.
tank. Use the Thumb Screw to adjust the proper
water level inside the tank as indicated on the tank
or 1/2˝ to 1˝ below the Overflow Tube.
Mini-Valve
18
HydroValve ships with the Mini-Valve at the midway
open position. Turn counterclockwise to decrease
the amount of water filling the bowl, adjusting up or
down until the tank shuts off close to the same time
as water in the bowl reaches the pencil mark.
© 2015 Danco, Inc. All Rights Reserved
Valve Shank
Shank Washer
Tank Bottom
Smart Nut
Attach Refill Tube
to Refill Tube Port
Clip to top of
Overflow Tube
Thumb
Screw
2727 Chemsearch Boulevard
Irving, Texas 75062
HC660
Ph. (800) 523-5135
www.nextbydanco.com
Advertisement
Table of Contents

Summary of Contents for Next HC660 HYDROCLEAN
- Page 1 Elbow Flapper Installation Limited Warranty Thumb This Next by Danco product is warranted to be free from defective Cone Screw materials and workmanship for the period of one (1) year after Washer initial installation unless otherwise specified in writing. Defective units returned to Next by Danco will be replaced without charge.
- Page 2 Next by Danco. Manual Sujeto a las “Exclusiones” enumeradas más abajo, Next by Danco promete al cliente reparar o, a elección de Next by Danco, reemplazar APAGADO cualquier parte de este producto de plomería que presente defectos materiales o de fabricación bajo uso normal después de la fecha...
Need help?
Do you have a question about the HC660 HYDROCLEAN and is the answer not in the manual?
Questions and answers