Table of Contents
Advertisement
Quick Links
Advertisement
Table of Contents

Related Manuals for Embedded Systems LM5p-GSMC


Summary of Contents for Embedded Systems LM5p-GSMC
- Page 1 Embedded Systems SIA, VAT No LV40003411103 47. Katolu str., Riga, LV 1003, LATVIA Phone: +371 67648888, fax: +371 67205036, e-mail: sales@openrb.com LogicMachine5 Reactor GSM (LM5p-GSMC, LM5p- GSM) Product Manual Document Issue 1.0 October, 2018 Technical Support: support@openrb.com...
- Page 2 Information in this document is provided solely to enable system and software implementers to use KNX/EIB LogicMachine product. Trademarks LogicMachine is a trademark of Embedded Systems SIA. All other names and trademarks are the property of their respective owners and are hereby acknowledged. Introduction LogicMachine (LM) is your easiest way to program complex logic in KNX/EIB, Modbus, BACnet networks.
- Page 3 Caution Security advice The installation and assembly of electrical equipment may only be performed by skilled electrician. The devices must not be used in any relation with equipment that supports, directly or indirectly, human health or life or with application that can result danger of people, animals or real value Mounting advice The devices are supplied in operational status.
-
Page 4: Table Of Contents
Contents DEVICE SPECIFICATION ............................8 TERMINAL CONNECTION SCHEMES ..................... 10 2. STANDARDS SUPPORTED ..........................19 3. QUICK STARTUP GUIDE ..........................21 3.1............................21 NSERT CARD 3.2..........................23 UICK STARTUP GUIDE 3.3..........................23 ETTING UP MODEM 3.4........................24 EFAULT LOGIN PARAMETERS 3.5. - Page 5 6.2.20. Input and output functions ......................107 6.2.21. Script control functions ......................... 108 6.2.22. JSON library ..........................108 6.2.23. Conversion ............................ 109 6.2.24. Bit operators ..........................109 6.2.25. Input and Output Facilities ......................110 6.2.26. Mathematical functions ......................... 111 6.2.27. Table manipulations ........................
- Page 6 9.5........................177 EBOOT OGIC ACHINE 9.6........................177 HUTDOWN OGIC ACHINE 9.7........................177 NTERFACE CONFIGURATION 9.8........................... 179 CONNECTION 9.9............................183 STATISTICS 9.10........................... 183 NET SETTINGS 9.11............................ 185 NET OBJECTS 9.12. HTTP ............................186 SERVER 9.13.
- Page 7 OBJECT VALUE EXPORT VIA XML ...................... 261 ALERTS, ERRORS VALUES ........................263 READ ALERTS RSS FEEDS FROM LOGICMACHINE ................ 264 CLOUD SOLUTION ............................. 266 USB2.0 PORT SPECIFICATION ........................ 272 CANX CONFIGURATION .......................... 273 27.1. CAN FT ........................273 CANNING LINE 27.2.
-
Page 8: Device Specification
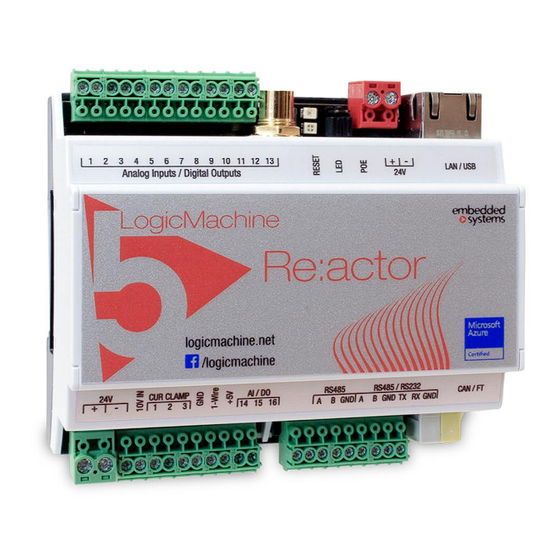
Device specification Types of product LogicMachine5 Reactor GSM Power CANx LM5p-GMSC LogicMachine5 Reactor GSM Power KNX LM5p-GMS Standards and norms compliance EMC: EN61000-6-1 EN61000-6-3 Certificate Technical data: Power supply: 2 x 24V DC on terminal connectors (1 for LM powering, 1 external relay powering) or 24V DC Passive Power-over-Ethernet Power consummation:... - Page 9 Maximum data rate 7.2Mbps downlink 5.76Mbps uplink Connections: CAN bus: Bus Connection Terminal 0.8mm2 Power supply: Screw, 5 mm2 Serial: Screw, 3.5 mm2 I/O: Screw, 3.5 mm2 1-wire Screw, 3.5 mm2 Operating elements 1 – CPU load 1 - Activity Enclosure: Material: Polyamide...
-
Page 10: Terminal Connection Schemes
1. Terminal connection schemes Model... - Page 11 Powering over Ethernet LM5 supports two powering modes: regular powering over screw terminals (Jumpers up or down) passive PoE powering over 24V DC (Jumpers down) Please note that there are two PoE types of PoE switches/adapters – passive and active (802.3af).
- Page 12 canX connection / Powering over 24V terminals...
- Page 13 RS-485 connection There can be used max two RS-485 on LM5 Lite. First one is definitive, second one is software switchable – either it works as RS-485 or as RS-232 : If it is set up as full-duplex it will operate as RS-232 and respective TX/RX/GND screw terminals should be used If it is set up as half-duplex (*) it will operate as RS-485 and respective A/B/GND screw terminals should be used...
- Page 14 RS-485/RS-232 connection If second serial port is set as full-duplex in LogicMachine configuration, it will operate as RS-232 and respective TX/RX/GND screw terminals should be used. *RS-232 is chosen in this case, RS-485 is not activated...
- Page 15 Digital output (e.g. relay/contactor)
- Page 16 Digital or Analog input (e.g. pushbutton or 0-5V current measurement sensor)
- Page 17 Digital input (e.g. pushbutton)
- Page 18 1-wire connection...
-
Page 19: Standards Supported
2. Standards supported... - Page 20 LogicMachine is compatible with the following standards: KNX/EIB TP1, KNXnet/IP CAN FT Modbus TCP, Modbus RTU Client/Server BACnet IP, Client/Server GSM/3G for Internet access; optionally for sending SMS notifications and controlling the installation by receiving SMS commands. ...
-
Page 21: Quick Startup Guide
3. Quick startup guide 3.1. Insert SIM card 1) Open front cover of the enclosure with help of screwdriver (by pushing to yourself the side edge of base cover) 2) Open MicroSIM holder by moving down the top part and lifting up... - Page 22 3) Insert SIM card and close the holder. Close the front cover...
-
Page 23: Quick Startup Guide
4) Connect 3G antenna 3.2. Quick startup guide 1) Mounting the device on DIN rail 2) Connect 24V power supply to the device (either through separate 24V crew terminals or through Passive 24V DC Power-Over-Ethernet) 3) Connect Ethernet/LAN cable coming from the PC/switch 3.3. -
Page 24: Default Login Parameters
3.4. Default login parameters Login name admin Password admin IP address 192.168.0.10 Network mask 255.255.255.0 The device can be accessed by opening web browser (Chrome, Firefox, Safari are supported) and entering IP of the device HTTP://IP Secure access to the device is available via HTTPS://IP:Port Supported web browsers: Google Chrome or Mozilla Firefox (for OS Windows), Safari (for OS X) 3.5. - Page 25 Protocol– specific protocol used for addressing o Static IP – static IP address. By default 192.168.0.10 o DHCP – use DHCP protocol to get IP configuration. Current IP– the IP address got from DHCP server. This field appears only if the IP address is given otherwise it’s hidden.
-
Page 26: Discover Logicmachine Ip Address
3.7. Discover LogicMachine IP address LM has built-in zeroconf utility by default, so using the following applications you can find out the IP: Windows PC – ServiceBrowser Linux PC – Avahi Android – ZeroConf Browser iOS – Discovery Windows PC Easiest way is by using the utility ServiceBrowser which can be downloaded here: http://marknelson.us/2011/10/25/dns-service-discovery-on-windows/... - Page 27 Android The freely available app called ZeroConf Browser, can be downloaded in Play Store: https://play.google.com/store/apps/details?id=com.grokkt.android.bonjour&hl=en iOS/Mac OS The freely available app called Discovery, can be downloaded in App Store: https://itunes.apple.com/en/app/discovery-bonjour- browser/id305441017?mt=8 For iPad install the iPhone/iPod version of the utility.
-
Page 28: Firmware Upgrade
3.8. Firmware upgrade Note! Before each upgrade please backup your visualization, scripts and object in Logic Machine Tools Backup. Note! After each upgrade, we strongly recommend to clean your browser cache. Use web browser to perform upgrade of the software of Logic Machine. Firmwares are available in a form of images and could be downloaded from support page ofwww.openrb.com. -
Page 29: Logic Machine For Knx/Eib Network Configuration Management With Ets
3.9. LogicMachine for KNX/EIB network configuration management with To use LogicMachine with KNXnet/IP functionality and program other KNX bus devices, the device should be added into ETS Connection Manager. Go to Extras Options Communication Configure interfaces ... -
Page 30: Knx And Ip Router Settings
Press Rescan button and then choose from the drop down menu found LogicMachine Press OK Back in Options Communication window select newly created interface as Communication Interface from the drop-down menu. To test the communication with ETS, press Test button. ... - Page 31 General tab Mode [ TP-UART / EIBnet IP Tunneling / EIBnet IP Tunneling(NAT mode) / EIBnet IP Routing] – KNX connection mode. LogicMachine5 has TPUART interface by default built- Note! If there is no KNX TP connected to the device, it will automatically offer to switch to KNXnet/IP mode.
- Page 32 Apply filter to tunneling – either to apply filter policy to telegrams in tunneling mode. If ETS is used it is recommended to turn this feature off. SRC policy [No filter / Accept selected individual addresses / Drop selected individual addresses]–...
- Page 33 TP > IP filter Filtering table for telegrams going from KNX TP1 to IP network is located in this submenu. Apply filter to virtual objects – either to apply filter policy to objects added in Objects tab as virtual objects without attraction to bus ...
-
Page 34: Security Notes For Logicmachine Installation
DST group policy [No filter / Accept selected group addresses / Drop selected group addresses]– policy to apply to the list of destination group addresses Group address list – list of group addresses. One address/range per line. Use * (e.g. 1/1/*) to filter all addresses in the given line. -
Page 35: Quick Guide - Mosaic Application For Easy Visualization
8. If FTP is used, use SSL/TLS . Also, change default FTP/APPs password in System config -> Services -> FTP server 9. If communication between several LMs is required in one building: By default KNXnet/IP communication is unsecure. If you have any doubts about security of your LAN, enable secure communication and specify encryption key in System config - >... - Page 37 For example, entering one of room, you see the following view There are also Control Type shortcuts on the left side by clicking on Settings button In Settings you can also change skin of the visualization...
- Page 38 Advanced visualization with more widgets is planned to be available for fixed monthly developers fee. Building structure / Editor Mode On the bottom panel you can set up your building structure by adding new rooms onto it. This panel is also designed to navigation by rooms for end-users. Just click on Add new room, then type a title for it and press "enter".
- Page 39 Now you can set a title for this widget and link KNX objects to widget's controls. After you've set up a widget click on the "Add this widget" button. Well done, the widget on the screen. Right-click on it to see/edit it's properties or delete the widget.
-
Page 40: Quick Guide - Create Visualization For Ipad/Pc
Notifications There is a special Messages field in Client mode where you can send specific notifications or alerts. Use storage name mosaic-message to write notifications. Custom widgets Here you can download Mosaic custom widget creation manual: http://openrb.com/wp- content/uploads/2016/11/Mosaic_widgets_eng.pdf Here you can download couple of custom widgets examples together with the instruction on how to install them: http://forum.logicmachine.net/showthread.php?tid=122&pid=2651#pid2651 3.13. - Page 41 Or connect LM to the bus and it will detect objects automatically (in yellow) in Objects tab once they are activated. Objects can be added manually as well. Prepare graphics Either in Adobe Illustrator or any ready images can be used. In this example we use professionally created designs in Illustrator in SVG form (so we can do scaling depending of the screen size and not losing the quality)
- Page 42 a) basic background which can be changed by necessity b) foreground which will stay unchanged...
- Page 43 Add both files in Logic Machine Vis. Graphics Images/Backgrounds Prepare set of icons (preferably in SVG form) and add them in Logic Machine Vis. Graphics Icons. Or you can use icons predefined in LogicMachine by default. Create “floor”...
- Page 44 In Logic Machine Vis.structure menu the structure of the visualization is defined and visualization backgrounds are uploaded. Use icon to add floor. In this example we will create a new floor named “1_page_H” and “Bathroom_H”. First Floor will be a dashboard with link to other rooms and functions. Choose screen resolution for which you are creating this visualization, choose first and second background images from the ones added before.
- Page 45 Add objects to newly created visualization map After the building and floor structure is defined, it is visualized in Visualization tab. Controlled and monitored objects can be added and managed in this section. Both side bars can be minimized by pressing on left/right arrow icon making the map more visible especially on small displays.
- Page 46 Objects can be added to the map by clicking on Unlock current floor plan for editing button. In this example we are creating first page of visualization which will link to other Floors with specific object control. Add link by clicking on Link tab, choosing specific icon, scale it and place in desired location.
- Page 47 Launching visualization on touch device (iPad in this case) Make sure your iPad is connected wirelessly to the Logic Machine In the browser enter Logic Machine’s IP (default 192.168.0.10). Click on the User mode visualization Save the application as permanent/shortcut in your iPad Touch visualization is also automatically created with list of Floor objects.
-
Page 49: Graphical User Interface Login
4. Graphical User Interface Login KNX/EIB LogicMachine has IP address 192.168.0.10 set by default to LAN interface. Use this address as www address in the browser's address field. Note! Make sure that the PC connecting to the LogicMachine has IP set from the same subnet. After successful login a default page appears. -
Page 50: Customize Background / Language
First screen of the interface is a constructor of applications – you can change applications which you see on specific device, change background color, install or remove apps, sort order etc. Note that the mentioned settings are individual for each device you are connecting from. 4.1. -
Page 51: Find Applications
After you choose the style, the interface is automatically set to chosen background 4.2. Find applications By clicking on the zoom icon on the left top corner, you can quickly find applications containing search phrase. -
Page 52: Unlock The Screen For Sorting Order And Hiding Apps
4.3. Unlock the screen for sorting order and hiding apps Sorting the order of applications is available when the screen is unlocked. Press Unlock icon for this purpose If you press Visibility icon you will be able to hide/unhide apps from main screen. This setting can be disabled by admin. -
Page 53: Admin Mode: Adding/Removing/Administering Apps
4.4. Admin mode: adding/removing/administering apps Enter admin mode by clicking on Admin icon and entering the password. Password admin Change admin password Once in admin mode, click on Settings icon and press Change admin password button. Another setting here is Allow users to show/hide apps which will enable/disable the possibility to show or hide apps for end-users as shown in 4.3. - Page 54 On the default App management page you see available applications. You can add the App to your first screen by clicking on Install button and approve the choice The installed Apps will appear then in Installed section where you can uninstall them by necessity.
- Page 55 You can install the app also from the file, by clicking on Install from file entry To update app click on respective Update icon or from main administration screen – on the following icon: By pressing on this icon you will be redirected to initial front page. Exit admin mode Click icon to exit admin mode.
-
Page 56: Application Development
5. Application development Available libraries/frameworks jQuery v2 (http://jquery.com/) • Bootstrap v3 (http://getbootstrap.com) • Font Awesome v4 (http://fontawesome.io) • Bootstrap comes without Glyphicons, use Font Awesome instead. Base directory structure /data – apps and widgets are stored here, accessible at http://IP/apps/data/ •... - Page 57 rows) on widget element. Width formula: cols * 110 – 10, height formula: rows * 110 – 10 Example Clock widget which takes double width/height and places SVG image which fills all available space inside of widget container: (function() { // get widget element and set double width/height var el = $('#clock').setWidgetSize(2, 2);...
- Page 58 Example (config.html) Create a simple for element with single numeric input which accepts values in 0..100 range <form id="myapp-config"> <div class="form-group"> <label for="myapp-input">Numberic input</label> <input type="number" name="input" id="myapp-input" class="form-control" min="0" max="100"> </div> </form> <script> (function() { var el = $('#myapp-config') // form element , input = $('#myapp-input');...
- Page 59 localStorage wrapper functions localStorage allows saving client-side configuration. Several functions are provided to safely execute localStorage functions, as they might fail is some cases like private mode on iOS. It also allows storing any values that can be serialized using JSON.stringify. storeSet(key, value) –...
- Page 60 Translation $.i18n.lang – current language or undefined if default language is used • $.i18n.add(ns, dictionary) – adds translations to current dictionary, ns must be a unique • application name $.i18n.translate(key, default, vars) or $.tr(key, default, vars) – translates a given key or •...
- Page 61 LP scripts Allows mixing HTML and Lua inside a single file, Lua chunks must be enclosed in <? ?> tags, closing tag at the end of the document is not required. Example Print current date <!DOCTYPE html> <html> <body>Current date is <? write(os.date()) ?></body> </html>...
- Page 62 <? for j = 1, size do ?> <td><? write(i * j) ?></td> <? end ?> </tr> <? end ?> </table> </body> </html> Full Lua function reference manual is available at: http://openrb.com/docs/lua.htm Object functions Most functions use alias parameter — either object group address or object name. (e.g. '1/1/1' or 'My object') Finding single/multiple objects grp.find(alias)
- Page 63 included. If exact data type match is required, set strict to true. grp.all() Returns a table with all known objects. Helpers grp.alias(alias) Converts group address to object name or name to address. Returns nil when object cannot be found. grp.getvalue(alias) Returns value for given alias or nil when object cannot be found.
- Page 64 Removes all tags for given alias. grp.settags(alias, tags) Overwrites all tags for given alias. Tags parameter can be either a string (single tags) or Lua table consisting of strings (multiple tags) Object creation and modification grp.setcomment(alias, comment) Sets comment field for given alias grp.create(config) Creates a new or overwrites an existing object based on provided config, which must be a Lua table.
- Page 65 address = grp.create({ datatype = dt.bool, name = 'My second object', Database functions SQLite v3 is used as the database engine. Note: Database tables must be prefixed with unique application name to minimize collisions between different applications. Core functions db:execute(query) – executes given query, return value can be either a database cursor •...
- Page 66 Examples -- Query parameter replacement db:query('UPDATE table SET field=? WHERE id=?', 'test', 42) -- Same as INSERT INTO table (id, value) VALUES (42, 'test') db:insert('table', { id = 42, value = 'test', -- Same as UPDATE table SET value='test' WHERE id=42 db:update('table', { value = 'test' }, { id = 42 }) -- Same as DELETE FROM table WHERE id=42 db:delete('table', { id = 42 })
-
Page 67: Logicmachine Configuration
6. LogicMachine configuration Login Password admin admin This is a home directory for LogicMachine configuration management. The main menu consists of the following menus: Reactor – LM Reactor specific IO settings Scripting – scripting repository management Objects– KNX bus object management ... -
Page 68: Reactor
6.1. Reactor Reactor IO configuration and mapping to KNX is done under Reactor tab. No additional software is needed to configure KNX mapping of IO ports. 6.1.1. Universal input/output You can set up Universal I/O port as binary output, voltage input, binary ON/OFF input, binary SHORT/LONG input, Step dimmer 1 byte, Relative dimmer 4 bit, Pulse meter and Frequency meter. -
Page 69: Output: Binary
6.1.2. Output: Binary Name – name of the port Link to object – group address to link the object with. By pressing the button, the field will be automatically filled with the next free group address. You can add up to 6 objects to one output. -
Page 70: Input: Voltage
6.1.3. Input: Voltage Name – name of the port Link to object – group address to link the object with. By pressing the button, the field will be automatically filled with the next free group address Lock object – lock object group address ... -
Page 71: Input: Binary: On/Off
6.1.4. Input: Binary: On/Off Name – name of the port Link to object – group address to link the object with. By pressing the button, the field will be automatically filled with the next free group address. Lock object – lock object group address ... -
Page 72: Input: Binary: Short/Long
6.1.5. Input: Binary: Short/Long Name – name of the port Short press object – group address to link the object with on short press. By pressing the button, the field will be automatically filled with the next free group address. ... -
Page 73: Input: Step Dimmer (1 Byte)
6.1.6. Input: Step dimmer (1 byte) Name – name of the port Link to object – group address to link the object with. By pressing the button, the field will be automatically filled with the next free group address. ... -
Page 74: Input: Relative Dimmer (4 Bit)
6.1.7. Input: Relative dimmer (4 bit) Name – name of the port Short press object – group address to link the object with on short press. By pressing button, the field will be automatically filled with the next free group address. ... -
Page 75: Input: Pulse Meter
6.1.8. Input: Pulse meter Name – name of the port Link to object – group address to link the object with. By pressing the button, the field will be automatically filled with the next free group address. Lock object – lock object group address ... -
Page 76: Input: Frequency
6.1.9. Input: Frequency Name – name of the port Link to object – group address to link the object with. By pressing the button, the field will be automatically filled with the next free group address. Lock object – lock object group address ... -
Page 77: Voltage Input
6.1.10. Voltage input Name – name of the port Link to object – group address to link the object with. By pressing the button, the field will be automatically filled with the next free group address Lock object – lock object group address ... -
Page 78: Current Clamp Input
6.1.11. Current clamp input Name – name of the port Link to object – group address to link the object with. By pressing the button, the field will be automatically filled with the next free group address. You can add up to 6 group addresses to one output. -
Page 79: Scripting
6.2. Scripting Scripting menu allows adding and managing various scripts, depending on the type of the script. There are two ways to program logics – FB (functional blocks) and via Lua programming language. Most of the Lua language aspects are covered in the first edition of "Programming in Lua"... -
Page 80: Functional Blocks (Fb) App
6.2.1. Functional Blocks (FB) app FB (Function blocks) editor allow easy, PLC like approach to programming based on IEC 61499(event execution) and on IEC61131(cyclic execution) standard. FB editor allows of mixing both standards on single diagram. Menu Diagrams – All logic diagrams are created here. Name of diagram must be unique ... - Page 81 FB editor basic controls Undo – undo last change Redo – redo last change Clear and New – delete all function blocks in diagram Print – print current diagram Zoom in – enlarge view Zoom out – reduce view ...
- Page 82 Adding new function block to the diagram Left click on selected function block to be added to the working space. When added, element need to be assigned /set. Clicking on element will open Properties dialog window on the right side. Sample: Description of Address Function block changed from “Address”...
- Page 83 Add timer function block Timer block represent old IEC61131(cyclic execution) standard. Select required block and set event to TIMER Set block properties as required and press apply. Select Timer from Event Elements and link output to timer input of your block...
- Page 84 Set timer properties to requires cycle frequency and press Show and generate. Logic will run every X seconds set in timer properties. In this example every 10 seconds. If no error generated script will be shown. Errors are highlighted with red mark around the block.
- Page 85 Add event function block Event block represent new IEC61499 standard. Select required block and set event to EVENT Event block must use Event element to trigger at last one of the inputs. Select show for each input which should trigger the logic when its value will change. ...
- Page 86 Select Address from Event Elements and select its object. Elements can be duplicated for quicker multiplication Link Address to desired input. Orange lines represent event signals Press show and generate to save and generate the logic. Created script will be displayed.
- Page 87 Linking blocks together There are 2 ways of linking blocks together: Via storage Via event object To link two blocks via storage, add a block and leave output without object and select Show, Press Apply to save changes. Add second block and leave one of the inputs without object and select Show.
- Page 88 Link output with input. Grey link is automatically generated storage. As this link is grey it will not trigger the second block. To link two blocks with event object fallow the same actions only select object on output of the block and change the second block to run as Event.
- Page 89 Select yes and both block will be linked via orange line. Telegram received on the output object will trigger logic in second block. Creation of custom blocks Description In the same way as puzzle programming FB editor will use user libraries to import new logic blocks.
- Page 90 return result, not result Input definition Input1 [object] - Input 1 = grp.getvalue('object') Input2 [storage] – Input2 = storage.get('storage') Input3 [object:find] – Input3 = grp.find('object') Input4 [tag] – Input4 = tag Input5 [tag:find] - Input5 = grp.tag('tag') Input6 [value] – Input6 = value Input7 [value:atext|12|true|false] –...
-
Page 91: Adding A New Script In Scripting Tab
6.2.2. Adding a new script in Scripting tab Click on Add new script button on the bottom part of the Event-based, Resident or Scheduled submenus The following fields should be filled when adding a new script: Event-based Script name – the name of the script ... - Page 92 Category – a new or existing name of the category the script will be included. This will not affect on script action, helps only by grouping the scripts and watching by categories in script listings page Description– description of the script Resident ...
-
Page 93: Event-Based Scripting
Script name – the name of the script Minute – Minute Hour – Hour Day of the month – Day of the month Month of the year – Month of the year Day of the week – Day of the week ... -
Page 94: Resident Scripting
dataraw (integer/string) — raw binary data datahex (string) — data as a hex-encoded string which can be used to convert value to Lua variable Note! event variable is available only in Event-based functions, not in Resident and Scheduled. Note! All event-based scripts are executed in a single queue-like manner. -
Page 95: Script Editor
6.2.6. Script editor When a script is added icon appears in Editor column that allows opening a script in scripting editor and re-working it with built-in code snippets. The idea is that not knowing the syntaxes you get a helper for writing your own scripts. Code snippets save also a time and make the coding much more convenient. -
Page 96: Object Functions
There is a special section in scripting editor which allows quickly find functions, objects or tags by name and storage variables. There is also a code shortcut button, which helps with most common function structure. There are also following helpful button in the script editor, which allows quickly access Error Logs, Test the script, Enable or disable it. -
Page 97: Returned Object Functions, Group Communication Functions
Most functions use alias parameter — object group address or unique object name. (e.g. '1/1/1' or 'My object') grp.getvalue(alias) Returns value for the given alias or Lua when object cannot be found. grp.find(alias) Returns single object for the given alias. Object value will be decoded automatically only if the data type has been specified in the 'Objects' module. -
Page 98: Group Communication Functions
object:response(value, datatype) Similar to object:write. Sends group response request to object's group address. object:read() Sends group read request to object's group address. Note: this function returns immediately and cannot be used to return the result of read request. Use event-based script instead. object:update(value, datatype) Similar to object:write, but does not send... -
Page 99: Data Type Functions, Data Types
-- verify that the requested object was found myobject then 4. myobject:write(52.12, dt.float16)-- explicitly set data type to dt.float16 (2-byte floating point) Switch all binary objects tagged 'lights' off. 1. lights =grp.tag('lights') lights:write(false) Group write to the specified group address and data type. 1. -
Page 100: Data Storage Function
o hour — number (0-23) o minute — number (0-59) o second — number (0-59) 3 byte date - dt.date — table with the following items: o day — number (1-31) o month — number (1-12) o year — number (1990-2089) ... -
Page 101: Alert Function
testfn=function(t) return 4. result =storage.set('my_stored_value_2', testfn)-- this will result in an error The following examples shows the basic syntax of storage.get. Assuming that key value was not found, first call will return while second call will return number which was specified as a default value. -
Page 102: Log Function
6.2.15. Log function log(var1, [var2, [var3, ...]]) Converts variables to human-readable form and stores them in the main database. All items are accessible in the "Logs" module. Example -- log function accepts Lua nil, boolean, number and table (up to 5 nested levels) type variables 2. -
Page 103: Data Serialization
6.2.18. Data Serialization serialize.encode (value) Generates a storable representation of a value. serialize.decode (value) Creates a Lua value from a stored representation. 6.2.19. String functions This library provides generic functions for string manipulation, such as finding and extracting substrings, and pattern matching. When indexing a string in Lua, the first character is at position 1 (not at 0, as in C). - Page 104 string.format (formatstring, ···) Returns a formatted version of its variable number of arguments following the description given in its first argument (which must be a string). The format string follows the same rules as the printf family of standard C functions. The only differences are that the options/modifiers *, l, L, n, p, and h are not supported and that there is an extra option, q.
- Page 105 If repl is a function, then this function is called every time a match occurs, with all captured substrings passed as arguments, in order; if the pattern specifies no captures, then the whole match is passed as a sole argument. If the value returned by the table query or by the function call is a string or a number, then it is used as the replacement string;...
- Page 106 particular, the callstring.sub(s,1,j) returns a prefix of s with length j, and string.sub(s, -i) returns a suffix of s with length i. string.upper (s) Receives a string and returns a copy of this string with all lowercase letters changed to uppercase.
-
Page 107: Input And Output Functions
• a single character class followed by '+', which matches 1 or more repetitions of characters in the class. These repetition items will always match the longest possible sequence; • a single character class followed by '-', which also matches 0 or more repetitions of characters in the class. -
Page 108: Script Control Functions
1. value knxdatatype.decode(event.datahex, dt.bool) 2. data =string.format('%s value is %s', os.date('%c'), tostring(value)) -- write to the end of log file preserving all previous data 4. file =io.open('/mnt/usb/log.txt', 'a+') 5. file:write(data .. '\r\n') file:close() Output: Mon Jan 3 05:25:13 2011 value is false Mon Jan 3 05:25:14 2011 value is true Mon Jan 3 05:25:32 2011 value is false Mon Jan 3 05:25:33 2011 value is true... -
Page 109: Conversion
Converts Lua variable to JSON string. Script execution is stopped in case of an error. json.pencode (value) Converts Lua variable to JSON string in protected mode, returns nil on error. json.decode (value) Converts JSON string to Lua variable. Script execution is stopped in case of an error. json.pdecode (value) Converts JSON string to Lua variable in protected mode, returns nil on error. -
Page 110: Input And Output Facilities
bit.band (x1 [, x2...]) Binary and between any number of variables bit.bor (x1 [, x2...]) Binary and between any number of variables bit.bxor (x1 [, x2...]) Binary and between any number of variables bit.lshift (value, shift) Left binary shift bit.rshift (value, shift) Right binary shift 6.2.25. -
Page 111: Mathematical Functions
will iterate over all lines of the file. When the iterator function detects the end of file, it returns nil (to finishthe loop) and automatically closes the file. The call io.lines() (with no file name) is equivalent to io.input():lines(); that is, it iterates over the lines of the default input file. - Page 112 Returns the cosine of x (assumed to be in radians). math.cosh (x) Returns the hyperbolic cosine of x. math.deg (x) Returns the angle x (given in radians) in degrees. math.exp (x) Returns the value math.floor (x) Returns the largest integer smaller than or equal to x. math.fmod (x, y) Returns the remainder of the division of x by y that rounds the quotient towards zero.
-
Page 113: Table Manipulations
math.random ([m [, n]]) This function is an interface to the simple pseudo-random generator function rand provided by ANSI C. (No guarantees can be given for its statistical properties.) When called without arguments, returns a uniform pseudo-random real number in the range [0,1). -
Page 114: Operating System Facilities
Returns the largest positive numerical index of the given table, or zero if the table has no positive numerical indices. (To do its job this function does a linear traversal of the whole table.) table.remove (table [, pos]) Removes from table the element at position pos, shifting down other elements to close the space, if necessary. - Page 115 Returns the value of the process environment variable varname, or nil if the variable is not defined. os.remove (filename) Deletes the file or directory with the given name. Directories must be empty to be removed. If this function fails, it returns nil, plus a string describing the error. os.rename (oldname, newname) Renames file or directory named oldname to newname.
-
Page 116: Extended Function Library
6.2.29. Extended function library toboolean(value) Converts given value boolean using following rules: nil, boolean false, 0, empty string, '0' string are treated as false, everything else as true string.split(str, sep) Splits the given string into chunks by the given separator. Returns Lua table. knxlib.decodeia(indaddressa, indaddressb) Converts binary-encoded individual address to Lua string. -
Page 117: User Libraries
Tries to convert its argument to a number. If the argument is already a number or a string convertible to a number, then tonumber returns this number; otherwise, it returns nil. An optional argument specifies the base to interpret the numeral. The base may be any integer between 2and 36, inclusive. -
Page 118: Common Functions
Secure the code There is an option keep source available for user libraries. Once disabled, the code is compiled in the binary form and can’t be seen for further editing. If this option is enabled, the source code is seen in the editor. Auto load library means that the library will be automatically loaded so you don’t have to use require when writing scripts. -
Page 119: Tools
6.2.33. Tools Export helpers – export scripting helpers Import helpers – import scripting helpers Restore helpers – restore default scripting helpers Backup user scripts – backup all scripts in *.gz file Restore from archive – restore script from archive (*.gz) file with two possibilities: o Remove existing scripts and import from backup o Append keeping existing (s) scripts... - Page 120 Show logs window – show logs in separate window Edit custom JavaScript...
-
Page 121: Objects
With custom JavaScripts it is possible to create different dynamic tasks, like detect short/long press from visualization using one icon or we can open specific Floor/Plan when some grp address is triggered - useful e.g. when you want IP Camera page automatically to be opened when Intercom button is pressed: $(function(){ if (typeof objectStore !== 'undefined') {... -
Page 122: Object Parameters
6.3.1. Object parameters To change the settings for existing or new objects, press on the specific list entry. Object name – Name for the object Group address – Group address of this object Data type – KNX data type for the object. This has to be set once the LM sniffs the new object for proper work. - Page 123 In Visulization Parameters you can do the following settings for the object: Send after each color pick – specifies either to send the telegram automatically into KNX bus once the color is selected in color picker. Number of presets to show – count of predefined presets in color picker in Visualization Preset 1..6 –...
- Page 124 When you add the object with RGB color data type in the Visualization, the color picker with predefined colors appears.
-
Page 125: Object Visualization Parameters
6.3.3. Object visualization parameters By pressing on the button of the corresponding object you can set specific visualization parameters for this type of object. 1 bit Control type – type of the visual control element which will appear in Touch Visualization o Toggle o Checkbox... - Page 126 o Slider inimum value – minimum value on the slider aximum value – maximum value on the slider Step – step for one slider movement Vertical slider – special option for Usermode visualization Invert vertical slider – invert vertical slider so the maximum is on top o Direct input / Step +/-...
- Page 127 Minimum value – minimum value on the control bar Maximum value – maximum value on the control bar Step – step for one position change o Circular slider Minimum value – minimum value on the control bar ...
- Page 128 o Custom value select – select from list of custom values. Custom values should be defined Show icons in Usermode – show icons instead of values for the object in visualization. You will be able to choose from defined icons/custom values.
-
Page 129: Change The Object State
6.3.4. Change the object state In the object list, by pressing on the button, you can change the state of the object. The appearance of the New value depends on what visualization parameters are set for specific object. 6.3.5. Custom values If special value naming is necessary, use this icon to set it up (only for Boolean and Integer data types) - Page 130 Clear – Clear the list of group addresses Next/Previous page – move to next or previous page Refresh – refresh the object list Mass edit – mass edit objects by a specific criteria – object properties, visualization parameters or custom values.
-
Page 131: Filter Objects
Memory – memory usage in % KNX/IP / KNX/TP – type of connection to KNX bus. If KNX/TP is set and it is not available, there will be error notification Sync project data – save all project data to internal flash by pressing this button. Otherwise the data is saved once in 30 minutes from RAM to Flash, or when Reboot or Shutdown commands are sent ... -
Page 132: Object Logs
6.4. Object logs Object historical telegrams are available in Object logs. Once logging is enabled for object, all it’s further history will be logged. Filtering is available when there is a need to find specific period information Start date – start date and time for log filtering ... -
Page 133: Export Logs
6.4.1. Export logs Example Once an hour, make CSV file with all objects logs and send to external FTP server with IP 192.168.1.11, login ‘ftplogin‘, password ‘ftppassword‘. In Scripting -> Scheduled add the script which will run once an hour ... - Page 134 -- csv buffer 21. buffer ={'"date","address","name","value"'} -- get object logs query='SELECT src, address, datahex, logtime, eventtype FROM objectlog WHERE logtime>= ? ORDER BY id DESC' _, row ipairs(db:getall(query, logtime))do object = objects[tonumber(row.address)] -- found matching object and event type is group write object row.eventtype=='write' then...
-
Page 135: Schedulers
-- error while uploading then alert('FTP upload failed: %s', err) 6.5. Schedulers Schedulers contain administration of user mode schedulers. Schedulers allow for end user to control KNX group address values based on the date or day of the week. 6.5.1. Add new scheduler ... - Page 136 Event can be added both in administrator interface as well as by end user in the special User mode schedulers interface. Active – Defines the Event to be active or not. Name – name of the Event Run at – Even could be triggered by specific time, sunrise or sunset. ...
-
Page 137: Scheduler Holidays
6.5.3. Scheduler holidays Once the event will be marked to run in Hol, Holiday entries will be activated. Name – name of Holidays Holiday type – type of Holidays, specific date or Day in the week can be selected ... -
Page 138: Add New Trend Log
6.6.1. Add new trend log Object – choose from list of object the one to make trends for Name – name of the trend Log type [Counter, Counter with negative delta, Absolute value] – type of the log. Counter type is used to count the date, Absolute value –... -
Page 139: Direct Link
6.6.2. Direct link To get direct link to a specific trend log click on Direct link button on bottom left part. 6.6.3. Trend logs functions To process logged information in trends, you can use built in trend log functions from scripting. Include library before calling trend log functions: require('trends') Include library before calling trend log functions... -
Page 140: Scenes
dates = { ['start'] = { year = 2016, month = 4, day = 15 }, ['end'] = { year = 2016, month = 4, day = 16 }, -- fetch current value day = trends.fetchone('Gas', dates) -- get data for the past year dates = {} dates['start'] = os.date('*t') dates['start'].year = dates['start'].year - 1... - Page 141 Name – scene name Scene is active – define either this scene is active or not Trigger object – group address for scene trigger object Trigger value – scene object trigger value...
-
Page 142: Visualization Structure
Scene sequence List of object and the sequence is defined here. Object – group address Write to bus – define either to send KNX bus telegram 6.8. Visualization structure In Vis.structure menu the structure of the visualization is defined and visualization backgrounds are uploaded. -
Page 143: Levels / Plans
6.8.1. Levels / Plans By default there is Main level added. To add a new level/building, press “Add new level” button. Please note that you can limit access to this specific level by adding PIN code. You can also add a new level by importing it from the file (which is exported on other LM for example). - Page 144 Parent – name of parent level Name – name for the plan Plan size – plan size in pixels. There are predefined resolutions available when clicking on the icon on the right size of this parameter: Layout – layout for this specific plan. All object from Layout will be duplicated on this particular plan including background color and plan image if they are not defined separately for this specific plan ...
-
Page 145: Layouts / Widgets
PIN code – specify PIN code to access the plan Primary background image – choose primary background image from the list added in Vis.graphics Images/Backgrounds Secondary background image – choose secondary background image from the list ... - Page 146 Layouts will not be visible from the Usermode/Touch visualizations. When you add any background, objects to layouts level in Visualization, they will automatically appear on all linked Levels. Parent – name of parent layout Name – name for the layout ...
- Page 147 Parent – name of parent widget Name – name for the widget Plan size – plan size in pixels. There are predefined resolutions available when clicking on the icon on the right size of this parameter Widget position – default position of the widget on the screen ...
- Page 148 When you have added necessary objects to the widget, you can choose it when adding objects for main Levels e.g. Bedroom in Main level.
-
Page 149: Visualization
Once added, you can try out the widget in Usermode visualization by clicking on added object (temperature sensor icon on the left), the widget appears on click. 6.9. Visualization After the building and floor structure is defined in Vis.structure tab, it is visualized in Visualization tab. -
Page 150: Object
Image – Add specific image on the visualization Frame – add frame object to the visualization Gauge – Metering gauge Camera – IP web camera integration into visualization Graph – Real-time graph to monitor value of scale-type objects While in editing mode, on the left side you can change plan resolution on the fly When some object is selected and in the editing mode, there appears Delete / Duplicate buttons so you can either delete or copy the object... - Page 151 Visualization parameters Defines global or local visualization parameter for specific group address.
-
Page 152: Link
Global (per-object) parameters – specify type of visualization parameter for this specific group address as seen in point 6.2.3. Once specified as global, the same visualization parameter will be used with this group address. Local (per-element) parameters – specify type of visualization parameter for this specific group address for this specific element as seen in point 6.2.3. -
Page 153: Text Label
Link to – Linked plan name or link to Schedulers / Trends or External Link (use the link in form http://www.openrb.com) Custom name – name for the link Hide in touch – do not show this object in Touch Visualization ... -
Page 154: Image
Text – label text Font size – label font size Text style – style of the text – bold, italic, underscored Custom font – font name Font color– label font color Additional classes – additional CSS classes for the element Once the label parameters are defined, press Add to plan button and newly created object will appear on the map. -
Page 155: Frame
Image source [Local; Remote] – image source location Source url / Select image – Source URL of the image or image from local database Image size – width and height of the image External link – external link URL when pressing on the image ... - Page 156 Additional classes – additional CSS classes for the element...
-
Page 157: Gauge
6.9.7. Gauge Gauge allows visualizing and changing object value in the gauge. Data object – KNX group address Gauge size – size of the gauge Custom name – custom name for the object Read only – make the gauge read only ... - Page 158 Source url – source address of the video stream Window size – size of the window of camera picture Custom name – name for the object Icon – icon for the object Auto open window – automatically open video window, otherwise it is launched by click on the icon ...
-
Page 159: Graph
6.9.9. Graph Real-time graphs can be integrated into visualization system to monitor the current and old value of scale-type objects. Make sure logging is enabled for the object in Object tab which values is planned to be shown in the graph. ... - Page 160 Number of points – number of data points to show in the graph Auto open window – graph window is automatically opened Hide background – hide icon background Additional classes – additional CSS classes for the element Once the graph parameters are defined, press Add to plan button and newly created object will appear.
-
Page 161: Vis.graphics
6.10. Vis.graphics The list of predefined icons, list of images and backgrounds is available in Vis.graphics tab. Press on Add icons button to add a new entry. The system accepts any size icons. GIF is also supported. Name (optional) – the name of the icon ... - Page 162 In Fonts tab you can add custom fonts In Custom CSS tab you can add your CSS style for the visualization which you can use when adding elements into visualization, so any elements of Look and Feel is customizable with this solution.
-
Page 163: Utilities
6.11. Utilities There are following utilities in the tab available: Import ESF file– imports ETS object file. It will be necessary to set correct data types for some imported objects. Existing objects will not be overwritten. Objects with the same name are considered duplicates and might not be imported Import neighbours –... - Page 164 Factory reset– delete all configuration and return to factory defaults Date and time – data and time settings Install updates – install LogicMachine update file *.lmu. LogicMachine will reboot after successful update Backup – backup all objects, logs, scripts, visualization. Restore–...
- Page 165 General Configuration – system general settings Interface language – interface language Automatic address range start – start group address when using automatic addressing in scripts, IO settings and other Discover new objects– either KNX object sniffer is enabled. If yes, once triggered all new objects will appear automatically in the Objects list ...
- Page 166 Warning! Excessive object logging degrades LogicMachine performance. Please follow this example to store logs on local FTP or automatically export to external FTP server: http://openrb.com/example-export-last-hour-csv-object-log-file-to-external-ftp-server-from- lm2/ Vis. Configuration – visualization specific settings Usermode sidebar [Show docked, Show as overlay (auto-hide), Hide (fullscreen mode] –...
-
Page 167: User Access
Disable object click animation – disable object click animation Dim inactive visualization after – define time in minutes after which the screen will be dimmed where visualization is opened Dim level – dim level for the display ... - Page 168 Disable password for Visualization – disable password access for visualization Enable password for Apps – enable password to enter the initial Apps screen of LogicMachine (when entering http://IP in the web-browser) Enable password for User directory – enable password access for User directory ...
- Page 169 Name – name of the user Login – login name Password – password Repeat password – repeat password Visualization access [None, Partial, Full] – type of Visualization access Schedulers access [None, Partial, Full] – type of Schedulers access ...
-
Page 170: Alerts
Access logs Shows a list of access logs 6.13. Alerts In Alert tab a list of alert messages defined with alert function in scripts is located. The messages are stored on the compact flash. Information on system start and KNX connection status messages are also automatically displayed in this window. -
Page 171: Error Log
temperature > then -- resulting message: 'Temperature levels are too high: 25.3' alert('Temperature level is too high: %.1f', temperature) 6.14. Error log Error messages from scripts are displayed in Error log tab. 6.15. Logs Logs can be used for scripting code debugging. The log messages appear defined by log function. -
Page 172: User Mode Visualization
7. User mode visualization User mode visualization contains created visualization maps. A password and users to access specific visualization maps can be created in Logic Machine --> User access... -
Page 173: Custom Design Usermode Visualization
7.1. Custom design Usermode visualization Through Custom CSS styles it is possible to create different type of visualization maps. Custom CSS can be done in Vis. Graphics Edit custom CSS tab. For more information of CSS examples please see our user forum: http://forum.logicmachine.net/... -
Page 174: Touch Visualization
8. Touch visualization Touch visualization is designed for iPhone/iPod/iPad/Android touch screen devices. All objects which are added in Logic Machine configuration by default are visible in touch visualization (if there is no Hide in touch option enabled). The main window is Building view where you can choose which Floor from which Building to control. -
Page 175: System Configuration
9. System configuration System configuration allows managing router functionality on KNX/EIB LogicMachine as well as do access control management, upgrade firmware, see network and system status and others. Login Password admin admin 9.1. Hostname Hostname can be change in System Hostname. -
Page 176: Changing Admin Password
9.2. Changing Admin password The admin password configuration window is located in System Admin access. 9.3. Packages System Packages shows the packages installed in the system. You can add new packaged by pressing on + 9.4. Upgrade firmware ... -
Page 177: Reboot Logic Machine
9.5. Reboot Logic Machine You can restart the LogicMachine by executing System Reboot command. 9.6. Shutdown Logic Machine You can shutdown the LogicMachine by executing System Shutdown command. It is advisable to shutdown the system before plug out the power, because the database is saved safely. 9.7. - Page 178 Protocol– specific protocol used for addressing Static IP – static IP address. By default 192.168.0.10 DHCP – use DHCP protocol to get IP configuration. Current IP– the IP address got from DHCP server. This field appears only if the IP address is given otherwise it’s hidden.
-
Page 179: Knx Connection
9.8. KNX connection KNX specific configuration is located in Network KNX connection window. General tab... - Page 180 Mode [ TP-UART / EIBnet IP Tunneling / EIBnet IP Tunneling(NAT mode) / EIBnet IP Routing] – KNX connection mode. LogicMachine5 has TPUART interface by default built- Note! If there is no KNX TP connected to the device, it will automatically offer to switch to KNXnet/IP mode.
- Page 181 Apply filter to tunneling – either to apply filter policy to telegrams in tunneling mode. If ETS is used it is recommended to turn this feature off. SRC policy [No filter / Accept selected individual addresses / Drop selected individual addresses]–...
- Page 182 TP > IP filter Filtering table for telegrams going from KNX TP1 to IP network is located in this submenu. Apply filter to virtual objects – either to apply filter policy to objects added in Objects tab as virtual objects without attraction to bus...
-
Page 183: Knx Statistics
SRC policy [No filter / Accept selected individual addresses / Drop selected individual addresses]– policy to apply to the list of source individual addresses Ind. address list – list of individual addresses. One address/range per line. Use * (e.g. 1.1.* ) to filter all addresses in the given line. - Page 184 Server enabled – specify if BACnet server is enabled or not Device ID – device ID in BACnet network Password – device password Object priority – object priority Add group address to object name – add automatically the address to object name Port –...
-
Page 185: Bacnet Objects
9.11. BACnet objects In Network BACnet objects you can see marked objects on LogicMachine which are sent to BACnet network. -
Page 186: Http Server
9.12. HTTP server In case additional www ports are needed to run the web-server on, use Network HTTP server menu. Default HTTP port is 80, default HTTPS port is 443. 9.13. NTP client/server Client status when enabled LM obtaining data from up to four selected servers. Local server status when enabled LM can serve as local NPT server for other LMs or other devices. -
Page 187: Http Ssl Certificate
9.14. HTTP SSL certificate SSL Certificates are small data files that digitally bind a cryptographic key to a device’s details. When installed on a web server, it activates the padlock and the https protocol and allows secure connections from a web server to a browser. There is amount of online SSL certificate providers some SSL certificates are free some are paid. -
Page 188: Ftp Server
9.15. FTP server You can enable access to FTP server of LogicMachine by enabling this service in Service Server. Server status – define either FTP server is enabled or disabled Port – port of the service Username – login name, ftp ... -
Page 189: Remote Services
9.16. Remote services Service status – define either remote services are enabled or disabled Username – user name Password – password Change the IP and password according to your LM settings http://remote:remote@192.168.0.10/scada-remote?m=rss&r=alerts Request parameters set the return value format ... - Page 190 script error script name time error time (UNIX timestamp) date error time (RFC date) objects list of objects marked for export, ordered by update time Return values: address object address (e.g. "1/1/1") name object name (e.g. "My object") data decoded object value (e.g 42 or "01.01.2012") datatype object datatype (e.g.
-
Page 191: System Monitoring
Parameters for date datatype: number (1-31) month number (1-12) year number (1990-2089) datatype optional for write / response / update, data type is taken from the database if not specified Possible values: bool bit2 bit4 char uint8 int8 uint16 int16 float16 time date uint32 int32 float32 access string Examples Write value of... -
Page 192: Remote Diagnostics
9.18. Remote diagnostics Remote diagnostics should be enabled only when there is remote Embedded Systems support necessary for the device. It enables SSH access to the device. Service status – define either remote SSH access is enabled or disabled. -
Page 193: System Status
9.20. System status General system status with CPU usage, Memory usage, Partition, Serial ports information can be seen in Status System status window. -
Page 194: Network Utilities
9.21. Network utilities Ping and Traceroute utilities are located in Status Network utilities window. Both IP address and DNS names are accepted. 9.22. System log Operating system log is available in Status System log. -
Page 195: Running Processes
9.23. Running processes System running processes can be seen in Status Running processes window. -
Page 196: User Mode Schedulers
10. User mode schedulers User mode schedulers contains user-friendly interface for end-user to manage scheduler tasks, for example, specify thermostat values depending of the day of the week, time and holidays. 10.1. Events Each scheduler is mapped to specific group address in administration panel (see section 1.4 of this manual). -
Page 197: Holidays
10.2. Holidays In Holidays special days are specified which are then used adding new events. Click on Add new holiday button to specify a holiday. -
Page 198: Trend Logs
11. Trend logs Trend logs are end user interface for trends (defined in administrator interface in section 1.5). By clicking on the menu button you can change to different trends where each is mapped to a specific KNX group address. ... - Page 199 Show previous – when enabled a yellow trend line appears showing Previous trend above Current trend Single trend – view single trend Multiple trends – view multiple trends. When this mode is chosen, you can select several object on the left side to be shown...
- Page 200 There is an automatic secondary axis – for two trends with different units / scales. By clicking on Data button, data points will be shown in a way of table which can be later exported as CSV file.
-
Page 202: Modbus Rtu/Tcp Interconnection With Lm
12.1. Modbus device profile First thing you should do is to define Modbus device profile – it is a *.json file with the following structure e.g. a fragment from UIO20 device by Embedded Systems: "manufacturer": "Embedded Systems", "description": "Universal 16+4 I/O module", "mapping": [... - Page 203 Value_delta – New value is sent when the difference between previously sent value and current value is larger than delta. Defaults to 0 (send after each read) (Number) Value_multiplier – Multiply resulting value by the specified number, value = value_base + value * value_multiplier (Number) Value_bitmask –...
-
Page 204: Reading Modbus Rtu Coil / Register From The Interface
12.2. Reading ModBus RTU coil / register from the interface As creating new Modbus profiles is not the most user-friendly task, we have added a new feature that allows reading any Modbus coil or register straight from the user interface. This should help users to find correct settings and addresses before creating new profiles. -
Page 205: Rtu Settings
Scan range start – start ModBus device address Scan range end – end ModBus device address 12.4. RTU settings RTU ( serial) enabled – defines either Modbus RTU is enabled Port (/dev/RS485-1; /dev/RS485-2) – specify the port to communicate or leave blank for automatic detection. -
Page 206: Adding Modbus Device
12.5. Adding Modbus device Once profiles are added, add Modbus device by clicking Add device button. Connection type – define either it is Modbus RTU or Modbus TCP connection Name – name of the device Profile – profile of the device ... -
Page 207: Program Address For Uio20 Modbus Device
12.6. Program address for UIO20 Modbus device There is a separate Write address button to program address for UIO20 device. Press programming button and click save afterwards. Programming LED will turn off after successful write operation. Once script is added, you can add the code in the Script Editor. There are lots of predefined code blocks in the Helpers. - Page 208 13. 'writebits', 14. 'writemultiplebits', 15. 'writeregisters', 16. 'writemultipleregisters', 17. 'reportslaveid', 18. 'getcoils', 19. 'getdiscreteinputs', 20. 'getinputregisters', 21. 'getregisters', 22. 'setcoils', 23. 'setdiscreteinputs', 24. 'setinputregisters', 25. 'setregisters', 26. }, -- new connecton init =function() require('rpc') local mb =setmetatable({}, __index mbproxy mb.slaveid mb.rpc rpc.client('127.0.0.1', 28002, 'mbproxy')
- Page 209 -- request ok else -- reply with an error res[ ]==nil then return nil, res[2] -- normal reply else return unpack(res) Handler (resident script with 0 delay) configuration 1. mb:open() Open Modbus TCP connection 2. mb:setslave(10) set slave device id 3.
- Page 210 end) -- register write callback mb:setwriteregistercb(function(register, value) register then -- send value limited to 0..100 grp.write('4/1/5', math.min(100, value), dt.scale) else alert('register: %d = %d', register, value) -- server part init if not server then require('rpc') -- incoming data handler local handler = function(request) local...
- Page 211 1. value = event.getvalue() 2. mb = mbproxy.new() 3. mb:setcoils(0, value) Example: event script which changes modbus slave register (address 5) Must be mapped to a group address with scaling (0..100) value 1. value = event.getvalue() 2. mb = mbproxy.new() 3.
- Page 212 mb:setregisters(id - 1, value) -- coil write callback function mbwritecoils(coil, value) local addr = coils[ coil + 1 addr then grp.write(addr, value, dt.bool) -- register write callback function mbwriteregisters(register, value) local addr = registers[ register + 1 addr then grp.write(addr, value, regdt[ register + -- knx group monitor, handles group writes...
- Page 213 -- handle modbus and knx mb:handleslave() knxclient:step() Example usage (TCP / master mode): require('luamodbus') mb = luamodbus.tcp() mb:open('192.168.0.1', 5000) mb:connect() -- verbose output and select slave number 10 mb:setdebug(true) mb:setslave(10) -- read input from reg 1 to 5, get slave-specific data mb:readinputregisters(1, 4) mb:reportslaveid() -- close serial connection...
- Page 214 coil2 = false coil3 = false mb:writebits(10, coil1, coil2, coil3) -- multiple write from table coils = { true, false, false } mb:writebits(10, unpack(coils)) Core functions: luamodbus.rtu() Creates new Modbus RTU object luamodbus.tcp() Creates new Modbus TCP object Modbus object functions: Core functions: mb:open(port, [baudrate = 9600, [parity = 'N', [databits = 8, [stopbits = 2]]]]) RTU mode - opens the serial port.
- Page 215 mb:setregisters(start, v1, [v2, [v3, ...]]) sets values to register/coil mapping from the start address returns true on success and nil, error description on error, exception code if applicable mb:setwritecoilcb(fn) mb:setwriteregistercb(fn) sets a callback function for coil/register write event callback should accept two parameters - coil/register address and value (boolean or number) for multiple writes callback is executed for each coil/register separately use nil to remove a callback Master functions:...
- Page 216 mb:setrecovery(recovery) enables / disables auto reconnect on error mb:setdebug(debug) enables / disables protocol debug output mb:getheaderlength() returns header length for the protocol in use...
-
Page 217: Bacnet Ip Interconnection With Lm
13. BACnet IP interconnection with LM 13.1. BACnet server mode: transparent data transfer to BACnet network BACnet server specific configuration can be done in Sys Config Network BACnet Settings. List all BACnet Interoperability Building Blocks (BIBBs) Supported ReadProperty-B DS-RP-B ReadPropertyMultiple-B DS-RPM-B... - Page 218 Server enabled – specify if BACnet server is enabled or not Device ID – device ID in BACnet network Password – device password Object priority – object priority Port – port number BBMD IP – BACnet router IP. When router IP and port are set, LM will act as a foreign device and will attempt to register with BACnet router.
-
Page 219: Bacnet Client Mode
In System Configuration Network BACnet objects you can see marked objects on LogicMachine which are sent to BACnet network. 13.2. BACnet client mode Normally this mode is used to interconnect LogicMachine, for example, with VRV systems over BACnet IP protocol. The settings are available in BACnet tab. - Page 220 By clicking on Scan Network button you can see a list of BACnet server devices on the network. With Scan Selected you can rescan specific BACnet server for respective objects. Mapping to KNX objects currently is done over scripting. Before using any BACnet function, you must include the library: require('bacnet') Read current value of binary or analog object: bacnet.readvalue(device_id, object_type, object_id)
- Page 221 Clear binary object value at priority 12: bacnet.write(127001, 'binary value', 2305, nil, 12)
-
Page 222: Dali Configuration
14. DALI configuration LogicMachine5 Reactor GSM support DALI over RS485 gateway. We recommend to connect no more than 32 ballasts to one DALI line. Scan gateways - scans for currently connected gateways, address mapping for missing devices is deleted automatically ... - Page 223 Partial scan, only add new devices - scans for newly added DALI devices to the selected gateway without assigning short addresses. Missing devices are not removed from the list Port settings – serial port name if there are external DALI-RS-485 interfaces connected Note! Make sure Modbus RTU is not enabled for the same RS-485 if you are using external DALI RS485 gateways connected to LM’s RS-485 port.
-
Page 224: Dali Object Mapping
Make sure you define Port name in Port settings when using RS485 DALI gateway. If you use Reactor with 1 x RS485, the port name will be ‘/dev/RS485’. If you use LM4, the port name is either ‘/dev/RS485-1’, ‘/dev/RS485-2’ or ‘/dev/RS485-3’. Then write for each external RS-485/DALI gateway its unique ID. - Page 225 gwid (number/string) gateway id: gateway number or internal internal2 when internal DALI exists (string) command to send, refer to command table for possible values params (table) command parameters Params (Lua table): addrtype (string) address type, only required for addressable commands, possible values: short group broadcast ...
- Page 226 dalicmd('internal', 'arc', { addrtype = 'broadcast', value = 42 }) Setting DTR For commands where DTR is needed prior to executing command, use setdtr command to set the value: -- set dtr for ballast 5 to 200 dalicmd('internal', 'setdtr', { addrtype = 'short', address = 5, value = 200 }) Example Change address of DALI ballast with current address 5.
- Page 227 require('user.dali') res, err = dalicmd('internal', 'queryshortaddr', { addrtype = 'broadcast' }) if res then log(res:byte()) else log(err) Example (add 4 DALI short addressed to one group with nr. 7) require('user.dali') dalicmd('internal', 'addtogroup', { addrtype = 'short', address = 1, value = 7 }) dalicmd('internal', 'addtogroup', { addrtype = 'short', address = 2, value = 7 }) dalicmd('internal', 'addtogroup', { addrtype = 'short', address = 3, value = 7 }) dalicmd('internal', 'addtogroup', { addrtype = 'short', address = 4, value = 7 })
- Page 228 { '15/1/3', 90 }, function callscene(id) local key, scene key = 'scene_' .. id scene = storage.get(key, scenes[ id ]) if type(scene) ~= 'table' then alert('Scene ' .. id .. ' not found') return for _, item in ipairs(scene) do grp.write(item[ 1 ], item[ 2 ]) function savescene(id) local key, scene...
- Page 229 local main, rev, step, val, new, delay step = 10 -- in % delay = 0.5 -- in seconds -- ignore "stop" command val = tonumber(event.datahex, 16) if val == 0 then return -- up, normal mode if event.dst == up then main, rev = up, down -- down, reverse step elseif event.dst == down then...
- Page 230 new = math.max(0, new) -- no change, stop if new == val then return -- write new value val = new grp.write(out, new, dt.scale) -- wait for next run os.sleep(delay) 2) Create 3 objects: 1/1/1 - binary (dim up) 1/1/2 - binary (dim down) 1/1/3 - 1-byte scale (output) 3) Create an event script for each binary object: bindimmer('1/1/1', '1/1/2', '1/1/3', event)
- Page 231 storeactual store actual level in the dtr storemax store the dtr as max level storemin store the dtr as min level storesystemfailure store the dtr as system failure level storepoweron store the dtr as power on level storefadetime store the dtr as fade time storefaderate store the dtr as fade rate storescene...
- Page 232 compare compare withdraw withdraw searchaddrh set search address (h) 0..255 searchaddrm set search address (m) 0..255 searchaddrl set search address (l) 0..255 programshortaddr program short address 0..63 verifyshortaddr verify short address 0..63 queryshortaddr query short address physicalselection physical selection enabledevicetype enable device type x 0..255...
-
Page 233: Wire Configuration
15. 1-Wire configuration LM5 Power (LM5p-DW1) has two 1-wire interfaces built-in. 1-wire is a bus technology which is built based on client-server topology and allowing to connect up to 100 devices to one controller. It is either 2-wire or 3-wire bus installation. In case of 2-wire system, a parasitic powering is used directly from the bus, normally up to 20 devices can work in this way. - Page 234 Once 1-wire sensors are connected to the 1-wire interface of LogicMachine5 Name – name of the 1wire device Linked to object – mapped KNX object Sensor status object – mapped KNX status object Write to bus – define either to write telegram in KNX bus on read value ...
- Page 235 Note! Max 1-wire network length is 100 m, you need 3-wires: +5V, 1-Wire, GND. It can take up to 0.5 seconds for each sensor reading. We recommend to connect up to 30 sensors. Further, in the latest firmware of LogicMachine there are features like increased polling time of 1-wire objects, implemented keepalive object which indicates of error if there was lost connection with at least one of 1-wire device.
-
Page 236: Dmx Interconnection With Lm
16. DMX interconnection with LM DMX protocol support is realized upon RS485 serial port. DMX function Add the following user library in Scripting User libraries. local luadmx require('luadmx') module('DMX', package.seeall) local -- default params local defaults -- storage key skey 'dmx_line_1', -- RS-485 port... - Page 237 return -- DMX init, returns new DMX object function init(params) local n, k, v, _ -- create metatable and set user parameters setmetatable({}, { __index DMX }) n.params params n.conn pcall(require('redis').connect) -- merge parameters that are set by user k, v pairs(defaults) n.params[ k ] then...
- Page 238 self.params.channels channels self.channels ticks self.ticks values self.conn:lrange(self.params.skey, 0, max -- check for new values for each channel chan 1, max tonumber(values[ chan ]) -- target value differs, set transcation channels[ chan ].target then channels[ chan ].target channels[ chan ].delta (channels[ chan ].target channels[ chan ].current)
- Page 239 DMX handler script Add the following resident script with sleep interval = 0, adjust port and channel as needed if not dmxhandler then require('user.dmx') dmxhandler = DMX.init({ port '/dev/RS485', -- RS-485 port name channels -- number of DMX channels to use transition -- soft transition time in seconds dmxhandler:run()
- Page 240 current -- set current scene values scene = scenes[ current i, v ipairs(scene) DMX.set(i, -- switch to next scene current current + 1 current > #scenes then current Random scene example The following example should be placed inside a resident script. Sleep time defines scene keep time (at least 1 second).
-
Page 241: Enocean Transmitter Configuration
17. EnOcean transmitter configuration LogicMachine5 Reactor GSM supports EnOcean through USB gateway which is based on product USB 300 (OEM), delivered by EnOcean organization as OEM product to 3rd parties. Note that different frequencies are used for EnOcean (based on geographical region). Be careful and select the proper USB gateway for your location. - Page 242 Once the device profile is set, you can map functionality of the specific device to KNX group addresses by clicking on Mapping icon. When EnOcean gateway received telegram from specific device, the respective row gets light green. Respective KNX group addresses get updated with the new values.
-
Page 243: Knx To Enocean Mapping
17.3. KNX to EnOcean mapping You should click on Add new device button to add EnOcean device which will be communicated from specific KNX object. Once the device is added, you should pair it with specific device in EnOcean network, press Tech-in button. -
Page 244: Mapping To Enocean Profiles Out Of The Supported List
Further this device can be mapped with specific KNX addresses. When KNX object value will be updated, the telegram will be sent to respective EnOcean device. 17.4. Mapping to EnOcean profiles out of the supported list In case you don’t find a profile of your EnOcean device in the list of profiles, you can use RAW format. - Page 245 b) create one object with 4-byte unsigned integer data type and another with 1-byte scaled. 4-byte object should be mapped to KNX EnOcean object with 4-byte RAW profile. c) Add the following script to the 1-byte scaled object (just for initial teach command) b3 = 0xE0 b2 = 0x47 b1 = 0xFF...
- Page 246 value = event.getvalue() res = (value/100)*255 grp.write('1/1/6', res, dt.uint8)
-
Page 247: Supported Enocean Profiles
17.5. Supported EnOcean profiles Profile name Profile name 00-00-00 RAW 4-bytes A5-04-01 Temperature & Humidity Sensor (0C..40C, 0%..100%) 00-00-01 RAW 4-bytes, split A5-04-02 Temperature & Humidity Sensor (-20C..60C, 0%..100%, Battery) F6-01-01 Rocker Switch, 1 Rocker A5-06-01 Light Sensor (300lx..60000lx) F6-01-02 Rocker Switch, 1 Rocker (inverted) A5-06-02 Light Sensor (0lx..1024lx) -
Page 248: G/Gsm Configuration
18. 3G/GSM configuration LogicMachine5 Reactor GSM has built in 3G modem. LogicMachine has also a regular 3G modem driver built-in (Huawei and other vendor supported). In System configuration go to Network 3G/PPP connection. Fill required fields depending on your 3G operator settings, apply settings. Current IP –... - Page 249 comport ='ttyUSB2' -- open serial port modem AT:init .. comport ('/dev/' -- command parser parser cmd, sender =function( find, pos, name, mode, offset, value, jvalue, obj local 14. cmd cmd:trim mode cmd:sub 1, 1 :upper mode mode =='W'or =='R'then 17. cmd cmd:sub :trim -- parse object name/address...
- Page 250 58. cmd , name, jvalue =string.format('Value of %s is %s' 59. modem:sendsms sender, cmd -- incoming sms handler handler =function( alert , sms.sender, sms.data ('incoming sms from %s (%s)' -- sms from known number, call parser .contains numbers, sms.sender iftable )then parser sms.data, sms.sender...
-
Page 251: Examples
18.1. Examples Binary write (send the following SMS to switch kitchen lights on): W 1/1/1 true Scaling write (send the following SMS to set value 67% for red LED): W LED1Red 67 Temperature (floating point) write (send the following SMS to make setpoint in the living room to 22.5 degrees): W “Room Setpoint”... - Page 252 Twilio account You can get ID and Token needed for the below example by registering on Twilio. Make sure you enter a verified SIM number list / recipients in your account. Or please contact us for ready example with our account data. Function Add the following function in Scripting –>...
-
Page 253: Communication With Rs232/Rs485 Serial Ports
19. Communication with RS232/RS485 serial ports The following are the naming of Serial ports for different versions of Logic Machine. Reactor, Reactor V2 RS485 A RS485 A RS485 A RS485-1 RS485-1 RS485 RS485 B RS485 B RS485 B RS485 A RS485 A RS485-2 RS485-2... - Page 254 Functions Include library before calling serial functions: require('serial') Opens given port, returns: port handle, or, in case of error, nil plus error message port, err = serial.open(device, params) Parameters: device port device name, required params parameters table, optional, (defaults are in bold): o baudrate 300, 600, 1200, 2400, 4800, 9600, 19200, 38400, 57600, 115200, 230400 o parity "none", "even", "odd"...
- Page 255 Examples Write to port port:write('test data') Blocking read (script will block until 10 characters are read) data=port:read(10) Timeout read (script will wait for 10 characters for 20 seconds) data=port:read(10, Close serial port port:close() Resident script, RS-485 echo test -- open port on first call if not port then require('serial') port = serial.open('/dev/RS485-1', { baudrate = 9600, parity = 'even', duplex = 'half' })
-
Page 256: Bluetooth 4.0 Integration
20. Bluetooth 4.0 integration Bluetooth can be integrated over USB-Bluetooth adapter. Some of supported Bluetooth 4.0 USB adapters: Broadcom BCM20702A0 Trust 18187 Belkin F8T065bf Plugable USB Bluetooth 4.0 Laird BT820 Configuration of Bluetooth is located in LogicMachine BLE tab. - Page 257 Mapping functionality to KNX group addresses Once BLE device is seen by LogicMachine Ambient, it will automatically appear in the list. By clicking on specific device, you can map its functionality to KNX group addresses. For AWOX AromLight Color BLE lamp, you can map LED color object to KNX. There are following mapping objects for Xiaomi Mi Band wearable –...
- Page 258 Example Alpha MIO BLE watch has heart-rate as one of objects. This event-based script will switch on ventilation if the heart-rate is >80 and switch off if its lower value = event.getvalue() value > then grp.write('2/2/2', true) else grp.write('2/2/2', false)
-
Page 259: Sip Server On Logicmachine
SIP server on LogicMachine Task: How to pair SIP door entry systems with building automation project? In LogicMachine we have built SIP registrar which can send SIP requests to final SIP clients. For example, one can install Linphone SIP client app on touch devices which are used for visualization control. Upon SIP request from door entry system, LogicMachine will forward the request to the respective SIP client / recipient. - Page 260 SIP client application You can use for example Linphone as your SIP client. You have to enter IP of LogicMachine in its settings.
-
Page 261: Object Value Export Via Xml
Object value export via XML Make KNX objects XML readable In the Objects tab click on the objects which you want to receive the current value by XML request. Check the Export object XML request from external PC The XML request looks like this: http://remote:remote@192.168.1.211/cgi-bin/scada-remote/request.cgi?m=xml&r=objects Parameters: ... - Page 262 Login, Password for remote XML request Login and password can be changed in Network Configuration System GUI Login Admin/Remote tab.
-
Page 263: Alerts, Errors Values
Alerts, Errors values In similar way also Alerts and Errors can be read by XML requests. Alerts XML request: http://remote:remote@192.168.0.10/cgi-bin/scada-remote/request.cgi?m=xml&r=alerts Errors XML request: http://remote:remote@192.168.0.10/cgi-bin/scada-remote/request.cgi?m=xml&r=errors... -
Page 264: Read Alerts Rss Feeds From Logicmachine
Read Alerts RSS feeds from LogicMachine It is possible to read Alerts and Errors messages by remote RSS readers. Add new RSS feed in the RSS reader Use the following URL: http://remote:remote@192.168.1.211/cgi-bin/scada-remote/request.cgi?m=rss&r=alerts 50 latest alerts will be shown ... - Page 265 Login, Password for remote RSS requests Login and password can be changed in System Configuration System User access Admin/Remote tab.
-
Page 266: Cloud Solution
Cloud solution This example shows how to control/monitor specific objects (KNX, ModBus, BACnet, EnOcean, DALI, DMX512, BLE, etc.) on LogicMachine from Android device located anywhere on the internet. Some notes: LM can be located in LAN with local IP, no public IP is required, no VPNs, no NAT is required on the router ... - Page 267 6) In LM mains screen you might see several versions of Mosaic (v1, v2, Cloud). After cloud app tests are finished, we will add cloud functionality in the regular Mosaic app which is located in app store. 7) Click on the newly installed Mosaic editor icon 8) Click on the Cloud in the menu 9) You will see the following screen.
- Page 268 12) Create cloud visualization by adding widgets and defining group addresses. You can create several Rooms and when in room, you click on Add New Widget button. After this is done, click Sync. Cloud button 13) Unarchive android-debug.zip (http://openrb.com/wp- content/uploads/2017/02/android-debug.zip) and transfer the android-debug.apk to your mobile Android device, install (later will be for iOS too) 14) Open installed LogicMachine app on mobile device 15) You can find all LMs which are in your network, choose any and you are connecting...
- Page 269 16) Then authorize with your login/password 17) Cloud first screen looks like this. In the future we will add some more cloud specific applications. Click on Mosaic icon which will bring you to your created LogicMachine Mosaic interface...
- Page 270 18) Cloud interface of your LogicMachine 19) You can switch to other LogicMachine mapped to your account by choosing it in drop- down list on the top 20) You can also login to cloud from web browser in link: https://cloud.logicmachine.net and access your LogicMachine from any place in the world.
- Page 271 examples. Mosaic_widgets_eng.PDF (http://openrb.com/wp- content/uploads/2017/02/Mosaic_widgets_eng.pdf) contains manual on how to create your own Widgets. 23. Please see instructions for adding custom themes / CSS (http://openrb.com/wp- content/uploads/2017/03/Mosaic_custom_theme_CSS.pdf) for your Mosaic visualization. Download sample theme here (http://openrb.com/wp- content/uploads/2017/03/theme.tar.gz).
-
Page 272: Usb2.0 Port Specification
USB2.0 port specification USB 2.0 characteristics: • USB 2.0 provides a bandwidth of 480 Mbit/s, corresponding to an effective image data rate of 40 MB/s. • Integrated voltage supply (5 VDC) for devices in the 4-pole cable. Devices complying with the USB specification may consume a total of 500 mA from the bus. -
Page 273: Canx Configuration
canX configuration canX app on LogicMachine allows to configure, monitor canX protocol based devices. canX app is available in LogicMachine application store. 27.1. Scanning CAN FT line If there are already devices connected in online mode, go to Line Scan tab, specify Line range (or leave default) and click on magnifier icon Once devices are found, the scanning process can be cancelled with... -
Page 274: Device Scan
add the device to Devices for further project configuration Scan and show device configuration (Device scan) Flash device LED 27.2. Device scan Device scan shows all objects of the specific device. ID – ID number of the object State – internal state of the device, defines is there are not mistakes with the device Type / Name –... - Page 275 Normal, off after power-up Inverse, off after power-up Normal, on after power-up Inverse, on after power-ups Relay status modes: Disabled Normal Inverse Input modes: Switch on/off Switch off/on (inverse) Switch Toggle Button Toggle (optional long press) Button On (optional long press) Button Off (optional long press) Button Start/Stop Button Stop/Start (inverse)
-
Page 276: Group Address Configuration
27.3. Group address configuration Group addresses can be configured either in object configuration settings or directly in Groups tab. Address – group address Name – group name Datatype – group data type Tags – tags for a specific group Properties – properties of group L –... - Page 278 Importing group addresses from ETS project file button allows to import KNX project file. Prior to importing, ETS project file need to be converted to JSON file using this online utility...
-
Page 279: Device Configuration
27.4. Device configuration Devices section is used to configure canX devices. The configuration can be done even if the device is not yet physically connected to the line (offline mode). Address – physical address of the device Name – name of the device Device type –... - Page 280 When clicking on a specific entry, device settings appear. Line [0..15] – Line ID Node [1..255] – Node ID Name – Name of the device Device type – automatically detected device type Profile mode – software profile mode for the device. There are several profiles possible for one type e.g.
- Page 281 UIO16 16 channel universal input/output module: When the changes are done for the device, it is marked in yellow.
- Page 282 Press this button to upload new settings to all modified / all devices.
-
Page 283: Locations
27.5. Locations Project structure can be defined in Locations tab. Name – name of the location Devices – devices associated with a particular location. First number indicates count of specific device in a particular room. Second - total count of devices. Groups –... -
Page 284: Reports
27.6. Reports Reports section lists all devices in the project indicating which devices are located in which line, how many group addresses are associated with a particular device, how much space it is required in the cabinet. 27.7. Monitoring the fieldbus line In Monitor tab you can see the activity on the bus line, send read/write requests to specific device / group /object. - Page 285 Time – time of telegram received Type (RX/TX; Object/Device/Group/Control) – type of telegram Address – group or physical device address the telegram was received to/from Name – name of the device Command – command received Data – data received Start monitor to see real-time messages Stop monitoring Export monitoring results to CSV file...
- Page 286 ObjectInfoRead - Read request for EEPROM address, with address as parameter for command ObjectInfoResponse (1 byte) - Response for ReadEEprom, return Value for given EEPROM address ObjectConfigWrite (1 byte) - Write EEPROM addr. = object id (response with ResponseObjectEpromConfig msg. if success) GAListAdd (4 bytes) –...
-
Page 287: Write Device / Physical Address
27.8. Write device / physical address To write device another physical address, go to Tools Write device address. Choose Line and Node number and click Write. Then click and release programming button on the device. The Write window will close once the new address is written. 27.9. -
Page 288: Project Configuration
27.10. Project configuration General project settings are available in Tools Project configuration. Project name – name of the project Master code – master code is written to devices together with physical address. It must be set only once per project. Changing master code requires physical device reset via programming button. -
Page 289: Find Device If You Have Several Of Them In The Line
27.12. Find device if you have several of them in the line In Line Scan when scanning, you can click on programming button of the device and the respective field will be set to green color 27.13. Connection helper Connection helper allows easing making connection between unused input and output objects. Once the Save Conneciton button is clicked, a new group address window is opened Address –... -
Page 290: Reset The Device
L – Log each group change E – Export. Used to map this group automatically to KNX group (Objects tab in LogicMachine) P – Post process. Execute a script on group address change R – Read on initialization (device start) Location –... -
Page 291: Other Examples
data = grp.getvalue(), Other examples Different examples, 3 party protocol integration and other useful applications can be found here: http://openrb.com/all-examples/ http://forum.logicmachine.net/...
Need help?
Do you have a question about the LM5p-GSMC and is the answer not in the manual?
Questions and answers