
Subscribe to Our Youtube Channel
Summary of Contents for Orange Photonics LIGHTLAB
- Page 1 INSTRUCTION MANUAL LIGHTLAB™ CANNABIS POTENCY ANALYZER BY ORANGE PHOTONICS Version 1.3.3...
- Page 2 INTRODUCTION...
-
Page 3: Table Of Contents
Contents Welcome _________________________________________________________________________________________________ 5 LightLab Packing List ___________________________________________________________________________________ 6 LightLab Technology Overview ________________________________________________________________________ 7 What Does LightLab Measure? _________________________________________________________________________ 8 1. LightLab Setup_______________________________________________________________________________________ 10 2. Sample Analysis- Flower ____________________________________________________________________________ 15 3. Sample Analysis- Concentrates _____________________________________________________________________ 24 4. Sample Analysis- Trim______________________________________________________________________________ 34 5. -
Page 4: Table Of Contents
INTRODUCTION ProMode on/off ............................. 102 Moisture Correction on/off....................... 102 12. Troubleshooting _________________________________________________________________________________ 103 Zero Timeout ............................103 Description ______________________________________________________________________________ 103 Causes and Fixes ________________________________________________________________________ 103 Air Bubbles Detected ........................... 103 Description ______________________________________________________________________________ 104 Causes and Fixes ________________________________________________________________________ 104 Result Confidence is Marginal/Result confidence is Poor ............ 105 Description ______________________________________________________________________________ 105 Causes and Fixes: _______________________________________________________________________ 105 Flow was out of range ......................... - Page 5 INTRODUCTION...
-
Page 6: Welcome
Welcome Welcome and thank you for choosing Orange Photonics. Your LightLab cannabis potency analyzer comes to you fully calibrated and ready to use. We are proud to serve established cannabis industry leaders and newcomers in support of greater efficiency and higher quality products through data. -
Page 7: Lightlab Packing List
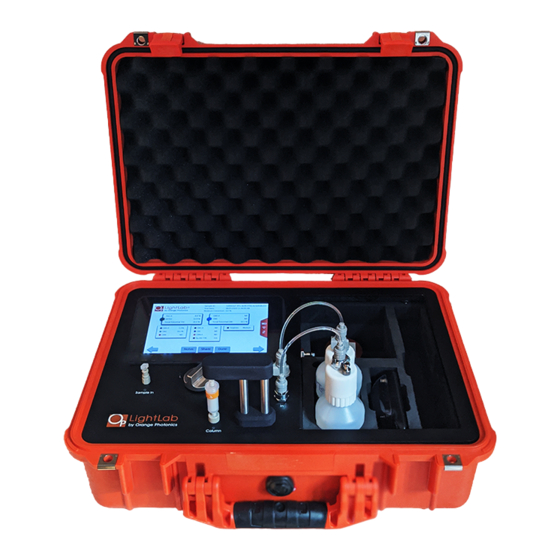
INTRODUCTION LightLab Packing List The first time you use the LightLab unpack the components on a clean, flat surface and familiarize yourself with each item. Packing list: Items Units LightLab Analyzer Extraction Shaker and Power Supply Fluidics Hardware Flushing Hardware... -
Page 8: Lightlab Technology Overview
INTRODUCTION LightLab Technology Overview... -
Page 9: What Does Lightlab Measure
Your LightLab is factory calibrated and will begin providing results directly out of the box for 6 major cannabinoids. The following is an explanation of the results the LightLab generates along with an example results screen: The following is a list of results shown and their meaning: THCA: Tetrahydrocannabinolic Acid. - Page 10 INTRODUCTION dosed with requires a conversion factor. The “total potential Δ9THC” factors in the loss of weight of THCA when converting to Δ9THC. The equation used is as follows: Total Potential Δ9THC= 0.877*THCA + Δ9THC This number is an indication of the overall “potency” of the sample. Total THC: This number is the sum of THCA + Δ9THC and is typically used to indicate the overall THC cannabinoid content present in a sample.
-
Page 11: Lightlab Setup
1. Open LightLab and remove cap baton and power supply. 2. Plug in LightLab if power is available (LightLab has an 8-hour battery). Do not turn the LightLab on yet. Note: LightLab has two charge settings on the charger (0.9A... - Page 12 LIGHTLAB SETUP 3. Remove waste cap from baton and place on waste container 4. Remove solvent cap from baton and place on solvent container 5. Connect fluid lines from bottles to LightLab.
- Page 13 LIGHTLAB SETUP 6. Lift column holder. 7. Remove Selective Separation Column caps and insert into column holder.
- Page 14 LIGHTLAB SETUP 8. Close column holder onto Selective Separation Column. 9. Turn on instrument. A systems check will run. Once complete, the LightLab will ask to start the warmup.
- Page 15 LIGHTLAB SETUP 10. Press “Start Warmup” to begin the warmup process. NOTE: the warmup can be skipped if the solvent caps and fluid connections have not been disconnected and the system has been run recently (within one hour).
-
Page 16: Sample Analysis- Flower
SAMPLE ANALYSIS - FLOWER 2. Sample Analysis- Flower Flower analysis should be used with any dried and cured cannabis flower material. 1. Select the type of sample to be measured (flower for this section). NOTE: if tests remaining is zero, you will be prompted to replace the column, see Section Replace Solvent 2. - Page 17 SAMPLE ANALYSIS - FLOWER 3. Add sample tags to the sample record if desired. These tags will be saved along with the sample results and can be accessed later. 4. Prepare at least 100mg of sample by grinding the sample with the included grinder.
- Page 18 0.997 and 10.003. If not proceed to Section 4 to recalibrate scale. 7. Place a vial cap on the scale and press “tare”. Ensure scale now reads zero with cap resting on it. Press forward arrow on the LightLab screen.
- Page 19 9. Type in the exact sample reading on the scale. 90-110mg is an acceptable range. Press forward arrow on the screen. Note 100mg is 0.100g. 10. Pour sample into the vial. Ensure all the sample is inside the vial and not trapped in the vial cap threads. Press forward arrow on the LightLab screen.
- Page 20 SAMPLE ANALYSIS - FLOWER 11. Connect the syringe to the solvent cap and pull plunger up to fill syringe. Fill syringe with at least 10ml of solvent. 12. Invert the syringe so that the bubble floats to the tip. Depress the plunger to remove the air bubbles and get the syringe volume to exactly 10ml.
- Page 21 13. Add contents of syringe to vial and place cap firmly on vial. Press forward arrow on LightLab screen. 14. Place vial into shaker and strap in place. Press forward arrow on LightLab screen. 15. Turn on shaker and press Start on LightLab screen.
- Page 22 SAMPLE ANALYSIS - FLOWER 16. Zero process will begin, which takes two minutes to complete. 17. Once Zero is complete, add syringe filter onto sample port. Press forward arrow on screen. 18. Set valve to load. Press forward arrow on screen.
- Page 23 SAMPLE ANALYSIS - FLOWER 19. Remove cap from vial and pull at least 2ml of sample into syringe used previously. Exact amount of sample isn’t important. Press forward arrow on screen. 20. Place syringe on syringe filter at sample port by gently twisting it on about a quarter turn.
- Page 24 SAMPLE ANALYSIS - FLOWER 22. Set valve to Run. Press forward arrow on screen. 23. Press Start. The LightLab will begin to analyze the sample. Results will be ready in 8 minutes. 24. Once sampling is complete, results are displayed on the screen. A note can be added to the sample if desired.
-
Page 25: Sample Analysis- Concentrates
SAMPLE ANALYSIS - CONCENTRATES 3. Sample Analysis- Concentrates Concentrates setting should be used for any extracted cannabis material including CO2, ethanol and butane extracts, distillates and other concentrated cannabis extracts. 1. Select the type of sample to be measured (concentrate for this section). NOTE: if tests remaining is zero, you will be prompted to replace the column, see Section 2. - Page 26 SAMPLE ANALYSIS - CONCENTRATES 3. Gather at least 100mg of sample. Most samples do not need any specific preparation; however, this may vary depending on the sample type. 4. Place scale on level surface and turn on. 5. Check calibration of scale by placing 10g calibration weight on scale. Results should be between 0.997 and 10.003.
- Page 27 SAMPLE ANALYSIS - CONCENTRATES 6. Place a vial cap on the scale and press “tare”. Ensure scale now reads zero with cap resting on it. Press forward arrow on the screen. 7. Add 100mg (+/- 10mg) to the vial cap. Make sure all sample is within inner circle of cap.
- Page 28 9. Pour sample into the vial (depending on sample it may stay on cap). Ensure all the sample is inside the vial and not trapped in the vial cap threads. Press forward arrow on the LightLab screen. 10. Connect the syringe to the solvent cap and pull up plunger to fill syringe. Fill...
- Page 29 SAMPLE ANALYSIS - CONCENTRATES 11. Invert the syringe so that the bubble floats to the tip. Depress the plunger to remove the air bubbles and get the syringe volume to exactly 10ml. A tissue may be used to catch any excess solvent. NOTE: It is important to ensure the syringe has exactly 10ml of solvent for accurate results.
- Page 30 SAMPLE ANALYSIS - CONCENTRATES 14. Place the extraction vial into the sample heater, then fill the included measuring cup with water and pour contents into the heater. Most samples will be heated sufficiently by filling measuring cup to the “E” line. Press firmly down on the button near the bottom of the heater to start heating.
- Page 31 SAMPLE ANALYSIS - CONCENTRATES 17. Turn on shaker and press Start on screen. 18. Zero process will begin, which takes two minutes to complete. 19. After completion of the zero, inspect the vial. If the sample has not fully dissolved or if there is a significant amount of residue on the vial from the sample repeat the heating and extraction process again.
- Page 32 SAMPLE ANALYSIS - CONCENTRATES 21. Set valve to load. Press forward arrow on screen. 22. Remove cap from vial and pull about 2ml of sample into syringe used previously. Exact amount of sample isn’t important. Press forward arrow on screen. 23.
- Page 33 There will be some resistance when injecting a sample- this is normal. Press forward arrow on screen. 25. Set valve to Run. Press forward arrow on screen. 26. Press Start. The LightLab will begin to analyze the sample. Results will be ready in 8 minutes.
- Page 34 SAMPLE ANALYSIS - CONCENTRATES 27. Once sampling is complete, results are displayed on the screen. A note can be added to the sample if desired. If SD card is installed, results will be added to a comma separated value (Excel compatible) file. Do not reuse syringe, filter or vial for future tests unless re-running the same sample.
-
Page 35: Sample Analysis- Trim
SAMPLE ANALYISIS- TRIM 4. Sample Analysis- Trim Trim analysis should be used for any cannabis “trim” that contains flower, leaf and plant stalk. Trim is typically used for cannabis extraction. 1. Select “Other” as the sample type for the main screen. 2. - Page 36 SAMPLE ANALYISIS- TRIM 3. If Moisture Correction is enabled, enter the moisture content of the sample to be run. If the moisture is not known, enter 0 to continue. 4. Add sample tags to the sample record if desired. These tags will be saved along with the sample results and can be accessed later.
- Page 37 0.997 and 10.003. If not proceed to Section 4 to recalibrate scale. 8. Place a vial cap on the scale and press “tare”. Ensure scale now reads zero with cap resting on it. Press forward arrow on the LightLab screen.
- Page 38 10. Type in the exact sample reading on the scale. 90-110mg is an acceptable range. Press forward arrow on the screen. Note 100mg is 0.100g. 11. Pour sample into the vial. Ensure all the sample is inside the vial and not trapped in the vial cap threads. Press forward arrow on the LightLab screen.
- Page 39 SAMPLE ANALYISIS- TRIM 12. Connect the syringe to the solvent cap and pull plunger up to fill syringe. Fill syringe with at least 10ml of solvent. 13. Invert the syringe so that the bubble floats to the tip. Depress the plunger to remove the air bubbles and get the syringe volume to exactly 10ml.
- Page 40 14. Add contents of syringe to vial and place cap firmly on vial. Press forward arrow on LightLab screen. 15. Place vial into shaker and strap in place. Press forward arrow on LightLab screen. 16. Turn on shaker and press Start on LightLab screen.
- Page 41 SAMPLE ANALYISIS- TRIM 17. Zero process will begin, which takes two minutes to complete. 18. Once Zero is complete, add syringe filter onto sample port. Press forward arrow on screen. 19. Set valve to load. Press forward arrow on screen.
- Page 42 SAMPLE ANALYISIS- TRIM 20. Remove cap from vial and pull at least 2ml of sample into syringe used previously. Exact amount of sample isn’t important. Press forward arrow on screen. 21. Place syringe on syringe filter at sample port by gently twisting it on about a quarter turn.
- Page 43 SAMPLE ANALYISIS- TRIM 23. Set valve to Run. Press forward arrow on screen. 24. Press Start. The LightLab will begin to analyze the sample. Results will be ready in 8 minutes. 25. Once sampling is complete, results are displayed on the screen. A note can be added to the sample if desired.
-
Page 44: Sample Analysis- Wet Flower
NOTE: Wet flower is an advanced analysis that may require modifications to the procedure below depending on the data/reporting required. It is not recommended for novice LightLab users. 1. Select “Other” as the sample type for the main screen. 2. Select the type of sample to be measured from the new list that appears (Wet Plant for this section). - Page 45 SAMPLE ANALYISIS- WET FLOWER 3. Select the stage of the plant. Select “vegetative” for early stage plants before flowers appear on the plant. Select “flowering” for plants nearing harvest. 4. Enter the moisture content of the sample to be run. If the moisture is not known, enter 0 to continue.
- Page 46 SAMPLE ANALYISIS- WET FLOWER 6. Gather at least 2g of sample from the plant. Note the cannabinoid content may be significantly different from a leaf sample when compared to a flower. We recommend gathering flower parts for flowering plants and large healthy leaves for vegetative plants.
- Page 47 9. Place a vial cap on the scale and press “tare”. Ensure scale now reads zero with cap resting on it. Press forward arrow on the LightLab screen. 10. Add the amount of sample indicated by the device (either 100mg (+/- 10mg) or 500mg (+/-50mg) depending on the options selected) to the scale.
- Page 48 12. Pour sample into the vial. Ensure all the sample is inside the vial and not trapped in the vial cap threads. Press forward arrow on the LightLab screen. 13. Connect the syringe to the solvent cap and pull plunger up to fill syringe. Fill syringe with either 5ml or 10ml of solvent depending on the options selected.
- Page 49 A tissue may be used to catch any excess solvent. NOTE: It is important to ensure the syringe has the exact amount of solvent indicated for accurate results. 15. Add contents of syringe to vial and place cap firmly on vial. Press forward arrow on LightLab screen.
- Page 50 SAMPLE ANALYISIS- WET FLOWER 16. Place vial into shaker and strap in place. Press forward arrow on LightLab screen. 17. Turn on shaker and press Start on LightLab screen. 18. Zero process will begin, which takes two minutes to complete.
- Page 51 SAMPLE ANALYISIS- WET FLOWER 19. Once Zero is complete, add syringe filter onto sample port. Press forward arrow on screen. 20. Set valve to load. Press forward arrow on screen. 21. Remove cap from vial and pull at least 2ml of sample into syringe used previously.
- Page 52 SAMPLE ANALYISIS- WET FLOWER 22. Place syringe on syringe filter at sample port by gently twisting it on about a quarter turn. Press forward arrow on screen. 23. Slowly inject at least 1ml of sample into sample port. Exact amount isn’t important.
- Page 53 SAMPLE ANALYISIS- WET FLOWER 25. Press Start. The LightLab will begin to analyze the sample. Results will be ready in 8 minutes. 26. Once sampling is complete, results are displayed on the screen. A note can be added to the sample if desired. If SD card is installed, results will be added to a comma separated value (Excel compatible) file.
-
Page 54: Sample Analysis- Raffinate
SAMPLE ANALYISIS- RAFFINATE 6. Sample Analysis- Raffinate Raffinate analysis should be used for plant material which has previously been extracted using CO2, Butane, Ethanol, etc. Raffinate is typically tested to ensure extraction was run to completion. The addition of 200mg rather than the 100mg used for Flower analysis allows a detection limit of 0.5% (flower has a detection limit of 1%) 1. - Page 55 SAMPLE ANALYISIS- RAFFINATE 3. If Moisture Correction is enabled, enter the moisture content of the sample to be run. If the moisture is not known, enter 0 to continue. 4. Add sample tags to the sample record if desired. These tags will be saved along with the sample results and can be accessed later.
- Page 56 0.997 and 10.003. If not proceed to Section 4 to recalibrate scale. 8. Place a vial cap on the scale and press “tare”. Ensure scale now reads zero with cap resting on it. Press forward arrow on the LightLab screen.
- Page 57 10. Type in the exact sample reading on the scale. 180-220mg is an acceptable range. Press forward arrow on the screen. Note 100mg is 0.100g. 11. Pour sample into the vial. Ensure all the sample is inside the vial and not trapped in the vial cap threads. Press forward arrow on the LightLab screen.
- Page 58 SAMPLE ANALYISIS- RAFFINATE 12. Connect the syringe to the solvent cap and pull plunger up to fill syringe. Fill syringe with at least 10ml of solvent. 13. Invert the syringe so that the bubble floats to the tip. Depress the plunger to remove the air bubbles and get the syringe volume to exactly 10ml.
- Page 59 14. Add contents of syringe to vial and place cap firmly on vial. Press forward arrow on LightLab screen. 15. Place vial into shaker and strap in place. Press forward arrow on LightLab screen. 16. Turn on shaker and press Start on LightLab screen.
- Page 60 SAMPLE ANALYISIS- RAFFINATE 17. Zero process will begin, which takes two minutes to complete. 18. Once Zero is complete, add syringe filter onto sample port. Press forward arrow on screen. 19. Set valve to load. Press forward arrow on screen.
- Page 61 SAMPLE ANALYISIS- RAFFINATE 20. Remove cap from vial and pull at least 2ml of sample into syringe used previously. Exact amount of sample isn’t important. Press forward arrow on screen. 21. Place syringe on syringe filter at sample port by gently twisting it on about a quarter turn.
- Page 62 SAMPLE ANALYISIS- RAFFINATE 23. Set valve to Run. Press forward arrow on screen. 24. Press Start. The LightLab will begin to analyze the sample. Results will be ready in 8 minutes. 25. Once sampling is complete, results are displayed on the screen. A note can be added to the sample if desired.
-
Page 63: Sample Analysis- Infused Product
5g would have a total dose of 10mg (2mg/g*5g). We recommend validating any sample preparation and analysis before routine analysis. Some samples may not be possible to measure with a standard LightLab analyzer. Contact Orange Photonics support if assistance is required. - Page 64 4. Gather a representative sample to be analyzed. The amount of sample required will vary depending on the potency and type of sample. LightLab analyzer can analyze between 0.1-3mg cannabinoid/1ml LightLab solvent. The recommended target value is 1.5mg cannabinoid/1ml LightLab solvent.
- Page 65 0.997 and 10.003. If not proceed to Section 4 to recalibrate scale. 7. Place a vial cap on the scale and press “tare”. Ensure scale now reads zero with cap resting on it. Press forward arrow on the LightLab screen.
- Page 66 9. Type in the exact sample reading on the scale. Press forward arrow on the screen. Note 100mg is 0.100g. 10. Pour sample into the vial. Ensure all the sample is inside the vial and not trapped in the vial cap threads. Press forward arrow on the LightLab screen.
- Page 67 Enter the exact amount of solvent into the LightLab NOTE: Be careful when entering the correct amount of solvent! Adding a different amount than is indicated on the LightLab screen will cause in incorrect results to be displayed.
- Page 68 NOTE: It is important to ensure the syringe has the exact amount of solvent indicated for accurate results. 13. Add contents of syringe to vial and place cap firmly on vial. Press forward arrow on LightLab screen.
- Page 69 Ensure sample is fully extracted into LightLab solvent to ensure accurate results. 15. Press Start on LightLab screen. Zero process will begin, which takes two minutes to complete. 16. Once Zero is complete, add syringe filter onto sample port. Note some samples...
- Page 70 SAMPLE ANALYISIS- INFUSED PRODUCT 18. Set valve to load. Press forward arrow on screen. 19. Remove cap from vial and pull at least 2ml of sample into syringe used previously. Exact amount of sample isn’t important. Press forward arrow on screen.
- Page 71 There will be some resistance when injecting a sample- this is normal. Press forward arrow on screen. 22. Set valve to Run. Press forward arrow on screen. 23. Press Start. The LightLab will begin to analyze the sample. Results will be ready in 8 minutes.
- Page 72 SAMPLE ANALYISIS- INFUSED PRODUCT 24. Once sampling is complete, results are displayed on the screen. A note can be added to the sample if desired. If SD card is installed, results will be added to a comma separated value (Excel compatible) file. Do not reuse syringe, filter or vial for future tests unless re-running the same sample.
-
Page 73: Sample Analysis- Custom
We recommend validating any sample preparation and analysis before routine analysis. Some samples may not be possible to measure with a standard LightLab analyzer. Contact Orange Photonics support if assistance is required. NOTE: Custom is an advanced analysis that may require modifications to the procedure below depending on the data/reporting required. - Page 74 4. Gather a representative sample to be analyzed. The amount of sample required will vary depending on the potency and type of sample. LightLab analyzer can analyze between 0.1-3mg cannabinoid/1ml LightLab solvent. The recommended target value is 1.5mg cannabinoid/1ml LightLab solvent.
- Page 75 0.997 and 10.003. If not proceed to Section 4 to recalibrate scale. 7. Place a vial cap on the scale and press “tare”. Ensure scale now reads zero with cap resting on it. Press forward arrow on the LightLab screen.
- Page 76 9. Type in the exact sample reading on the scale. Press forward arrow on the screen. Note 100mg is 0.100g. 10. Pour sample into the vial. Ensure all the sample is inside the vial and not trapped in the vial cap threads. Press forward arrow on the LightLab screen.
- Page 77 Enter the exact amount of solvent into the LightLab NOTE: Be careful when entering the correct amount of solvent! Adding a different amount than is indicated on the LightLab screen will cause in incorrect results to be displayed.
- Page 78 NOTE: It is important to ensure the syringe has the exact amount of solvent indicated for accurate results. 13. Add contents of syringe to vial and place cap firmly on vial. Press forward arrow on LightLab screen.
- Page 79 Ensure sample is fully extracted into LightLab solvent to ensure accurate results. 15. Press Start on LightLab screen. Zero process will begin, which takes two minutes to complete. 16. Once Zero is complete, add syringe filter onto sample port. Note some samples...
- Page 80 SAMPLE ANALYISIS- CUSTOM 17. Set valve to load. Press forward arrow on screen. 18. Remove cap from vial and pull at least 2ml of sample into syringe used previously. Exact amount of sample isn’t important. Press forward arrow on screen. 19.
- Page 81 There will be some resistance when injecting a sample- this is normal. Press forward arrow on screen. 21. Set valve to Run. Press forward arrow on screen. 22. Press Start. The LightLab will begin to analyze the sample. Results will be ready in 8 minutes.
- Page 82 SAMPLE ANALYISIS- CUSTOM 23. Once sampling is complete, results are displayed on the screen. A note can be added to the sample if desired. If SD card is installed, results will be added to a comma separated value (Excel compatible) file. Do not reuse syringe, filter or vial for future tests unless re-running the same sample.
-
Page 83: Shutting Down
SHUTTING DOWN 9. Shutting Down If LightLab is typically left in one location, it does not need to be completely packed away and can remain set up. If the device will be used again in less than one day, we recommend simply turning off the analyzer. - Page 84 SHUTTING DOWN 3. Remove Selective Separation Column and place red caps on the column. Close column holder. NOTE: It is important to keep the column wet for best performance. Always immediately replace red caps when storing the column, do not store without caps in place.
- Page 85 SHUTTING DOWN 6. Remove waste cap and place in baton, then put the baton cap in place. Place storage cap on waste bottle and tighten firmly. 7. The baton can be stored directly above the power brick on the right side of the storage compartment.
- Page 86 9. The grinder and other small parts can be placed in the large storage compartment. Test kits can also be stored in the same compartment. 10. If a shaker is used, it can be placed on top of the large compartment with the shaking mechanism toward the middle of the LightLab.
- Page 87 SHUTTING DOWN 11. The LightLab is now ready to travel. While the device is hardened against bumps and shaking, it is a scientific instrument and should be treated with care when transporting. NOTE: If stored for extended periods, store device on its side (as shown in the...
-
Page 88: Scale Calibration
SCALE CALIBRATION 10. Scale Calibration 1. If the scale has been used for more than a month or if the calibration weight does not read between 9.997 and 10.003g then a scale calibration is required. Make sure the scale is on a level surface and there is no significant air movement. Turn scale on and wait until scale reads 0.000g. - Page 89 4. After a few seconds, the display will flash 20.000. Add the second calibration weight to the scale along with the first. NOTE: The second weight is included in a bag below the scale in the LightLab box. 5. After a few seconds, the display will read PASS. The calibration is now complete.
-
Page 90: Lightlab Settings
LIGHTLAB SETTINGS 11. LightLab Settings NOTE: All LightLab settings can be accessed by pressing the gear button on the LightLab home screen. The setting screen shown below will appear. Pressing the forward arrow in the bottom right will access additional settings. - Page 91 LIGHTLAB SETTINGS 1. Detach waste fluid line and remove waste cap. Remove waste bottle and replace storage cap. Dispose of solvent waste per applicable local or company regulations. Press forward arrow on screen 2. Detach solvent fluid line and remove solvent cap. Remove solvent bottle and replace storage cap.
-
Page 92: Replace Column
LIGHTLAB SETTINGS 4. LightLab will flush for 90 seconds, and will be ready for a new sample once complete. Replace Column 1. The Selective Separation Column will last for 25 tests before replacement is needed. A counter in the upper right corner of the screen shows the number of tests left on the column. - Page 93 LIGHTLAB SETTINGS 2. Remove old column by lifting the column holder arm and then pulling column out of holder. Twisting the column will facilitate removing it. 3. Remove caps on new column and place into column holder.
-
Page 94: Flush System
LIGHTLAB SETTINGS 4. Close column holder onto Selective Separation Column. 5. LightLab will flush new column for 90 seconds, and will be ready for a new sample once complete. FLUSH SYSTEM If the LightLab performs poorly, indicates that results were marginal or LightLab solvent does not flow through system, the instrument may need to be flushed. -
Page 95: Flushing Forward
Removing the column allows higher pressure to force out clogs. Press forward arrow on screen. 2. Close column holder. Press forward arrow on screen. Press Start button to turn on pump. LightLab will flush solvent for 90 seconds. -
Page 96: Flushing Backward
LIGHTLAB SETTINGS Flushing Backward 1. Remove Selective Separation column from device. Press forward arrow on screen. 1. Close column holder. Press forward arrow on screen. 2. Remove sample fluid lines from solvent and waste bottle. Replace with flushing lines. The flushing lines have opposing male and female ends. The solvent bottle should be connected to the OUT on the instrument and the waste should be connected to the IN on the instrument. -
Page 97: Clearing Sample Input
LIGHTLAB SETTINGS 3. Press Start button to turn on pump. LightLab will flush solvent for 90 seconds. Clearing Sample Input 1. Remove Selective Separation column from device. Press forward arrow on screen. 2. Close column holder. Press forward arrow on screen. - Page 98 LIGHTLAB SETTINGS 3. Disconnect the waste line from the waste container. Press forward arrow on screen. 4. Connect waste line to sample input flush port on the side of the instrument. Press forward arrow on screen. 5. Connect Luer end of sample flush line to Sample In port. Press forward on...
- Page 99 6. Connect other end of sample flush line to waste container. Press forward on screen. 7. Press Start button to begin flush. The LightLab solvent should come out of the Sample In port and into the waste bottle, forcing any debris in the fluid lines with...
-
Page 100: Change Date/Time
LIGHTLAB SETTINGS CHANGE DATE/TIME LightLab comes with a factory calibrated internal clock that will last for several years. The date, time and time zone may be changed as needed to correct for offsets or new time zones. Daylight savings time is corrected for in the indicated time zones. Press the Home or Settings button to confirm changes. -
Page 101: Reset Counter
LIGHTLAB SETTINGS 1. Press “Export User Data” to export all test results from the LightLab. NOTE: “Export Diagnostic Data” will export a file that will not be readable by a user. The exported file is intended to be sent to an Orange Photonics support representative and contains raw instrument and diagnostic data. -
Page 102: Support
SD card via your computer. Once the SD card contains the update file, insert the SD card into the LightLab. Plug in the LightLab to external power (do not update while operating on battery) and select the “Update” button. LightLab... -
Page 103: Sounds On/Off
LIGHTLAB SETTINGS SOUNDS ON/OFF LightLab has audible sounds that indicate when a zero or test is complete. These can be turned off by pressing the “Sounds ON/OFF” button. A beep will confirm that the sound is on when pressed. PROMODE ON/OFF ProMode, when enabled, provides abbreviated on-screen instructions for users that are experienced with LightLab operation. -
Page 104: Troubleshooting
Description To ensure an accurate analysis, a sample must be run within 4 minutes of completion of a zero. If the LightLab is idle for longer than 4 minutes this error will appear. Causes and Fixes This is caused by waiting too long after zero has completed before starting a sample. -
Page 105: Description
TROUBLESHOOTING Description LightLab has integrated air bubbles detection that takes place during system warmup as well as during zeroing, solvent replace and column replace. You may see a warning that air bubbles or drift were detected and the instrument will attempt to remove the bubbles automatically. -
Page 106: Result Confidence Is Marginal/Result Confidence Is Poor
LightLab may indicate that the resulting fit was marginal, and that accuracy may be degraded or that the fit was poor and no results will display. The LightLab analyzes the quality of the results calculated, and if the quality of the fit is not good, an error will be returned. - Page 107 TROUBLESHOOTING 4. The analyzer is cold, or the warmup sequence was skipped or not completed correctly. If possible, move the instrument to a warmer environment, then turn the device off and back on again, and ensure the warmup sequence is completed with solvent and fluid lines in place before running a sample.
- Page 108 Description LightLab contains a highly sensitive flow meter that controls the flow and pressure inside the system to tight tolerances. If the flow is outside of a range and the LightLab is unable to correct the condition, an error occurs.
-
Page 109: High Absorbance Sample
TROUBLESHOOTING 7. The instrument has a clog. Flush the sample input (Settings Flush System Clear Sample Input) and then re-start the analysis. For persistent clogs, flush the instrument forward (Settings Flush System Flush Forward), or backward (Settings ... -
Page 110: Power On Self Test (Post) Fail
10 minutes, then try again. 3. The incorrect charger may be plugged in. Replace with original charger and try again. Note LightLab uses a specialized charger and cannot be operated with a standard DC power brick. 4. If a component continues to fail on startup, contact support. - Page 111 If the samples become difficult to inject, clearing the sample input may be necessary, see Section 11, Clearing Sample Input. 5. For flower, the moisture content of the plant may be significant. LightLab measures weight percent, and plant material will always contain some amount of moisture.
- Page 112 6. If comparing against a laboratory test, there are several reasons the results may differ between the LightLab and the laboratory. a. The sample analyzed by LightLab may not be the same as that run by the lab. Cannabis is a natural product with variation between different flowers.
- Page 113 TROUBLESHOOTING 7. When benchmarking your results with industry results, keep in mind that often results shown at dispensaries are inflated. It is extremely rare for a plant to contain >30% cannabinoids (that would mean nearly 1/3 of the plant is cannabinoids- not leaving much for the plant structure, chlorophyll, etc.).
-
Page 114: Compliance And Safety Information
Never use a LightLab that is damaged or operating erratically. Never use the device for anything but it’s intended use. Do not open the LightLab, harmful UV rays may be present inside the device. COMPLIANCE INFORMATION This device complies with Part 15 of the FCC Rules. Operation is subject to... - Page 115 COMPLIANCE AND SAFETY INFORMATION the instruction manual, may cause harmful interference to radio communications. Operation of this equipment in a residential area is likely to cause harmful interference in which case the user will be required to correct the interference at his own expense.
-
Page 116: Contact Information
SUPPORT CONTACT INFORMATION +1 603.573.9212 x2 support@OrangePhotonics.com Support Hours: Monday – Friday 8AM – 7PM Eastern (5AM-4PM Pacific) CUSTOMER DASHBOARD www.OrangePhotonics.com/Dashboard GENERAL INQUIRIES +1 603.573.9212 x0 info@OrangePhotonics.com SALES SUPPORT +1 603.573.9212 x1 sales@OrangePhotonics.com Orange Photonics, Inc +1 (603) 573-9212 www.OrangePhotonics.com info@OrangePhotonics.com...
Need help?
Do you have a question about the LIGHTLAB and is the answer not in the manual?
Questions and answers