Advertisement
www.DanaherMotion.com
OC950 EPROM Installation Instructions
For OC950-600-UP & OC950-500-UP
Remove AC Input Power from the controller before disassembly.
NOTE
OC950 EPROM Installation
Requirements
1. Perform this operation on a dry surface with a clear area of at least 12 in wide and 12 in
deep. The area should be static free, and precautions to safeguard the EPROMS
against static discharge should be taken.
2. A PLCC extraction tool is required for removing the EPROMS. It is included in upgrade
kit.
Procedure
1. Prepare the static free worktable.
2. Remove power from the drive.
3. Remove the option card from the drive.
4. Place the option card on the edge of the table with the faceplate facing toward you and
overhanging the edge. Connector J51 should be on the left side of the faceplate.
NOTE
NOTE
Manufacturer
McKenzie
Be careful not to stress or bend the PC board.
Pin 1 on the EPROM is indicated by a dot and is silk-screened on
the PC Board. The EPROM is also keyed on one corner.
Part Number
TOL PL CC-XT-2
Advertisement
Table of Contents

Related Manuals for Pacific Scientific OC950 EPROM

Summary of Contents for Pacific Scientific OC950 EPROM
- Page 1 OC950 EPROM Installation Instructions For OC950-600-UP & OC950-500-UP Remove AC Input Power from the controller before disassembly. NOTE OC950 EPROM Installation Requirements 1. Perform this operation on a dry surface with a clear area of at least 12 in wide and 12 in deep.
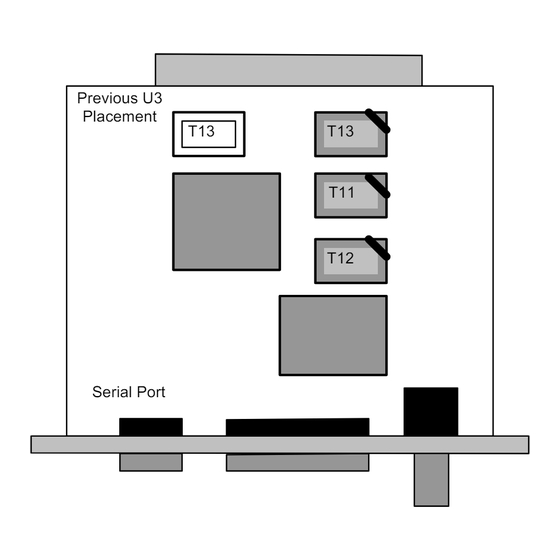
- Page 2 Danaher Motion Pacific Scientific 09/2004 EEPROM Installation Instructions Previous U3 Placement Serial Port 5. With the PLCC extractor, remove (3) EPROMS labeled U1, U2 and U3. Fully insert the prongs of the PLCC tool into the diagonal slots in the PLCC sockets. Squeeze the tool together to secure the PLCC chip.
Need help?
Do you have a question about the OC950 EPROM and is the answer not in the manual?
Questions and answers