Table of Contents
Advertisement
Available languages
Available languages
Quick Links
Assembly Instructions
M
B
LLR16209
High Table Side
Leg Frame
Leg Frame
Adjustable Glide
1 PC
2 PCS
D
LLR16208
Adjustable Cross
Bar Set
Cross Bar Set
1 PR
B
N
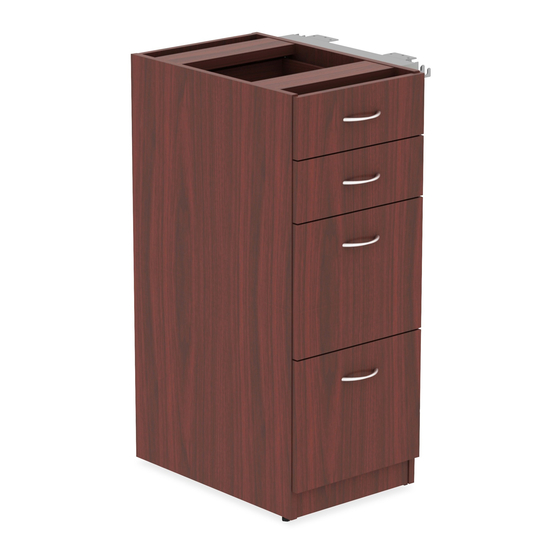
LLR16210/16211
/16236
4-Drawer Cabinet
with Side metal
Adjustable Glide
File Clip
Frame
4 PCS
4 PCS
STEP 1
STEP 3
IMPORTANT NOTE:
• Place all laminated parts on a clean and smooth surface such as a rug or carpet to avoid the parts from being scratched.
• Check to make sure that you have all parts and hardware.
• Remove all wrapping materials, including staples and packaging straps before you start to assemble.
• Do not tighten all screws/bolts until pieces are completely assembled.
• Keep all hardware parts out of children's reach.
• It is recommended for 2 persons to complete this assembly.
C
Screw M4.8*22
12 + 2 extra PCS
E
F
C
U Bracket
Screw M8*20
Screw M4.8*22
4 PCS
4 PCS
8 + 2 extra PCS
O
P
Q
300*16*3mm
96mm Metal Scallop
Metal Bar
Shape Handle
Side Metal Frame
2 PCS
4 Sets
Rubber hammer
G
H
Screw M8*8
Allen Wrench-4#
8 PCS
1 PC
C
R
Screw M4.8*22
Screw M4*40
1 PC
6+2 extra PCS
4+2 extra PCS
STEP 2
I
T
S
Allen Wrench-5#
Metal Flat Plate
Screw M5*19
1 PC
1 PC
8 + 2 extra PCS
TWO PEOPLE ARE REQUIRED TO
ASSEMBLE AND MOVE THIS MODEL
Rubber hammer
Advertisement
Table of Contents

Related Manuals for Lorell 59632


Summary of Contents for Lorell 59632
- Page 1 Assembly Instructions LLR16209 High Table Side Leg Frame Leg Frame Adjustable Glide Screw M4.8*22 1 PC 2 PCS 12 + 2 extra PCS LLR16208 Adjustable Cross Bar Set Cross Bar Set U Bracket Screw M8*20 Screw M4.8*22 Screw M8*8 Allen Wrench-4#...
-
Page 2: Important Note
Assembly Instructions STEP 5 STEP 4 STEP 7 STEP 6 Loosen the screws to take off the top panel Press the right lever up and left lever down to take off 4 drawers Lock Lever IMPORTANT NOTE: •... - Page 3 Assembly Instructions STEP 8 Suggest to keep the distance of 5mm from metal frame edge to panel edge Suggest to keep the distance of 5mm from metal Only assemble high table side leg Align frame edge to panel edge frame using 12 pcs screw “C”.
-
Page 4: Completed Assembly
Assembly Instructions STEP 11 STEP 12 COMPLETED ASSEMBLY IMPORTANT NOTE: • Place all laminated parts on a clean and smooth surface such as a rug or carpet to avoid the parts from being scratched. • Check to make sure that you have all parts and hardware. •... -
Page 5: Instructions D'assemblage
Instructions d’assemblage LLR16209 Pied de table en châssis (long) Pied de table Patin d’ajustement Vis M4.8*22 en châssis x1 x12 + 2 extra LLR16208 Traverses réglables Traverses réglables Support Vis M8*20 Vis M4.8*22 Vis M8*8 Clé hexagonale-4# Clé hexagonale-5# 1 paire x8 + 2 extra LLR16210/16211... - Page 6 Instructions d’assemblage ÉTAPE 4 ÉTAPE 5 2 personnes sont requises pour l’assemblage et le déplacement de ce modèle. ÉTAPE 7 ÉTAPE 6 Pour retirer les 4 tiroirs, appuyer sur le cran de droite tout en soulevant le cran de gauche Cran NOTE IMPORTANTE : •...
- Page 7 Instructions d’assemblage ÉTAPE 8 Éléments ajourés de 5 mm Éléments ajourés de 5 mm Aucun écart Utiliser 12 des vis C pour monter le pied de table ÉTAPE 9 ÉTAPE 10 Pour bien ajuster le cadre au classeur, il est recommandé...
- Page 8 Instructions d’assemblage ÉTAPE 12 ÉTAPE 11 ASSEMBLAGE COMPLÉTÉ 2 personnes sont requises pour l’assemblage et le déplacement de ce modèle. NOTE IMPORTANTE : • Déposez toutes les pièces laminées sur une surface propre et douce comme sur une carpette ou un tapis afin d’éviter l’éraflure des pièces. •...
-
Page 9: Instrucciones De Ensamble
Instrucciones de ensamble LLR16209 Armazón de Tornillo M4.8*22 pata lateral 12 unidades + Armazón de pata Nivelador ajustable 2 unidades de la mesa alta 1 unidad 2 unidades adicionales LLR16208 Juego de Tornillo M4.8*22 8 unidades barras cruzadas Juego de barras Soporte en U 4 Tornillo M8*20 4... - Page 10 Instrucciones de ensamble PASO 4 PASO 5 Se necesitan dos personas para ensamblar y mover este modelo. PASO 7 PASO 6 Oprima la palanca derecha hacia arriba y la palanca izquierda hacia abajo para sacar 4 cajones Palanca de cierre NOTA IMPORTANTE: •...
- Page 11 Instrucciones de ensamble PASO 8 Mantenga la distancia de 5 mm Mantenga la distancia de 5 mm Únicamente arme la armazón de la pata lat- Alinea eral de la mesa alta usando 12 tornillos “C”. PASO 9 gabinete, usualmente se necesita PASO 10...
- Page 12 Instrucciones de ensamble PASO 11 PASO 12 MONTAJE COMPLETO Se necesitan dos personas para ensamblar y mover este modelo. NOTA IMPORTANTE: • Coloque todas las partes laminadas sobre una superficie limpia y uniforme (como un tapete o la alfombra) para evitar que se rayen.
- Page 13 Instructions CALL US FIRST! DO NOT RETURN TO STORE. For immediate help with assembly or product information call our toll-free number: 1-888-598-7316 Mon. - Fri. 7am to 7 pm CST Our staff is ready to provide assistance. Damaged or missing parts ship from our facility in 1-2 business days. Please provide the following information: 1.
Need help?
Do you have a question about the 59632 and is the answer not in the manual?
Questions and answers