Table of Contents
Advertisement
Advertisement
Table of Contents

Related Manuals for Aqua-Marina OP-277


Summary of Contents for Aqua-Marina OP-277
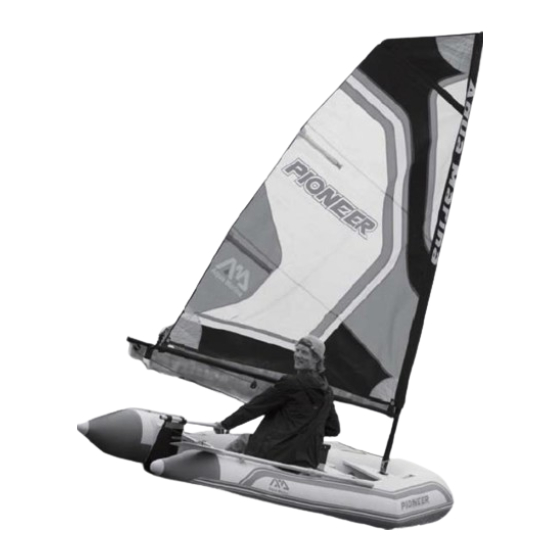
- Page 1 USER MANUAL – EN Inflatable Sailing Dinghy Aqua Marina Pioneer OP-277...
-
Page 2: Table Of Contents
CONTENTS INTRODUCTION ............................. 3 GENERAL INFORMATION ........................3 MANUFACTURER’S CERTIFICATION ....................3 MANUFACTURER’S RECOMMENDATION ..................3 SAFETY PRECAUTIONS ........................4 SPECIFICATION AND FEATURES ......................5 SPECIFICATIONS ..........................5 STANDARD EQUIPMENT ........................6 SAIL RIGS ............................... 7 PRODUCT FEATURES ........................... 8 ASSEMBLY AND DISASSEMBLY ...................... -
Page 3: Introduction
INTRODUCTION Pioneer inflatable sailing boat is a new way of exploring the sailing experience. It allows people and first-time sailors to enjoy sailing fun and expert sailors to test their limits. DESIGN As a multi-purpose sailing dinghy, this boat features a stable and smart design which gives a classic speed boat shape and durable aluminium deck providing excellent stability and performance. -
Page 4: Safety Precautions
1. As per Directive 2013/53/EU boat Design Category C – Inshore: Designed voyagers in coastal waters, large bays, estuaries, lakes and rivers where conditions up to, and including, wind force 6 and significant wave heights up to, and including, 2 m may be experienced 2. -
Page 5: Specification And Features
Do not drag the boat over rocks or gravel. Avoid them if possible. Do not exceed certified maximum capacities of this boat under any circumstance. Do not go boating alone. Do not use compressors, CO or compressed air for inflation. Use only Aqua Marian recommended pumps. -
Page 6: Standard Equipment
STANDARD EQUIPMENT Aluminium deck (foldable Triangle head for insert the sail mast removable) Oar holder Rotation oar lock Safety grab handles Aluminium oar set Centre thwart/dagger board insert Mast insert hole bench Halyard hook connecting rope Transom Stern rudder lug (connection position of Aluminium motor mount board stern rudder plate) Recessed pressure valve for inflate the... -
Page 7: Sail Rigs
SAIL RIGS Sail: 3.8 m , PVC window and Dacron fabric. Boom: 2-section adjustable aluminium boom with rollers to secure the sail line. One segment with 970 mm (length), 40 mm (diameter), 1 mm (wall thickness). One segment with 1170 mm (length), 40 mm (diameter), 1 mm (wall thickness). Mast: 4-section aluminium mast Section 1: 210 mm (length), 45 mm (diameter), 2 mm (wall thickness). -
Page 8: Product Features
PRODUCT FEATURES... -
Page 9: Assembly And Disassembly
ASSEMBLY AND DISASSEMBLY SET-UP PREPARATION Unfold the boat from the packing box. Choose a smooth and clean surface to set up your boat. NOTE: Do not scratch the product with a knife while opening the package. VALVE OPERATION Follow these valve instructions to inflate or deflate the boat properly. The boards inflation valve is located near the nose of the board. -
Page 10: Inflation Steps
You have to deflate some air to protect it from damage due overpressure. Use only Aqua Marina® approved inflation pumps. Never use motor driven high-pressure air pumps as these may cause over inflation. Fill it only with cold air. -
Page 11: Boat Set Up
BOAT SET UP 1. Hull inflation Use a standard 16” hand pump for inflation. First inflate the bow and then inflate the air chambers on both sides of the hull. Stop inflation until the hull is expanded. During the setting up, don’t inflate fully the air chambers of the hull. -
Page 12: Sail Rig Set Up
3. Complete the hull inflation At last, complete the hull inflation. Same as above, firstly add inflation to the air chamber in the bow. Then the air chambers on the both sides of the hull, at last the inflatable keel. The steps are as following pictures. -
Page 13: The Connection Installation Of The Sail Rig And Hull
3. After the mast installation is completed, insert it into the side mast sleeve of the sail rig from the bottom port and push it to the top of the sail rig. THE CONNECTION INSTALLATION OF THE SAIL RIG AND HULL 1. - Page 14 Make the other end of the boom connection with the roller to bind with the sail rig with magic stick and fix it as shown in following picture. 3. Halyard installation Fix one end of the standard strong halyard to the stern plate rope (stern plate rope has been installed). Pull the other end through the first pulley and the second pulley of the boom connection to finish the installation.
-
Page 15: Oar Assembly
5. Centre thwart installation Insert the centre thwart through the hole position as shown in the picture. Central thwart should be inserted into the waterproof bag. It is necessary to stick it tightly around the waterproof bag to prevent water from entering. Installation is completed. OAR ASSEMBLY 1. - Page 16 When landing on the shore, carry the boat. Do not drag it on sand or ground to avoid damage. While using the tow rings, go slowly and avoid over-towing. Clean your boat after a trip to prevent damage from sand, salt water or sun exposure. Most dirt can be removed with a garden hose, sponge and mild soap.
-
Page 17: Leak Detection And Repair
LEAK DETECTION AND REPAIR AIR LEAK DETECTION If your boat appears a bit soft, it might not be because of leak. If the boat was inflated late in the day with 32°C (90°F) air, that air might cool down to 25°C (77°F) overnight. The cooler air exerts less pressure on the hull, so it could appear soft the next morning. - Page 18 These Conditions of Warranty and Warranty Claims are an integral part of every Purchase Agreement made between the Seller and the Buyer. All Warranty Conditions are valid and binding, unless otherwise specified in the Purchase Agreement, in the Amendment to this Contract or in another written agreement.
- Page 19 SEVEN SPORT s.r.o. Registered Office: Borivojova 35/878, 130 00 Praha 3, Czech Republic Headquarters: Delnicka 957, 749 01 Vitkov, Czech Republic Warranty & Service Centre: Cermenska 486, 749 01 Vitkov, Czech Republic CRN: 26847264 VAT ID: CZ26847264 Phone: +420 556 300 970 E-mail: eshop@insportline.cz reklamace@insportline.cz...
Need help?
Do you have a question about the OP-277 and is the answer not in the manual?
Questions and answers