Table of Contents
Advertisement
Quick Links
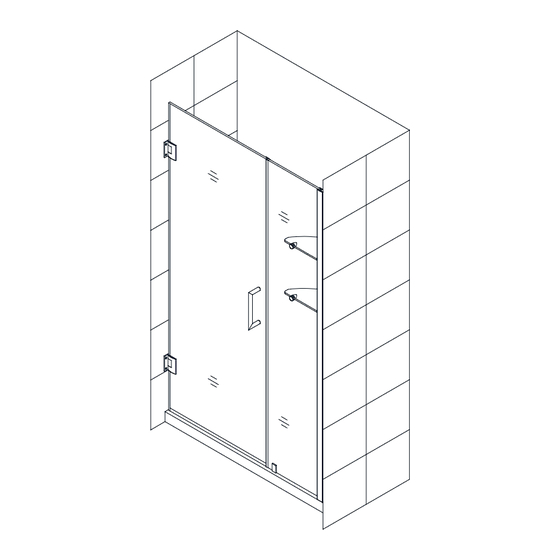
UNIDOOR Style C
S
D
I
P
I
I
HOWER
OOR AND
NLINE
ANEL
NSTALLATION
NSTRUCTIONS
IMPORTANT
DreamLine
reserves the right to alter, modify or redesign products at any time without prior notice.
®
For the latest up-to-date technical drawings, manuals, warranty information or additional details please refer
to your model's web page on DreamLine.com
STEP 2:
Install Shower Panel
STEP 1:
Install Shower Door
STYLE C
For more information about DreamLine
Shower Doors, Tub Doors & Enclosures, please visit DreamLine.com
®
©2018 DreamLine. All Rights Reserved
UNIDOOR STYLE C
Advertisement
Chapters
Table of Contents

Subscribe to Our Youtube Channel
Summary of Contents for Dreamline UNIDOOR Style C
- Page 1 DreamLine.com STEP 2: Install Shower Panel STEP 1: Install Shower Door STYLE C For more information about DreamLine Shower Doors, Tub Doors & Enclosures, please visit DreamLine.com ® ©2018 DreamLine. All Rights Reserved UNIDOOR STYLE C...
- Page 2 ® For the latest up-to-date technical drawings, manuals, warranty information or additional details please refer to your model’s web page on DreamLine.com Model #s SHDR-20237210F-##...
- Page 3 ©2018 DreamLine. All Rights Reserved Style “A” (single door installation shown) with Half-Frosted Glass: NOTE: This model features the Half-Frosted glass option. The textured surface on the door glass should be installed to face outside of the shower. The door glass can be flipped for left or right-hand installation.
- Page 4 ©2018 DreamLine. All Rights Reserved Table of Contents Section Title Page # Unidoor Styles Preparation Tools Required Reinforcement locations Glass and Hinge hole details 11-12 Detailed Diagram of Shower Door Components and Parts List Installation Instructions 14-21 Adjustable Hinge Details...
-
Page 5: Unidoor Styles
©2018 DreamLine. All Rights Reserved UNIDOOR STYLES- Models with Glass-to-Wall hinges UNIDOOR Single Shower Door manual Ver 2 Rev 6 02/2018... - Page 6 ©2018 DreamLine. All Rights Reserved Models with Glass-to-Glass Hinge panels: For Glass-to-Glass Hinge Door models: Use the installation manual that is packaged with the Hinge panel glass first. UNIDOOR Single Shower Door manual Ver 2 Rev 6 02/2018...
- Page 7 ©2018 DreamLine. All Rights Reserved STYLE A UNIDOOR Single shower door 23”- 30” Refer to detailed diagram on page 12 of this manual to begin the installation. STYLE B * UNIDOOR Shower door 23” – 30” with 6” small or 12”-30” large stationary panel with a Support Bar UNIDOOR-LS Shower door 23”...
- Page 8 ©2018 DreamLine. All Rights Reserved STYLE M2 *^ UNIDOOR X Shower door 23”~30” with 6” or 24” hinge panel with 12”, 18”, 24” or 26” inline buttress panel secured using u-channel STYLE M3 *^ UNIDOOR X Shower door 23”~30” with 6” or 24” hinge panel, with 6”, 6-1/2”, 14”, 14-1/2”, 22”...
-
Page 9: Preparation
“Detailed Diagram of Shower Door Components”. If the unit has been damaged, has a finishing defect, or is missing parts, please contact our customer support department within 3 business days of the delivery date. Please note that DreamLine will not ®... - Page 10 ©2018 DreamLine. All Rights Reserved Tools Required UNIDOOR Single Shower Door manual Ver 2 Rev 6 02/2018...
- Page 11 ©2018 DreamLine. All Rights Reserved UNIDOOR Single Shower Door manual Ver 2 Rev 6 02/2018...
- Page 12 ©2018 DreamLine. All Rights Reserved UNIDOOR Single Shower Door manual Ver 2 Rev 6 02/2018...
- Page 13 ©2018 DreamLine. All Rights Reserved UNIDOOR Single Shower Door manual Ver 2 Rev 6 02/2018...
-
Page 14: Handle
©2018 DreamLine. All Rights Reserved Detailed Diagram of Shower Door Components The glass surface with the ClearMax™ label must be installed to face inside of the shower Packing List Description Description Part# Part# Door glass Side strip (hinge side) Handle Bottom anti-water strip (sweep) Countersunk screw ST5×70... - Page 15 ©2018 DreamLine. All Rights Reserved Single Shower Door Assembly and Installation NOTE: The following shower door installation instructions should be used as a general guide and prerequisite to the installation of the UNIDOOR, UNIDOOR-LS, UNIDOOR LUX and UNIDOOR PLUS models. Before you begin the installation, please check your finished opening size.
- Page 16 ©2018 DreamLine. All Rights Reserved 2. The Door Glass (01) ships with four 5/8” shims attached to the top (2pcs) and bottom (2pcs). Determine the swing of your door and only remove the shims from the top of the door glass, leaving the bottom shims in place.
- Page 17 ©2018 DreamLine. All Rights Reserved TIP: The PVC hinge spacer can also be used as a template to assist with marking the hinge mounting holes. *Only use the PVC hinge spacer to correct for minor out-of-plumb wall conditions. Fig. 4...
- Page 18 ©2018 DreamLine. All Rights Reserved Setting the Adjustable Hinges The Adjustable hinges are pre-set to overclose to 85º and are adjustable up to 90º after the door is installed. Once the door glass is installed, simply loosen the Allen set screws and position the door to the desired closed position.
- Page 19 ©2018 DreamLine. All Rights Reserved 5b. The hinges are factory set to 85 degrees. You can change this angle by using the adjustment screws on the hinge plate. (Fig 5b) outside inside Fig 5b 5c. Use the supplied Allen Key to loosen the adjustment screws on the inside hinge plate, adjust the door to the desired angle (90 degrees for example) then retighten the adjustment screws (Fig 5c).
- Page 20 ©2018 DreamLine. All Rights Reserved 6. Mount the Handle (02) to the Door Glass (01). (Fig 6) Fig. 6 7. Measure the bottom of the Door Glass Handle side 3/8" (01) from end to end to determine the strip end actual width of the door.
- Page 21 ©2018 DreamLine. All Rights Reserved 8. Take three measurements: from the top edge of the Door Glass (01) to the upper body of the top Hinge (05) (+) 7/8” from the lower body of the upper Hinge to the upper body of the bottom Hinge (+) 1-3/4”...
- Page 22 ©2018 DreamLine. All Rights Reserved Fig. 10 If the model includes additional panel glass, refer to the manual that is packaged with the panel glass to continue with the installation. UNIDOOR Single Shower Door manual Ver 2 Rev 6 02/2018...
-
Page 23: Product Maintenance
©2018 DreamLine. All Rights Reserved Product Maintenance BASES and BACKWALLS: To ensure long-lasting life for your acrylic back walls: wipe them off after each use with a soft cloth. To clean the acrylic back walls use non-abrasive sprays or cream based cleaners. - Page 24 ©2018 DreamLine. All Rights Reserved TEL: 866-731-2244 FAX: 866-857-3638 REAM INE.COM For more information on DreamLine ® Shower Doors Enclosures please visit DreamLine.com UNIDOOR Single Shower Door manual Ver 2 Rev 6 02/2018...
- Page 25 Right-Hand panel installation shown Please review this entire manual prior to installation. For more information about DreamLine Shower Doors, Tub Doors & Enclosures, please visit DreamLine.com ® INLINE PANEL - Style C shower panel manual Ver 1 01/2018 ©2018 DreamLine. All Rights Reserved...
- Page 26 SHDR-20547210S-## SHDR-20537210CS-## SHDR-20547210CS-## SHDR-20557210S-## SHDR-20567210S-## SHDR-20577210S-## SHDR-20587210S-## SHDR-20597210S-## SHDR-20607210S-## ## = Finish 01- Chrome 04- Brushed Nickel 06- Oil Rubbed Bronze 09- Satin Black INLINE PANEL - Style C shower panel manual Ver 1 01/2018 ©2018 DreamLine. All Rights Reserved...
- Page 27 This model is treated with DreamLine’s exclusive ClearMax Glass technology. This is a specially formulated coating that prevents the buildup of soap and water spots. Install the surface with the ClearMax label towards the inside of the shower. Please note that depending on the model, the glass may be coated on either one or both surfaces.
-
Page 28: Table Of Contents
Table of Contents Page # Section title Preparation Tools Detailed Diagram of Shower Panel Components Parts Diagram and Parts List Adjustable Wall Profile System Installation Steps 7-14 Vinyl Seals Glass Shelves Product maintenance INLINE PANEL - Style C shower panel manual Ver 1 01/2018... -
Page 29: Preparation
2. Please note that you should consult your local building codes with questions on installation compliance standards. Building and plumbing codes may vary by location, and DreamLine ® not responsible for code compliance standards for your project and will not accept any returns. - Page 30 Before discarding the carton, check for small hardware bags that may have fallen to the bottom of the box. If any parts are damaged or missing, please contact DreamLine for replacement. The shipping boxes may contain extra parts not used in ®...
-
Page 31: Detailed Diagram Of Shower
Detailed Diagram of Shower Panel Components Diagram C INLINE PANEL - Style C shower panel manual Ver 1 01/2018... - Page 32 Parts List Diagram C DESCRIPTION DESCRIPTION PART# PART# Wall profile Pan head screw ST4.2x35 4pcs Glass profile Decorative screw cover and washer Panel glass Bottom bracket 2pcs Glass shelf Anti-Water strip (inline) 8pcs 2pcs Wall Anchor Shelf bracket (with nut) 3pcs 4pcs Pan head screw ST4.2x10...
-
Page 33: Adjustable Wall Profile System
Adjustable Wall Profile System Glass Profile Wall Profile The Glass Profiles can be adjusted within the Wall Profiles for overall width or to correct for out-of-plumb conditions within the model size. Screw them together after making final adjustments. Ø1/8" INLINE PANEL - Style C shower panel manual Ver 1 01/2018... -
Page 34: Installation Steps
Before beginning the installation, recheck the finished opening size. Specific model size information can be found on DreamLine.com. NOTE: The left-swing Unidoor door installation is shown as an example throughout this manual. Use the same method for aligning the door and panel for the Elegance door and inline panel installation. - Page 35 Apply clear silicone into the entire length of the channel in the Glass Profile (#10) and attach it to the edge of the Panel Glass (#11). Make sure the Glass Profile (#10) is flush with the top and bottom of the Panel Glass (#11).
- Page 36 Press the Anti-Water Strip (inline) (#19) onto the vertical edge of the Panel Glass (#11). (This will protect the edge of the panel glass and allow for proper spacing with the door glass). Attach the Bottom Bracket (#18) through the bottom hole of the Panel Glass (#11). (Fig 3) inside inside inside...
- Page 37 Close the Door and align the Panel Glass (#11) with the align the panel glass Door Glass. Use the reference mark on the threshold (from with the door glass Step #1 ) to confirm that the Door is perpendicular to the 1/16"-1/8"...
- Page 38 Double check the alignment and spacing of the panel glass with the door glass before drilling into the threshold for the bottom bracket. Drill a hole for the Bottom Bracket (#18) into the threshold at the mark that was made in step #5. ** Use an Ø1/8”...
- Page 39 Recheck the alignment and spacing of the Door Glass and Panel Glass (#11) and test the operation of the Door. After final adjustments of the Panel Glass (#11) drill holes into the Glass Profile (#10) through the predrilled holes in the Wall Profile (#09) using an Ø1/8” drill bit. Use the Pan Head Screws ST4.2×10 (#14) and Washers (#17) to attach the Wall Profile (#09) to the Glass Profile (#10).
- Page 40 Glass Support Shelves Installation ELEGANCE Style C UNIDOOR Style C Right-Hand panel installation shown Mark the Glass Shelf (#12) position on the wall. According to the measurements in Fig. 10a1, mark the drilling holes for the Shelf Brackets (without nut) (#22).
- Page 41 Allow 24 hours for the silicone to fully cure before using the shower. (Fig 11) Hours Hours ELEGANCE Style C UNIDOOR Style C Fig 11 Right-Hand panel installation shown INLINE PANEL - Style C shower panel manual Ver 1 01/2018...
-
Page 42: Product Maintenance
NOTE: To maximize the life of your door, it is important to regularly inspect the glass and all hardware for misalignment, proper attachment, and/or damage. Contact DreamLine with any questions or concerns. ® DreamLine shower doors and enclosures are designed not to leak when ®... - Page 43 TEL: 866-731-2244 FAX: 866-857-3638 DREAMLINE.COM For more information on DreamLine Shower Doors and Enclosures please visit DreamLine.com ® ©2018 DreamLine. All Rights Reserved...
Need help?
Do you have a question about the UNIDOOR Style C and is the answer not in the manual?
Questions and answers