Table of Contents
Advertisement
Quick Links
Horse
Power
INSTALLATION MANUAL:
HPI 2101 cylinder 2 stroke
universal ignition witli integrated 60W liglit coil
HPI - Kuilenstraat 97, 3960 Bree, Belgium
TEL: (0032) 089-46 74 39 | FAX: (0032) 089-47 33 28 | GSM: (0032) 0495-53 90 21
Email: hpi@hpi.be | Website: www.hpi.be
HPI wants to thank you for your confidence in its products.
Please read this manual carefully to ensure years of enjoyment of this specialised high end electronic device.
This manual shows you how to properly install the Stator, flywheel, CDI and HT coil.
Stator Installation:
•
Remove the original ignition from your engine.
•
Depending on the engine's setup, a mounting plate is included in this set.
This mounting plate serves as an adaptor between your engine and the 210 ignition.
Fit the mounting plate on your engine.
•
Locate the cable exit on your engine and position the stator according to this hole.
If necessary, remove the plug (see backside) and lead the cable through the hole.
•
Center the stator on the mounting plate (if present) or directiy on your engine.
•
Gently bolt the stator to your engine; do not tighten the bolts yet.
Flywheel Installation:
The flywheel has to be placed on the crankshaft or otherwise on an axis which rotates at the same speed.
•
Position the cylinder 2mm before its Top Dead Centre (TDC).
•
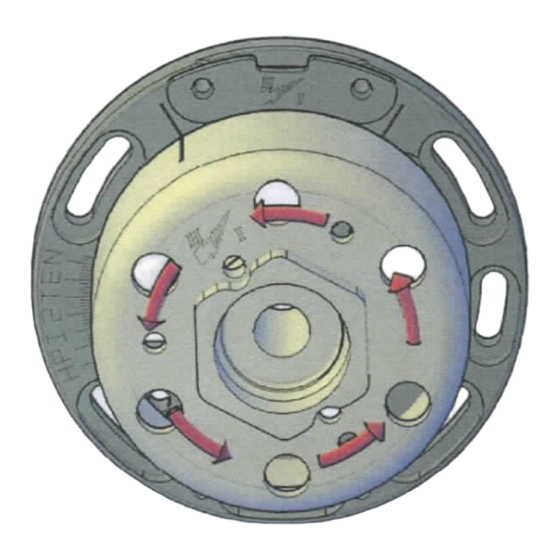
Place the flywheel on the shaft, aligning the mark on the rotor with the mark on the stator.
This Position corresponds with the maximum ignition advance. (see backside Image)
•
The images on the right indicate which mark should be aligned
according to the rotation direction.
•
Double check that the flywheel does not touch the stator windings.
•
Fasten the flywheel to the shaft.
•
Check the position of the cylinder.
If necessary adji ist thft-^lignment by turning the stator pjatg,.
^
•
Fasten the stator plate.
To gain Performance, try to vary the cylinder position between 2 to 4mm before TDC.
Wiring instructions:
•
Light-coil yellow
HT-coil
orange
black ring
•
Stator
3-way plug
Connect the 60W light coil to your light circuit or regulator
Connect the HT-coil to the frame.
Plug the orange cable to the HT-coil,
Connect the black cable with ring to the
bracket of the HT-coil and to the frame.
Plug the 3-way connector of the stator directiy into the CDI.
If you need to lead the cable through a narrow space,
See back side to remove the connector from the cable loom.
Kill
black/white
Connect the black-white to frame / ground for an emergency stop.
Curve
yellow
swItch
yellow/green
connect the curve button to these wires. (optional)
Switch the button to select the desired advance curve.
To minimize electrical interference, try to keep all cables at a safe distance from the HT cable.
Fasten all the cables to the frame and keep them clear from hot places and moving parts.
Please attend to the following remarks:
the CDI-unit and cables must not be exposed to mechanical stress.
the CDI-unit must not be exposed to excessive heat (not behind the radiator, dose to the cylinder or the exhaust).
the CDI-unit must not be exposed to electrical interferences (not dose to the ht-coil).
the CDI-unit must not be directiy exposed to fluids (water, gasoline, oil,...).
Do NOT extend cables, this may cause interference and damage to the CDI orthe engine.
ATTENTION
When using the M6 holes of the flywheel, (fan, flywheel puller,...)
Make Sure the bolts don't protrude inside the flywheel!
Protruding bolts can damage the stator colls and void warranty.
Advertisement
Table of Contents

Need help?
Do you have a question about the HPI 210 and is the answer not in the manual?
Questions and answers