Table of Contents
Advertisement
Quick Links
USER GUIDE
Model 2652
THE PERSONAL SMART METER
WELCOME
Eco
welcome you to the Saveometer personal smart meter (PSM). This user manual
1
will guide you through the simple steps that are necessary before you enjoy your
new purchase, and will help you to save money and our environment every day for
years to come.
Your new Saveometer PSM is designed to work "out of the box". We recognise that
many people like to enjoy new purchases immediately, and frequently start reading
the user guide as a last resort! But on this occasion please take time to read this
guide, and you will soon discover that the Saveometer has very many useful money
saving features that may otherwise remain undiscovered.
1
Advertisement
Table of Contents

Summary of Contents for Saveometer 2652
- Page 1 Your new Saveometer PSM is designed to work “out of the box”. We recognise that many people like to enjoy new purchases immediately, and frequently start reading...
-
Page 2: Table Of Contents
INDEX Saveometer display – side view and support PAGE bracket open Welcome Index Technical and What’s in the box statutory data label Feature list Getting Started To avoid damage the support bracket is The Atomic clock designed to release if... -
Page 3: What's In The Box
Up to 3 jacks may be connected at a time rechargeable 1 Sensor clip with wire & jack batteries 2 Transmitter 3 Saveometer display (Use only the Power supply 4 Power supply & 6 batteries supplied batteries which connects 5 Display charging base... - Page 4 Very low energy Eco friendly “ switching” power supply The Saveometer PSM current sensor clip is efficient from half an amp up to 100 amps Two or three phase electricity supplies may be monitored. (Each phase requires an ...
-
Page 5: Getting Started
10 hours, then replace the transmitter with the Saveometer display for a similar period. When batteries need recharging battery icons will show on the display - T indicating the transmitter and D the display. - Page 6 If you require more guidance and examples of typical installations please visit www.saveometer.com/installation If your electricity meter is located in a distant external meter box or a basement, or you have a...
-
Page 7: The Atomic Clock
As you walk around the house or commercial premises switching electrical equipment on and off, the Saveometer will show you every 6 seconds the precise hourly cost of electricity you are using. And please remember that for electricity …... -
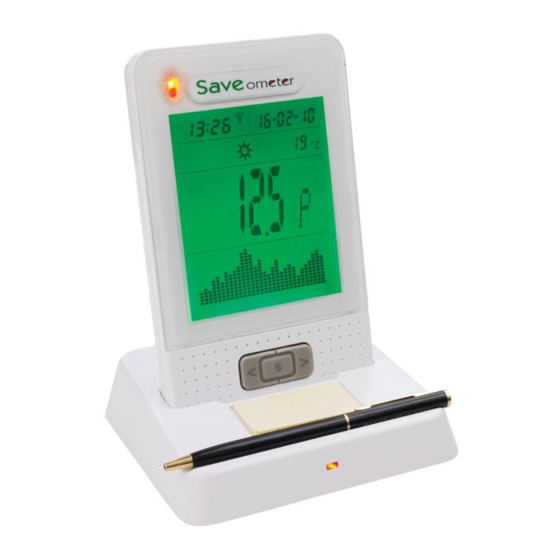
Page 8: The Saveometer Display
THE SAVEOMETER DISPLAY The Saveometer shows the cost per hour of the electricity you are using at any particular time. Every 45 seconds the display will show, for 5 seconds each, your electricity costs so far in the current week, and then the costs so far in the current... - Page 9 8 ACCESSING EVEN MORE INFORMATION By pressing the Top Button (TB) briefly the Saveometer will instantly show you even more information. Each short consecutive press of the button shows the following: Press What you see Description The back light remains illuminated whenever the Backlight turns on.
-
Page 10: How To Change Settings
9 HOW TO CHANGE SETTINGS Getting the best from the Saveometer PSM You can personalise your Saveometer and make it even more accurate for your particular home, office or commercial premises. During manufacture the variable choices are set to default values, all of which can be varied and tailor made to your own personal choice. - Page 11 A and then scroll through B, C & D using the S key & the Saveometer will automatically input the same rate to periods B, C & D. If paying 2 or 3 rates per day, set start times &...
- Page 12 S Erase ALL acquired stored data. This feature is seldom used and is primarily for when a Saveometer is reinstalled in a new applicable location, such as when moving home or business. This enables you to erase all data that your Saveometer has ever acquired since it was first installed.
- Page 13 Set time zone. It is also unlikely that you will ever need to use 0 (Zero) this mode. As mentioned in 11 above the Saveometer receives radio signals from one of several geographically spread transmitters, some of which may give a time that is not in line with the location where the Saveometer is located.
-
Page 14: Calculating Your Settings
This mode enables you to synchronise your gas meter with the Cubic Saveometer. Select mode 20 & you will see 5 or 6 main digits (000000). Meters Read your gas meter (ignoring the last 2 or 3 digits on the right – usually 00000 surrounded in red) and using the <... - Page 15 Please note that when your energy bills have varying charges for the initial kWh used, the accuracy of the Saveometer will vary seasonally. On an annual basis the cost figures will however remain accurate to within approximately 2 %.
-
Page 16: Technical Specification
If the Saveometer or any part thereof is used in a manner not specified herein the protection provided by the Saveometer may be impaired. Final manufacture is by a carefully selected ISO9001:2000... -
Page 17: Your Guarantee
Please take care of your Saveometer PSM. Do not attempt to repair or service any part of the Saveometer Personal Smart Meter, in the customersupport@saveometer.com event of any problems contact us at ... - Page 18 User Guides are occasionally mislaid or lost. If this happens there are abbreviated instructions also printed on a small label at the back of the display, as well as brief guide printed on the underside of the display charging base. Alternatively, free copies are available from our web site at www.saveometer.com...
-
Page 19: A Record Of Your Chosen Settings
14 A few typical electricity sensor clip installations Sensor clip 15 A record of your chosen settings Date of new Date of new Date of new MODE Description Default setting setting setting Rates & times +/- 12.5p all day Start time A - & rate Start time B - &... - Page 20 1000 mAH to 1500 mAH maximum. Failure to do so may damage the switch mode power supply. If the Saveometer is installed in a large house or in commercial Electricity sensor clip premises it is likely that the electricity is a “three phase” supply. A with three meter connecting separate sensor clip is required for each phase.
Need help?
Do you have a question about the 2652 and is the answer not in the manual?
Questions and answers