Table of Contents
Advertisement
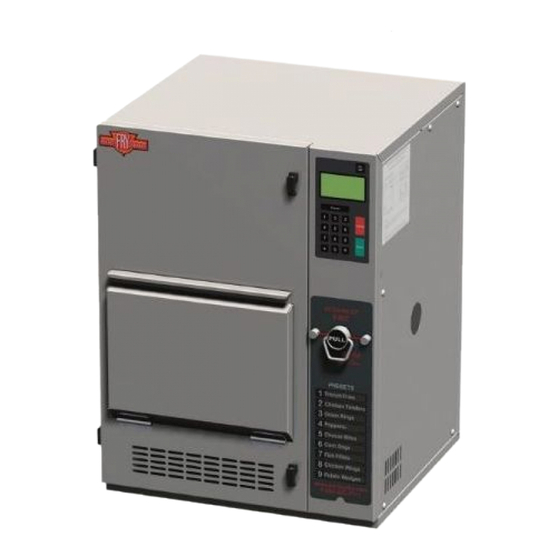
PFC SERIES MODELS
OWNER'S MANUAL
Be sure ALL operators read, understand and
have access to this manual at all times.
PHONE: 603-225-6684
MAILING ADDRESS: P.O. Box 501, Concord, NH 03302-0501
SHIPPING ADDRESS: 39 Sheep Davis Road, Pembroke, NH 03275
FAX: 603-225-8472
GENERAL INFORMATION: profits@perfectfry.com
CUSTOMER SUPPORT: service@perfectfry.com
WEB: www.perfectfry.com
©2012 PERFECT FRY COMPANY
L20-390 R3
Advertisement
Table of Contents

Related Manuals for PERFECT FRY COMPANY PFC 187


Summary of Contents for PERFECT FRY COMPANY PFC 187
- Page 1 PHONE: 603-225-6684 MAILING ADDRESS: P.O. Box 501, Concord, NH 03302-0501 SHIPPING ADDRESS: 39 Sheep Davis Road, Pembroke, NH 03275 FAX: 603-225-8472 GENERAL INFORMATION: profits@perfectfry.com CUSTOMER SUPPORT: service@perfectfry.com WEB: www.perfectfry.com ©2012 PERFECT FRY COMPANY L20-390 R3...
-
Page 2: Table Of Contents
OWNER’S MANUAL FOR ALL PFC MODELS TABLE OF CONTENTS THANK YOU FOR PURCHASING A PERFECT FRYER! ..................... 1 ..............................1 ARRANTY EGISTRATION ................................1 RYER CTIVATION OWNERS RESPONSIBILITIES ............................2 REGULATIONS & RECYCLING ............................3 ... - Page 3 OWNER’S MANUAL FOR ALL PFC MODELS DECLARATION OF CONFORMITY ..........................41 ORIGINAL STANDARD EQUIPMENT LIMITED WARRANTY ................. 42...
-
Page 4: Thank You For Purchasing A Perfect Fryer
warranty (see page Error! Bookmark not defined. for further details). Take comfort in knowing that the management and staff at Perfect Fry Company are dedicated to ensure that you, the owner and operator of a Perfect Fryer, receive a top quality product that is thoroughly inspected and tested prior to shipment. -
Page 5: Owners Responsibilities
OWNER’S MANUAL FOR ALL PFC MODELS –12/4/2017 OWNERS RESPONSIBILITIES It is the owner’s responsibility to: Insure the PERFECT FRYER is properly maintained. Allow only properly trained personnel to operate, clean and maintain a PERFECT FRYER. Contact local authorities having jurisdiction to insure that the installation conforms to all local fire, building and health regulations. -
Page 6: Regulations & Recycling
OWNER’S MANUAL FOR ALL PFC MODELS –12/4/2017 REGULATIONS & RECYCLING Installation of your PERFECT FRYER must conform to all local fire and health regulations and building codes. The installation use and maintenance is to be in accordance with the Standard for Ventilation Control and Fire Protection of Commercial Cooking Operations, NFPA 96 - 2004. -
Page 7: Safety First
OWNER’S MANUAL FOR ALL PFC MODELS –12/4/2017 SAFETY FIRST LIFTING & MOVING: Your PERFECT FRYER’s gross shipping weight is 92 lb. (42 kg). Net weight = 80 lb. (36 kg). DEEP FRYING: Cooking oil is very hot, 350ºF (177ºC). Hot oil can cause severe burns. DO NOT TOUCH THE COOKING OIL UNLESS YOU ARE SURE IT HAS COOLED. -
Page 8: Installation
AMPS WATTS MODEL AMPS NUMBER RECEPTACLE Put a check mark in the box beside the Model Number of your PERFECT FRYER □ PFC 187 16.0 1875 5-20 □ PFC 375 16.0 3750 6-20 □ PFC 570 24.0 5700... -
Page 9: Prepare Counter-Top Area
OWNER’S MANUAL FOR ALL PFC MODELS –12/4/2017 INSTALLATION (Continued) Prepare Counter-top Area Clearances: 1” on sides 2” on back 0” on top Unpack 1) Cut straps on shipping box 2) Remove box top and body 3) Remove outer plastic wrapping and keep box along with foam corners and sides Page 6 of 42... - Page 10 OWNER’S MANUAL FOR ALL PFC MODELS –12/4/2017 4) Lift your PERFECT FRYER onto counter-top Your PERFECT FRYER weighs 80 lb. (36 kg). Lift it carefully with your legs or with the help of another person and place it in its final location. 5) Remove all foam stuffing and parts 6) Put check mark ...
- Page 11 OWNER’S MANUAL FOR ALL PFC MODELS –12/4/2017 Page 8 of 42...
- Page 12 OWNER’S MANUAL FOR ALL PFC MODELS –12/4/2017 7) Ensure that blow-off caps on fire extinguisher nozzles are kept in place 8) Go to ASSEMBLY section (next page) Page 9 of 42...
-
Page 13: Assembly
OWNER’S MANUAL FOR ALL PFC MODELS –12/4/2017 ASSEMBLY 1) Clean parts and inside of cabinet (all except air filter cartridge) a) Wash in warm soapy water b) Rinse with hot water c) Rinse with vinegar solution (1 part vinegar to 2 parts water) The heater box must NOT be immersed in water or other liquid. - Page 14 OWNER’S MANUAL FOR ALL PFC MODELS –12/4/2017 ASSEMBLY (Continued) 6) Slide air filter cartridge firmly back into filter compartment and fasten down with latch. 7) Install spill tray into bottom cooking compartment Note: Indents on bottom of spill tray should fit into indents on bottom of cabinet 8) Set heater module onto vat Note: “^”...
- Page 15 OWNER’S MANUAL FOR ALL PFC MODELS –12/4/2017 ASSEMBLY (Continued) 10) Slide heater module/vat into cooking compartment and push in all the way. Ensure electrical connection is complete with a firm push on the heater module. 11) Install drip tray in-front of oil vat. Drip tray will fit snug between front edge of oil vat and inside edge of spill tray.
- Page 16 OWNER’S MANUAL FOR ALL PFC MODELS –12/4/2017 d) Pivot basket tray forward from vertical position and insert arms into spill tray. 13) Install and close front panel. Turn latch ¼ turn clockwise and press down 14) The fryer will now begin heating. In a few minutes, you will be ready to start cooking! Page 13 of 42...
-
Page 17: Cooking
OWNER’S MANUAL FOR ALL PFC MODELS –12/4/2017 COOKING Large Basket Extra Large Basket Fill Line 1. Insert Basket 2. Press Start 3. Frying 4. Remove & Serve Page 14 of 42... -
Page 18: Cleaning
OWNER’S MANUAL FOR ALL PFC MODELS –12/4/2017 CLEANING Daily Maintenance Do not unplug the fryer and always make sure the fryer is turned off Do not touch heater module, oil vat or oil unless you are sure it has cooled 1) Wipe basket(s) with paper towel to remove crumbs and food particles 2) Wipe crumbs, oil and any other food matter from inside of door into spill tray using a paper towel... - Page 19 OWNER’S MANUAL FOR ALL PFC MODELS –12/4/2017 CLEANING (Continued) 4) Pour cooking oil from vat into containers for disposal. Have empty containers handy for proper disposal of used cooking oil. A rendering company can help with proper disposal. 5) Remove basket lift, oil vat and heater module (picture right).
-
Page 20: Periodic Maintenance
OWNER’S MANUAL FOR ALL PFC MODELS –12/4/2017 CLEANING (Continued) Periodic Maintenance Air Filter Cartridge Replacement Replace the air filter cartridge at least once every 3 months, more often for higher volume usage. Replacement is safer and easier when the fryer is cool rather than hot. -
Page 21: Tips On Deep Frying
OWNER’S MANUAL FOR ALL PFC MODELS –12/4/2017 TIPS ON DEEP FRYING Great Food in Less Time Use premium quality commercial deep frying oil. Canola and Soybean oils are recommended. Do not use household cooking oils from your local supermarket. Poor quality oils may shorten the life of the air filter cartridge. -
Page 22: Oil Facts
OWNER’S MANUAL FOR ALL PFC MODELS –12/4/2017 OIL FACTS Frying oil is especially formulated to withstand high temperatures. For this reason, you must ensure you are using the right product. Liquid vegetable shortening is produced by several companies; the oil has an additive and/or has been formulated to increase the performance during high temperature usage. - Page 23 OWNER’S MANUAL FOR ALL PFC MODELS –12/4/2017 OIL FACTS (Continued) If the oil temperature is set too high, the food will cook on the exterior and the interior will be undercooked. When the interior is cooked completely, the exterior will be overdone or burnt. The higher temperature will also cause the oil to break down faster and smoke.
- Page 24 OWNER’S MANUAL FOR ALL PFC MODELS –12/4/2017 OIL FACTS (Continued) Food Not Browning Properly? New oil may not brown the product; check color again after a few basket loads. Too much product is in the basket; fill no higher than the fill line. ...
-
Page 25: Operating Instructions
OWNER’S MANUAL FOR ALL PFC MODELS –12/4/2017 OPERATING INSTRUCTIONS LCD SCREEN Displays user KEYPAD ON/OFF KEY information Easy to use, just a firm To turn ON touch with your finger tip To turn OFF A smooth flat surface ... -
Page 26: Starting Up
OWNER’S MANUAL FOR ALL PFC MODELS –12/4/2017 OPERATING INSTRUCTIONS (Continued) Starting Up YOU DO THIS PERFECT FRYER DOES THIS HEATING MANUAL 1) Now in HEATING mode ºF 2) Oil temperature rising to operating 1) Press for ½ second. temperature READY MANUAL 2) Allow 10 to 30 minutes for oil to 3) Once operating temperature is... -
Page 27: Preset Mode
OWNER’S MANUAL FOR ALL PFC MODELS –12/4/2017 OPERATING INSTRUCTIONS (Continued) Preset Mode YOU DO THIS PERFECT FRYER DOES THIS 1) Put food in basket READY PRESET 2) Open door 1) Now in PRESET mode ºF 3) Set basket on basket lift 4) Close door displays PRESET... -
Page 28: Cooking Time Correction
OWNER’S MANUAL FOR ALL PFC MODELS –12/4/2017 OPERATING INSTRUCTIONS (Continued) Cooking Time Correction YOU DO THIS PERFECT FRYER DOES THIS COOKING MANUAL 1) Enter incorrect cooking time 4:30 1) Brief pause, basket lowers into oil (4:30 instead of 1:30 for example) 2) COOKING cycle begins. -
Page 29: Standby Mode
OWNER’S MANUAL FOR ALL PFC MODELS –12/4/2017 OPERATING INSTRUCTIONS (Continued) Standby Mode SEE THIS LCD DO THIS GET THIS LCD READY MANUAL STANDBY MANUAL 1) Press together ºF ºF 2) Release both Note: Temperature will decrease to 275ºF (to set default standby temperature, see page 28 for more information) Note: During slow periods, using standby mode reduces energy costs, allows a quick recovery and minimizes oil breakdown. -
Page 30: User Defined Options
OWNER’S MANUAL FOR ALL PFC MODELS –12/4/2017 USER DEFINED OPTIONS CUSTOMIZE YOUR PERFECT FRYER WITH YOUR OWN SETTINGS CTS Cook Time Sensitivity Temperature read-out: ºC or ºF Preset Cooking Times Cooking Oil Standby Temperature Count of Cook Cycles ... -
Page 31: Background Menu - Accessing
OWNER’S MANUAL FOR ALL PFC MODELS –12/4/2017 USER DEFINED OPTIONS (Continued) Background Menu - Accessing SEE THIS LCD DO THIS GET THIS LCD READY MANUAL PFC VER.: 6.X.X FRYER SN# XXXXX ºF 1) Press together ENTER PASSWORD: Release together MAIN MENU PFC VER.: 6.X.X LANGUAGE... - Page 32 OWNER’S MANUAL FOR ALL PFC MODELS –12/4/2017 USER DEFINED OPTIONS (Continued) OPERATION OPTIONS WAIT MODE When , will not allow cooking until oil has reached operating temperature Default is STANDBY MODE When , gives user ability to put fryer into standby OPERATION OPTIONS WAIT MODE ...
- Page 33 OWNER’S MANUAL FOR ALL PFC MODELS –12/4/2017 USER DEFINED OPTIONS (Continued) REMINDER TIME Time elapsed after cook cycle is finished Reminds operator to remove product after it has finished cooking “Beeps” and displays “PRODUCT READY” on LCD ...
- Page 34 OWNER’S MANUAL FOR ALL PFC MODELS –12/4/2017 USER DEFINED OPTIONS (Continued) USER COUNTERS COOK TIME Accumulated cook cycle time in hours NUMBER OF CYCLES USER COUNTERS COOK TIME: Accumulated number of cook cycles NO. CYCLES: ON TIME: ...
-
Page 35: Option Changes
OWNER’S MANUAL FOR ALL PFC MODELS –12/4/2017 USER DEFINED OPTIONS (Continued) OPERATION TESTS (for service personnel) FANS Use the arrow keys to turn fans on and off (note: oil temperature must be below 122ºF (50ºC)) OPERATION TESTS Monitor rpm and current values of each fan FANS INTERLOCKS... -
Page 36: Customizing Presets
OWNER’S MANUAL FOR ALL PFC MODELS –12/4/2017 USER DEFINED OPTIONS (Continued) Customizing Presets SEE THIS LCD DO THIS GET THIS LCD MAIN MENU PRESETS LANGUAGE 1:FRENCH FRIES 3:00 1) From main menu, scroll down to OPERATION OPTIONS 2:CHICKEN TENDERS 4:00 PRESETS 3:ONION RINGS 2:30... -
Page 37: Customizing Presets On The Front Label
OWNER’S MANUAL FOR ALL PFC MODELS –12/4/2017 USER DEFINED OPTIONS (Continued) Customizing Presets on the Front Label Used in conjunction with your custom programmed presets (please refer to page 33), easily identify your own custom presets by using the supplied label page. Simply follow the steps below: 1) Remove preset slider (default presets are located on front and custom preset label template is located on back). -
Page 38: Help
OWNER’S MANUAL FOR ALL PFC MODELS –12/4/2017 HELP PERFECT FRYER “beeps” twice to signal an error condition. When the error condition is corrected, two beeps signal It is possible to have more than one SYSTEM ERROR displayed at the same time. When that happens, all error conditions will be displayed on the LCD. - Page 39 OWNER’S MANUAL FOR ALL PFC MODELS –12/4/2017 HELP (Continued) SEE THIS LCD DO THIS GET THIS LCD CAUSED BY Cooking oil level is too low. Make sure oil level is between the hot and SYSTEM ERROR cold lines at rear of vat.
-
Page 40: Trouble-Shooting Table
OWNER’S MANUAL FOR ALL PFC MODELS –12/4/2017 HELP (Continued) Trouble-shooting Table “PROBLEM” PROBABLE CAUSE PROBABLE SOLUTION 4) Plug in fryer Won’t turn ON when you 1) Not plugged in 5) Check circuit breaker or replace fuse 2) Circuit breaker or fuse 6) Make sure PERFECT FRYER is 3) Wiring plugged in according to its electrical... -
Page 41: Pfs Automatic Extinguisher
OWNER’S MANUAL FOR ALL PFC MODELS –12/4/2017 PFS AUTOMATIC EXTINGUISHER Note: Please refer to the PFS Automatic Extinguisher Installation, Inspection, Maintenance & Recharge Manual (L20-361) for more detailed information. The PFS must be stored above 32°F (0°C) GENERAL DESCRIPTION INSPECTION & MAINTENANCE The PFS consists of a cylinder assembly (with The PFS must be serviced on a regular basis. - Page 42 OWNER’S MANUAL FOR ALL PFC MODELS –12/4/2017 PFS AUTOMATIC EXTINGUISHER (Continued) Inspection and Maintenance Semi-Annually (continued) 5) Where semi-annual maintenance of any wet 8) The maintenance report, with chemical containers or PFS components recommendations if any, shall be filed with reveals conditions such as, but not limited to, the owner or with the designated party corrosion or pitting in excess of...
-
Page 43: Blow-Apart Diagram & Parts List
OWNER’S MANUAL FOR ALL PFC MODELS –12/4/2017 BLOW-APART DIAGRAM & PARTS LIST Item Description Part # Item Description Part # Front Door 4ST888 Extra Large Basket 6HT905 Front Panel 4ST889 Basket Lift Assembly 3HT740 Kit Door Springs-PFC 2DT957 Motor Module 2HT689 Lift &... - Page 44 Serial Number: ________________________________ Year of Manufacture: ________________________________ I, the undersigned, hereby declare that the equipment specified above conforms to the above Directive(s) and Standard(s) Place: Perfect Fry Company LLC. Concord, NH, USA Date: ___/___/___ ________________________________(Signature) ________________________________(Full Name) ________________________________(Position) Page 41 of 42...
- Page 45 OWNER’S MANUAL FOR ALL PFC MODELS –12/4/2017 ORIGINAL STANDARD EQUIPMENT LIMITED WARRANTY Effective January 1, 2018, Serial Number E18AA000000 General Warranty Perfect Fry warrants to the original purchaser of its commercial cooking appliances and related equipment that said appliances and related equipment will be free from defects in material and workmanship under normal use for a period of one (1) year from the date of installation, with appropriate documentation, to a maximum of fifteen (15) months from the date of manufacture, subject to the following additions, exceptions, exclusions and limitations.
- Page 46 Mailing Address: P.O. Box 501, Concord, NH 03302-0501 Shipping Address: 39 Sheep Davis Road, Pembroke, NH 03275 Tel: 603-225-6684 Fax: 603-225-8472 General Information: profits@perfectfry.com Customer Support: service@perfectfry.com Web: www.perfectfry.com © 2012 PERFECT FRY COMPANY LLC PRINTED IN USA L20-390 R3 Page 1 of 1...
Need help?
Do you have a question about the PFC 187 and is the answer not in the manual?
Questions and answers