Advertisement
Table of Contents
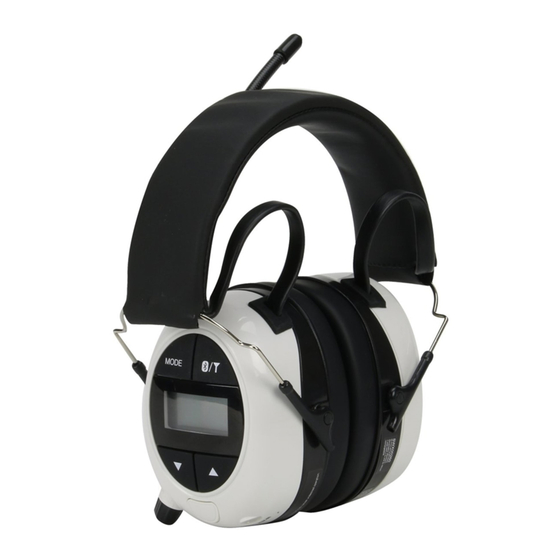
MP3/AM/FM DIGITAL RADIO and HEARING PROTECTOR with Bluetooth
SAFETY WORKS P/N SWX00260
USER INSTRUCTION MANUAL (ENGLISH)
Thank you for purchasing this Safety Works MP3/AM/FM Digital Radio and
Hearing Protector with Bluetooth capability. This hearing protector is designed
to reduce exposure to harmful levels of noise. To get the best comfort, fit and
function from this product, read this User Instruction Manual carefully before
operating this unit. Save this Manual for future reference.
For details on noise reduction, refer to the attenuation table.
COMPONENTS
SPECIFICATIONS
1. AM/FM Antenna
Power Supply
2. LCD Display
Three "AAA" sized batteries
3. Tune
/Minute Adjustment
(UM-3) batteries or equivalent
Arrow
Frequency Range
4. Mode/Time Setting Button
AM Frequency: 540-1700 kHz
5. Bluetooth Button
FM Frequency: 87.5-108 MHz
6. Power ON/OFF and Volume
Control Knob
7. Tune
/Hour Adjustment Arrow
8. Battery Compartment and Cover
9. Auxiliary Jack
10. Three (3) AAA Alkaline Batteries
11. Microphone
12. Ear Cup Cushion
13. Acoustic Foam Absorbent
➒
⓫
➊
➓
⓬
➑
➍
➎
➋
➐
➌
⓭
➏
BATTERY INSTALLATION
Lift open the BATTERY COVER (8) to reveal the COMPARTMENT (8) using the tab
at the bottom. Be careful not to lose the cover. Insert THREE (3) HEAVY DUTY
AAA ALKALINE BATTERIES (10) ensuring the polarity is correct according to the
diagram inside the battery compartment. Incorrectly installed batteries could
damage the unit. To close the BATTERY COMPARTMENT, place cover over battery
compartment and snap into place.
ADJUST THE FIT
Don the ear muffs with the controls over your right or left ear.
CAUTION! Spread the ear cups only enough to clear the ears.
Brush hair from beneath the cushions with your hand as much as possible.
CAUTION! Make sure the cushions seal tightly against your head. Foreign objects
(such as pencils) between the ear cup and your head reduce the efficiency of the
ear muff. Use glasses with smallest temple available (cable type is best).
With the headband over the crown of your head, position the muffs to completely
enclose your ears.
CAUTION! The muffs only provide hearing protection when worn with the head-
band over the crown of your head.
Slide the muffs up or down to adjust for a firm, comfortable fit.
CAUTION! Make sure the cushions seal tightly against your head. Foreign objects
(such as pencils) between the ear cup and your head reduce the efficiency of
the ear muff. Use glasses with smallest temple available (cable type is best).
Spread the ear cups only enough to clear the ears. Do not reform or reshape the
headband.
RADIO OPERATION
Turn Unit On - Turn the power ON/OFF KNOB (6) clockwise from the OFF position
and adjust the sound level by turning the same knob (6). There will be a slight
delay while the radio searches for a signal. DO NOT turn up volume until the signal
is found and the volume can be adjusted appropriately.
Manual Search - Press a TUNE BUTTON (7) or (3) step by step until it reaches
your favorite station. The interval is 10 kHz per step for AM and 0.1 MHz for FM.
Auto Search - Press and hold a TUNE BUTTON (7) or (3) for two seconds,
release the button when the auto scan starts. Auto scan will stop when a clear
signal is reached. Repeat the steps until it reaches your desired station.
Set Preset Station - Quickly Tap the (Bluetooth symbol/ ) BUTTON (5) and
toggle between AM, FM, and Bluetooth (BT symbol) settings. There are 20 preset
stations, 10 stations for each band. To preset your favorite station into memory,
tune to the selected station. Press and hold the MODE BUTTON (4), release the
button when the "M" and the present station number (1-10) are flashing. Then
press TUNE BUTTON (7) or (3) to select the desired position (1-10). Press the
MODE BUTTON (4) again to confirm the setting. When a new station is stored, the
new selected station will replace the previous setting.
Listen to the preset station - Press the ( / ) (5) first to choose AM or FM.
Then press the MODE BUTTON (4) to reach your preset station. Press the MODE
BUTTON (4) again to select preset stations M1 to M10.
Setting up Bluetooth Operation - Turn on the Bluetooth function on your
phone or other Bluetooth enabled device. (This function is often found in the
phone's settings area.) Turn on the ear muff and tap the ( / ) BUTTON to toggle
from AM or FM to Bluetooth ( ). Look for the screen to display ".... " moving to the
right. In your Bluetooth enabled device (eg., phone) settings, look for a device that
starts with "HP-" (for example, HP-52 and pair the device with the Safety Works
AM-FM-MP3 ear muff. After the device is paired, "Connected" will usually appear
on the phone's settings and "-ON-" will appear on the ear muff's LCD display.
To disable the pairing, press and hold the ( / ) BUTTON(5) for 2 seconds. Once
disabled, OFF will appear on the ear muff's LCD display.
Press MODE to play or pause music from your MP3 player. Press the TUNE BUT-
TON (7) to skip to the next song.
Answering a phone call while using the Bluetooth function - When there is
a phone call with a paired phone, there will be a telephone ringing sound in the
ear muff. To answer the call, press the MODE BUTTON (4) on the ear muff, or the
answer button on your phone. (Note: you may also need to select the Bluetooth
function on your phone's audio button (often found on the answer screen during
a phone call.) After the phone is paired, the user can also still hear a phone call
while in the AM, FM or Auxiliary device modes.
TIME SETTING
Turn off the radio or auxiliary device by turning the POWER KNOB (6) count-
er-clockwise to off. Press TUNE BUTTON (7) or TUNE BUTTON (3)to select the
12 or 24 hour time mode.
Next, press the MODE BUTTON (4) and when the time is flashing, press TUNE
BUTTON (7) to adjust the hour, then select the MODE BUTTON (4) to accept the
hour settting. Repeat the process by selecting the TUNE BUTTON (7) and TUNE
BUTTON (3) to adjust the minutes. Press the MODE BUTTON (4) again to accept
the setting.
AUXILIARY JACK OPERATION
Connect external audio devices (such as an MP3 player) through the AUXILIARY
JACK (9) using a 3.5MM Auxiliary Jack Cord (not included.)
Once an external audio device is connected, the radio automatically shuts off.
If an external audio device is connected, the volume should be adjusted using the
device—not the VOLUME CONTROL KNOB (6) on the headset.
PLEASE NOTE:
The speaker volume is limited to comply with OSHA regulations.
Radio reception quality may be slightly distorted depending on surroundings.
To prevent damage to the radio, do not use in a high-temperature or high-humid-
ity environment for prolonged periods of time. To prevent damage to the hearing
protector and radio within, do not subject it to rough handling.
MAINTENANCE
Inspect the hearing protector regularly for cracks and signs of leakage. Ear muffs,
and in particular, cushions may deteriorate with use and age. Replace ear muff if
any component is worn, cracked, or damaged. Clean the outside of the muffs and
cushions with soap and a damp cloth. CAUTION! Do not use solvents or abrasives.
This product and its performance may be adversely affected by certain chemical
substances.
After use, moisture may accumulate inside the ear cups. To avoid moisture
damage to electronic components, the ACOUSTIC FOAM ABSORBENT (13) must
be removed regularly, and the ear cups/contents allowed to dry.
To remove, reach inside the EAR CUP CUSHION (12) and pull out the ACOUSTIC
FOAM ABSORBENT (13). CAUTION! Do not touch the electronics board or cables!
Once dry, reinstall the ACOUSTIC FOAM ABSORBENT (13) by placing it in the ear
cup to completely cover the electronics.
STORAGE
Ensure that the muffs are clean and dry before storage. Store the muffs at room
temperature, away from dust. Do not store in direct sunlight. Exposure to direct
sunlight in places such as car interiors, which may reach temperatures of up to
140°F (60°C), may warp the product, affect the performance of the electronics or
lead to malfunctioning. Do not store where the temperature could drop below
freezing. Do not extend the headband. To avoid uneven compression of the ear
cup cushion, ensure that the cushions lie flat against each other and that there are
no creases in them. To prevent damage, remove batteries.
TROUBLESHOOTING
If the radio stops working:
Check for correct battery installation.
Make sure the battery plates are clean and making contact with the batteries.
Ensure the hearing protector is dry. If necessary, perform steps in Maintenance
section. Install new batteries.
TESTING AND APPROVALS
The Noise Reduction Rating (NRR) is third-party tested in accordance with ANSI
S3.19-1974.
Note: This equipment has been tested and found to comply with the limits for
a class B digital device, pursuant to part 15 of the FCC Rules. These limits are de-
signed to provide reasonable protection against harmful interference in a residen-
tial installation. This equipment generates, uses, and can radiate radio frequency
energy and, if not installed and used in accordance with the instructions, may
cause harmful interference to radio communications. However, there is no guar-
antee that interference will not occur in a particular installation. If this equipment
does cause harmful interference to radio or television reception, which can be
determined by turning the equipment off and on, the user is encouraged to try to
correct the interference by one or more of the following measures:
Reorient or relocate the receiving antenna.
Increase the separation between the equipment and receiver.
Connect the equipment into an outlet on a circuit different from that to which the
receiver is connected.
Consult the dealer or an experienced radio/TV technician for help.
This Class B digital apparatus complies with Canadian ICES-003.
USE LIMITATIONS
SWX00260
FCC ID:WYQ-BTH5S2
Power Supply: 3 x AAA batteries
Alimentation électrique : 3 piles AAA
This device complies with Part 15 of the FCC Rules. This device complies with
Industry Canada licence-exempt RSS standard(s).
Operation is subject to the following two conditions:
(1) This device may not cause harmful interference, and
(2) This device must accept any interference received, including interference
that may cause undesired operation. Changes or modifications not expressly
approved by the party responsible for compliance could void the user's
authority to operate the equipment.
The device has been evaluated to meet general RF exposure requirement.
The device can be used in portable exposure condition without RF restriction.
American Standard ANSI S3.19-1974
NRR 23 - dB CSA;Class A
Frequency Hz
125
250
500
1000
2000
3150
4000
6300
8000
Mean Attenuation dB
18.9
22.3
26.0
33.1
34.8
36.6
35.7
39.1
36.5
Standard Deviation dB
4.4
3.0
3.5
2.1
2.6
2.8
2.5
5.1
5.7
The level of noise entering a person's ear when a hearing protection is worn as
directed is closely approximated by the difference between the A-weighted
environmental noise level and the NRR.
Example:
If the environmental noise level measured at the ear is 92 dB(A), and the NRR is
23 decibels (dB), the level of noise entering the ear is approximately equal to 70
dB(A):
92 dB(A) - 23 dB(A) = 68 dB(A).
CAUTION! For noise environments dominated by frequencies below 500 Hz, use
C-weighted environmental noise levels.
The EPA has selected the NRR as a measure of a hearing protector' s noise reducing
capabilities. There is no warranty as to the suitability of the NRR as a measure of
the actual workplace protection since such protection is highly dependent on user
training, motivation, and utilization. Refer to the above instructions for proper fit. A
better estimate of workplace protection can be obtained by derating the labeled
NRR of this, or any other hearing protector, by 50%.
Although hearing protectors can be recommended for protection against the
harmful effects of impulsive noise, the Noise Reduction Rating (NRR) is based on
the attenuation of continuous noise and may not be an accurate indicator of the
protection attainable against impulsive noise such as gunfire. The noise reduction
capability of this hearing protector against impulsive noise may be estimated
by referring to the attenuation performance of the hearing protector at the
frequency of the impulsive noise exposure as provided in the attenuation data on
the package. To estimate the noise reduction capability of this hearing protector
against impulsive noise, refer to the Attenuation Data above. If the frequency of
the impulsive noise is 2000 hertz (Hz), for example, the mean (average) reduction
of noise attained by test subjects at the frequency was 34.8 decibels (dB). Using
the standard deviation of 2.6 dB the estimated noise reduction at 2000 Hz would
range from 32.2 dB to 37.4 dB. Refer to manufacturer of equipment producing the
impulsive noise to determine the frequency.
WARNING
Follow an appropriate hearing conservation program, which includes adequate
monitoring and audiometric testing, to ensure effective hearing protection.
Improper use of the hearing protector or failure to implement an appropriate
hearing conservation program, including adequate monitoring and testing can
result in hearing loss or other serious personal injury.
WARNING
y Check performance before using this product.
y This product contains small parts that may present a choking hazard.
Not for children under 3 years.
y Hearing protectors in general can block external sounds such as
warning calls, alarms, and other important signals. Pay special attention
to what is happening around you when wearing hearing protectors.
Setting the volume too high can further reduce your ability to hear
external sounds, which could expose you to considerable risk and lead
to serious accidents. Adapt the volume to your working situation.
y These ear muffs contain batteries and electrical components that may
cause ignition in flammable or explosive atmospheres. DO NOT use in
environments where sparks may cause a fire or explosion. Misuse can
result in injury or death.
y DO NOT use the radio while driving an automobile or bike. The radio
and muffs could block surrounding sounds and increase the risk of
having an accident.
y Failure to follow the warnings and instructions in this User Instruction
Manual can result in serious personal injury or death.
CASQUE ANTI-BRUIT NUMÉRIQUE MP3/AM/FM avec Bluetooth
SAFETY WORKS Réf. SWX00260
GUIDE DE L'UTILISATEUR (FRANÇAIS)
Merci pour votre achat de ce casque anti-bruit numérique MP3/AM/FM
Safety Works avec compatibilité Bluetooth.
Ce casque anti-bruit minimise l'exposition aux niveaux de bruit dangere-
ux. Pour un confort, un ajustement et un fonctionnement optimums, lire
attentivement ce guide avant d'utiliser le casque. Conserver ce guide pour
consultation future.
Consulter le tableau d'atténuation pour obtenir plus de détails sur la réduc-
tion du bruit.
COMPOSANTS
FICHE TECHNIQUE
1. Antenne AM-FM
Alimentation électrique
2. Afficheur à cristaux liquides
Trois piles AAA ou piles
3. Flèche descendante – syntoniseur
(UM-3) ou l' é quivalent
et réglage des minutes
Gamme de fréquences
4. Touche de réglage mode/horloge
Fréquence AM : 540 – 1 700 kHz
5. Touche Bluetooth
Fréquence FM : 87,5 – 108 MHz
6. Bouton Marche-Arrêt et volume
7. Flèche ascendante – syntoniseur
et réglage des heures
8. Couvercle et compartiment des piles
9. Prise auxiliaire
10. Trois (3) piles alcalines AAA
11. Microphone
12. Oreillère
13. Mousse absorbante et insonorisante
➒
⓫
➊
➓
⓬
➑
➍
➎
➋
➐
➌
⓭
➏
POSE DES PILES
Appuyer sur la patte inférieure du COUVERCLE pour ouvrir le COMPARTI-
MENT DES PILES (8). Attention de ne pas perdre le couvercle.
Insérer TROIS (3) PILES ALCALINES AAA À GRANDE CAPACITÉ (10); veiller à
respecter la polarité, indiquée par le schéma à l'intérieur du compartiment :
des piles mal orientées pourraient endommager l'appareil.
Refermer le COMPARTIMENT À PILES : replacer le couvercle, puis l'enclencher
en place.
AJUSTEMENT DU CASQUE
Placer les coquilles sur les oreilles, les commandes du côté droit ou gauche.
MISE EN GARDE! Les coquilles doivent entourer étroitement les oreilles.
Dégager avec les mains le plus de cheveux possible des coquilles.
MISE EN GARDE! L'ajustement des oreillères doit être hermétique. Les corps
étrangers (comme des crayons) placés entre la coquille et la tête réduisent
l'efficacité de l'oreillère. Utiliser des lunettes avec des branches aussi minces
que possible (de préférence, le type cordon).
Tandis que l'arceau coiffe la tête, placer les coquilles de manière à ce qu'elles
épousent les oreilles.
MISE EN GARDE! Les coquilles offrent une protection auditive uniquement
lorsque l'arceau coiffe la tête.
Faire glisser les coquilles vers le haut ou le bas pour les adapter fermement et
confortablement.
MISE EN GARDE! L'ajustement des oreillères doit être hermétique. Les corps
étrangers (comme des crayons) placés entre la coquille et la tête réduisent
l'efficacité de l'oreillère. Utiliser des lunettes avec des branches aussi minces
que possible (de préférence, le type cordon). Les coquilles doivent entourer
étroitement les oreilles. Ne pas reformer ou reprofiler le serre-tête.
UTILISATION DE LA RADIO
Mise en marche – Tourner le BOUTON MARCHE-ARRÊT (6) dans le sens
horaire pour allumer la radio, puis régler le niveau sonore. Il y aura un léger
délai, au cours duquel la radio cherchera un signal. NE PAS augmenter le
volume pendant ce délai; attendre la réception du signal avant de régler le
volume.
Recherche manuelle – Appuyer sur la TOUCHE DE SYNTONISATION (7) ou
(3) pour sélectionner la station préférée. La sélection s'effectue par incré-
ments de 10 kHz pour la bande AM et de 0,1 MHz pour la bande FM.
Recherche automatique – Appuyer sur la TOUCHE DE SYNTONISATION (7)
ou (3) pendant deux secondes : la relâcher lorsque le balayage automa-
tique commence. Le balayage automatique s'arrête dès réception d'un signal
clair; relancer le balayage jusqu'à ce que la station souhaitée soit atteinte.
Préréglage d'une station – Tapoter la TOUCHE ( / ) (5) pour passer
au réglage souhaité : AM, FM, ou Bluetooth ( ). 20 stations peuvent être
préréglées, soit 10 stations pour chaque bande. Pour prérégler une station
en mémoire, sélectionner d'abord la station voulue. Appuyer ensuite sur la
TOUCHE MODE (4); la relâcher lorsque le « M » et le numéro de station (1 à
10) clignotent. Appuyer sur la TOUCHE DE SYNTONISATION (7) ou (3)
pour choisir le chiffre de la station préréglée (1 à 10). Appuyer de nouveau
sur la TOUCHE MODE (4) pour confirmer le réglage. La mise en mémoire
d'une nouvelle station annule le réglage précédent.
Écoute d'une station préréglée – Tapoter la touche ( / ) (5) pour choisir
la bande AM ou FM, puis appuyer sur la TOUCHE MODE (4) pour passer à
la station préréglée. Appuyer de nouveau sur la TOUCHE MODE (4) pour
sélectionner l'une des stations préréglées M1 à M10.
Préparatifs d'utilisation Bluetooth – Activer la fonction Bluetooth de son
téléphone ou autre appareil compatible Bluetooth. (Cette fonction se trouve
souvent dans la zone des paramètres du téléphone.) Allumer le casque,
puis tapoter la TOUCHE ( / ) (5) pour passer d'AM ou de FM à Bluetooth
( ). Vérifier à l'écran que ".... " glisse vers la droite. Dans les paramètres de
l'appareil compatible Bluetooth (par ex., téléphone), rechercher le nom d'un
périphérique qui commence par « HP- » (par ex., HP-52), puis jumeler celui-ci
avec le casque AM-FM-MP3 Safety Works. Après le jumelage, « Connecté »
sera normalement affiché dans les paramètres du téléphone, et l'écran ACL
du casque affichera « -ON- ».
Pour déconnecter, appuyer pendant 2 secondes sur la TOUCHE ( / ) (5).
Après la déconnexion, l'écran ACL du casque indiquera « OFF ».
Appuyer sur MODE pour écouter ou mettre en pause la musique du lecteur
MP3. Appuyer sur la TOUCHE DE SYNTONISATION (7) pour passer à la piste
suivante.
Réception d'un appel lorsqu'on utilise la fonction Bluetooth – Si le télé-
phone jumelé reçoit un appel, le casque émet une sonnerie. Pour répondre
à l'appel, appuyer sur la TOUCHE MODE (4) sur la coquille, ou sur la touche
de réception du téléphone. (Remarque : Sur certains téléphones, il faut
sélectionner la fonction Bluetooth de la touche audio (souvent, sur l'écran
de réception lors d'un appel). Après jumelage d'un téléphone, l'utilisateur
continuera à entendre les appels en modes AM, FM, ou appareils auxiliaires.
RÉGLAGE DE L'HORLOGE
Éteindre d'abord la radio ou l'appareil auxiliaire (tourner le BOUTON
MARCHE-ARRÊT (6) à bloc dans le sens antihoraire).
Appuyer sur la TOUCHE DE SYNTONISATION (7) ou (3) pour sélectionner
le mode 12 heures ou 24 heures.
Appuyer ensuite sur la TOUCHE MODE (4); lorsque l'heure clignote, appuyer
sur la TOUCHE DE SYNTONISATION(7) ou (3) pour régler l'heure, puis
sur la TOUCHE MODE (4) pour la valider. Répéter le processus pour régler les
minutes : appuyer sur la TOUCHE DE SYNTONISATION (7) ou (3). Appuyer
à nouveau sur la TOUCHE MODE (4) pour valider le réglage.
UTILISATION DE LA PRISE AUXILIAIRE
Brancher un appareil audio externe (par exemple, un lecteur MP3) sur la
PRISE AUXILIAIRE (9) au moyen d'un câble de prise auxiliaire 3,5 mm (non
fourni).
La radio s'éteint automatiquement lorsque l'on branche un appareil audio
externe.
Régler le volume de l'appareil audio externe avec sa propre commande – ne
pas utiliser le BOUTON DE VOLUME (6) du casque.
REMARQUE :
Le volume du haut-parleur est limité, conformément aux règlements de
l'OSHA.
Possibilité d'une légère distorsion du son en réception, selon l'environne-
ment d'écoute.
Pour prévenir les dommages à la radio, éviter une utilisation prolongée dans
un milieu où la température ou l'humidité sont élevées.
Ne pas soumettre à un traitement brutal le casque anti-bruit et sa radio
(risque d'endommagement).
ENTRETIEN
Vérifier régulièrement le casque anti-bruit (fissures, signes de fuite).
L'usage et l'âge altèrent les coquilles et, en particulier, les coussinets. Rem-
placer une coquille dont le composant est usé, fissuré ou abîmé.
Passer un chiffon humide et savonneux sur les coquilles et les coussinets.
MISE EN GARDE! Ne pas utiliser de solvants, ni d'abrasifs. Ce produit et son
efficacité pourraient être compromis par certaines substances chimiques.
L'humidité s'accumule parfois à l'intérieur des coquilles après leur utilisation.
Pour prévenir une détérioration par l'humidité des composants électro-
niques, enlever régulièrement la MOUSSE ABSORBANTE ET INSONORISANTE
(13) et laisser sécher les coquilles/l'intérieur.
Saisir le COUSSINET dans LA COQUILLE (12), puis sortir la MOUSSE ABSOR-
BANTE ET INSONORISANTE (13). MISE EN GARDE! Veiller à ne pas toucher la
carte électronique ou les fils!
Pour replacer la MOUSSE ABSORBANTE ET INSONORISANTE (13) lorsqu'elle
est sèche, insérer le coussinet dans la coquille de manière à ce qu'il recouvre
parfaitement l'électronique.
RANGEMENT
Vérifier que les coquilles sont propres et sèches avant de remiser le casque.
Remiser le casque à la température ambiante, à l'abri de la poussière.
Ne pas laisser le casque en plein soleil : l'exposition directe au rayonne-
ment solaire (par exemple, à l'intérieur d'un véhicule) pourrait faire subir
au casque des températures supérieures à 60 °C (140°F) qui risquent de
Advertisement
Table of Contents

Summary of Contents for SAFETY WORKS SWX00260
- Page 1 Save this Manual for future reference. attentivement ce guide avant d’utiliser le casque. Conserver ce guide pour starts with “HP-” (for example, HP-52 and pair the device with the Safety Works d’une nouvelle station annule le réglage précédent.
- Page 2 (dB), le niveau de bruit entrant dans l’oreille sera égal à environ 70 13. Espuma acústica absorbente el dispositivo con las orejeras AM-FM-MP3 de Safety Works. Después de como llamadas de emergencia, alarmas y otras señales importantes. PRUEBAS Y APROBACIONES dB(A) : 92 dB(A) –...
Need help?
Do you have a question about the SWX00260 and is the answer not in the manual?
Questions and answers
All of a sudden the radio plays for a few minutes and then stops and then everything on the screen is just flashing