Advertisement
Quick Links
Advertisement

Summary of Contents for PureFlow Raptor FRRP-100
- Page 1 INSTALLATION MANUAL FOR 24 VALVE 5.9L CUMMINS POWERED DODGE TRUCKS 1998 ½ THROUGH 2002 MODEL FRRP-100 FACTORY REPLACEMENT RAPTOR PUMP READ THESE INSTRUCTIONS THOROUGHLY BEFORE BEGINNING INSTALLATION PureFlow AirDog 705 MAUSOLEUM ROAD SHELBYVILLE, IN 46176 1-877-421-3187 WWW.PUREFLOWAIRDOG.COM...
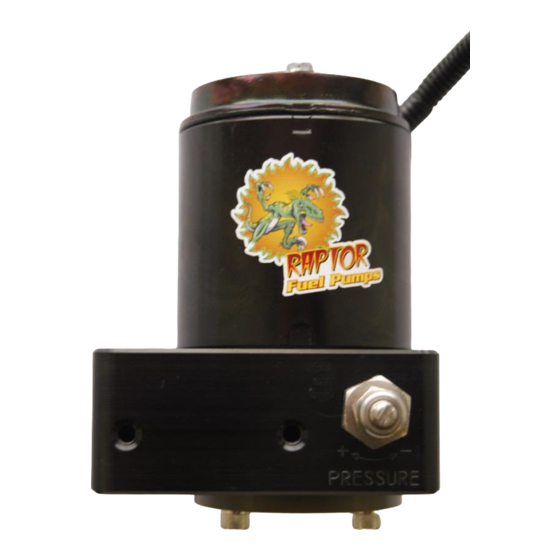
- Page 2 Adjustable Regulator MOUNTS IN THE SAME LOCATION AS THE OE TRANSFER PUMP...
-
Page 3: Safety Guidelines
AIRDOG immediately of any parts missing or damaged. Read the installation manual and understand how the system operates before beginning installation. If any installation procedure is uncertain, contact PUREFLOW AIRDOG for technical assistance. NOTE: SOME OF THE PICTURES USED IN THIS MANUAL ARE FOR EXAMPLE ONLY AND MAY NOT PICTURE A COMPONENT EXACTLY THE SAME AS FOUND IN YOUR TRUCK. - Page 4 QUICK CONNECT COMPONENT OVERVIEW Provided in this kit is an OE style quick connection system. This system allows a quick, clean, and professional install. SAE J2044 Quick Connect System The SAE J2044 quick connect system is the most commonly used system in the automotive industry.
-
Page 5: Parts List
Parts List DESCRIPTION PART NUMBER IMAGE Factory Replacement Raptor™ Pump FRRP-100 (FRRP) Mounting Hardware Kit 901-61-0102-FRRP Customer Service Oring Replacement Kit 906-05-0100 1/2” Male QC x 3/4-16 ORB 08J2044-3/4UNF 2ft of Fuel Line HS02 1/2" 90° Hose Quick Connect Fitting FQC1290 12mm X ½”... - Page 6 ILLUSTRATION OF COMPONENTS...
- Page 7 INSTRUCTIONS REMOVING THE STOCK PUMP FIG 1. (SOURCE: alldatapro.com) 1. Disconnect the electrical connector. Reference #6 of Fig. 1 2. Remove the banjo fitting on the inlet side of the stock fuel pump. Reference #4 of Fig 1. Do not discard this banjo fitting. It will be reused. 3.
- Page 8 Assembling the Fuel Lines This kit includes a length of fuel line and separate fuel line ends to allow for much cleaner looking installations! Assemble the fuel lines as you install them. You won’t want to pre-assemble the hoses or your lengths may be off. Take the fuel line end and lubricate the barbed end with clean motor oil (Figure 2) and press it into the fuel line (HS02) until all three barbs are covered (Figures 3 and 4).
- Page 9 INSTALLING THE FRRP-100 1. Replace the 2 original sealing washers on the stock banjo fitting with the 2 new ones provided (part# 1P-5-DS). And firmly tighten the factory fuel supply line in the inlet port of the FRRP using the factory banjo fitting. The factory support bracket is no longer used.
- Page 10 INSTALLING THE FRRP-100 CONTINUED 6. Assemble one end of the hose (Reference the fuel line assembly section) using fuel line end FQC1290 and plug it into the WAP102 fitting installed in the filter canister “inlet” port in the previous step. A “click” will be heard once the fitting is properly connected. FQC1290 Figure 8 HS02...
-
Page 11: Adjusting The Pressure Regulator
3. Start engine! Adjusting the Pressure Regulator NOTE: PureFlow AirDog strongly recommends the use of a fuel pressure gauge to monitor the output pressure on all of its fuel systems. To adjust the fuel pressure, loosen the lock nut on the regulator adjustment screw. Using a flat blade screw driver, rotate the adjustment screw clockwise to increase pressure or counter clockwise to decrease pressure. - Page 12 BUYER must follow the Warranty Procedure for any PRODUCT that is in question of Warranty. All Warranty claims are subject to the approval of PureFlow AirDog. If it is determined that a Warranty claim exists, PureFlow AirDog will, at its sole discretion, replace the defective PRODUCT with a comparable PRODUCT, repair the defective PRODUCT, or refund the BUYER”S purchase price in exchange for the PRODUCT.
-
Page 13: Warranty Procedure
Serial Number and Model Number available for the Technician when the call is made. This will expedite all steps of the process. The customer performs any and all tests requested by the PureFlow AirDog Technician. This is done to isolate the potential problem while eliminating potential installation or maintenance related issues,...
Need help?
Do you have a question about the Raptor FRRP-100 and is the answer not in the manual?
Questions and answers