Advertisement
Quick Links
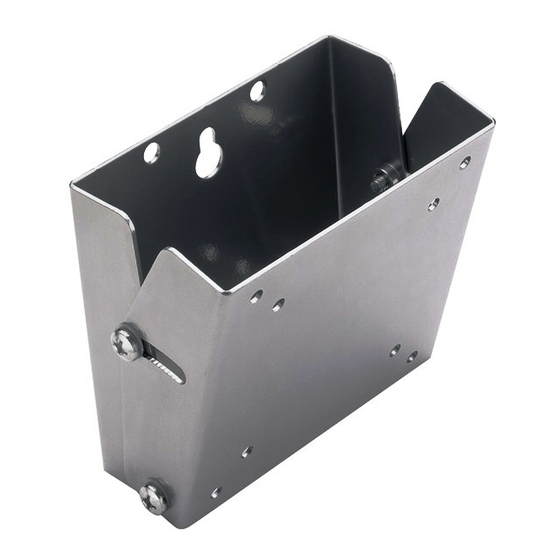
Step 4
Install the Wall Plate onto the Monitor Plate using
the supplied 1/4"-20 Screws (3) and Nylon Washers
(10).
Carefully hang the monitor by sliding the keyhole
slots on the Wall Plate over the protruding screws, as
indicated by arrows in Fig. 5.
Tighten the screws holding the Wall Plate.
Note: Tilting the monitor away from the wall, im-
proves access to the wall mounting screws.
Step 5
Adjust tension of the Tilt Screw (Fig. 5) to provide
the desired degree of adjustability or locking of tilt
mechanism.
Thank you for purchasing an OmniMount product.
Warranty: Limited Lifetime on manufacturing defects and workmanship.
Specifications are subject to change without prior notice.
Every effort has been made to provide accurate and error-free assembly and installation instructions. OmniMount Sys-
tems disclaims liability for any difficulties arising from the interpretation of information contained in these instructions.
If OmniMount products are used for purposes other than their original intent, OmniMount, its distributors and retailers
shall not be held responsible or liable for injuries or property damage, direct, indirect, or consequential, which may arise
from the inability to use this product safely, properly, and in the manner for which it has been designed and manufac-
tured. Warranty does not apply to products which have been lost, damaged by misuse, abuse, or accident.
OmniMount Systems, Inc.
8201 South 48th Street • Phoenix, AZ 85044-5355
1-800-MOUNT-IT • www.omnimount.com
Fig. 5
P/N 1001156—Rev. B 7/2004
Installation Instructions
QM100T:
LCD Tilt Mount
•
Universal VESA mount
•
Easy to install
•
+15º to -5º of tilt
•
Can be inverted
•
40 lbs (18.1 Kg) capacity
IMPORTANT: Consult a qualified installer if you have any questions
regarding the proper installation of this wall mount system.
Questions? 1-800-MOUNT IT
Advertisement

Subscribe to Our Youtube Channel
Related Manuals for Omnimount QM100T


Summary of Contents for Omnimount QM100T
- Page 1 • Easy to install If OmniMount products are used for purposes other than their original intent, OmniMount, its distributors and retailers • +15º to -5º of tilt shall not be held responsible or liable for injuries or property damage, direct, indirect, or consequential, which may arise •...
- Page 2 Caution: Never force screws into the monitor, as damage may oc- the monitor, considering the monitor dimensions. cur. The QM100T is supplied with the necessary hardware for either Wooden Stud Mounting or Masonry Mounting. Determine your mounting type and proceed accordingly.
Need help?
Do you have a question about the QM100T and is the answer not in the manual?
Questions and answers