Advertisement
Table of Contents
- 1 Table of Contents
- 2 XMIC Introduction
- 3 Warnings
- 4 System Description
- 5 Optional Additional Equipment
- 6 XMIC Overview
- 7 Preparing the XMIC for Use
- 8 Using the XMIC
- 9 Filter Selection
- 10 Survey Mode
- 11 Survey Mode Screens
- 12 MLP Mode
- 13 MLP Mode Screens
- 14 Guidance to Effective Acoustic Leak Detection
- 15 XMIC Technical Specification
- 16 Warranty
- Download this manual
Advertisement
Table of Contents

Subscribe to Our Youtube Channel
Summary of Contents for FCS XMIC
- Page 1 XMIC ® XMIC User Manual Fluid Conservation Systems, Inc 502 TechneCenter Drive, Suite B Milford, Ohio 45150 Phone (800) 531-5465 www.fluidconservation.com...
-
Page 2: Table Of Contents
Page 1 Contents Xmic Introduction Warnings System Description Optional Additional Equipment Xmic Overview Preparing the Xmic for Use Using the Xmic Filter Selection Survey Mode Survey Mode Screens MLP Mode MLP Mode Screens Guidance to Effective Acoustic Leak Detection Xmic Technical Specification... -
Page 3: Xmic Introduction
The portable amplifier module has an LCD display and the advanced, easy-to-use features of the Xmic enable the operator to pinpoint leaks faster and with more confidence than ever before. Note: The headphones supplied with the Xmic cannot be interchanged. The impedance of the headphones is matched to the Xmic control unit during manufacture. -
Page 4: Warnings
Warnings Lithium ion batteries The batteries supplied and fitted to the Xmic units are rechargeable lithium ion. Do not short circuit or overcharge these batteries. Any misuse of these batteries may result in explosion or fire. They must not be used in any other application or used with any other equipment. -
Page 5: System Description
1. Control/amplifier module with adjustable carry strap. 2. Acoustically shielded ground microphone foot. 3. Aviation quality headphones. 4. Lithium ion battery pack and battery charger. 5. Carry case. 6. Cables. 7. Manual. Xmic 24/01/05 MAN-095-0001 Revision B © Palmer Environmental Ltd 2005... -
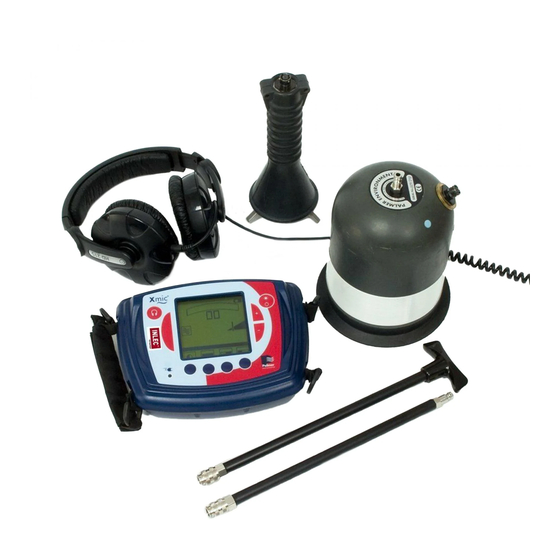
Page 6: Optional Additional Equipment
Xmic with optional handprobe, tripod and probe rods. Equipment list including optional extras:- 1. -
Page 7: Xmic Overview
Page 6 Xmic Overview Number Description Mute Button Mode Select Dynamic Acoustic Signal Level meter Battery Status Power On/Off and Back Light Gain Level Gain Increase/Decrease Battery Charging LED Contrast Adjustment Context Sensitive Button Context Sensitive Button Context Sensitive Button... - Page 8 Page 7 Number Description Headphone and Charger Socket Sensor Socket Retaining Screws for Battery Compartment Xmic 24/01/05 MAN-095-0001 Revision B © Palmer Environmental Ltd 2005...
-
Page 9: Preparing The Xmic For Use
Page 8 Preparing the Xmic for Use The battery pack for the Xmic is supplied as a separate item in the carry case. The batteries within this pack are supplied quarter charged. To insert the battery pack, unscrew the three screws on the underside of the unit, remove the cover and packing foam and connect the battery pack. -
Page 10: Using The Xmic
Plug the headphones into the Xmic control unit. Xmic Switch On/Off Switch the unit on by momentarily pressing the On/Off switch. The unit will switch on and remain switched on until this same button is pressed again unless it is left unused. -
Page 11: Filter Selection
Filter Selection To clarify the leak noise, background or unwanted noise frequencies can be filtered out using a combination of the controls on the Xmic. Unwanted frequencies can be filtered out via the bandpass, bandwidth and filter position buttons. There are two modes of operation – survey mode and minimum level profiling mode... -
Page 12: Survey Mode Screens
Page 11 Survey Mode Screens Preset Filter Screen This is the initial screen, which appears when the Xmic is switched on. Adjustable Filter Screen Pressing the Mode Select button (red button on left- hand side of screen) once will bring the user to the opposite screen where they can enter their own custom filters. - Page 13 Preset Filter for High Frequencies Used on metal pipes. The frequency spectrum indicator bar shows only the higher frequencies are allowed through when the high pass filter button is pressed Xmic 24/01/05 MAN-095-0001 Revision B © Palmer Environmental Ltd 2005...
- Page 14 The bandwidth of the frequencies allowed through can be adjusted using the double-headed arrow buttons as shown here. Xmic 24/01/05 MAN-095-0001 Revision B © Palmer Environmental Ltd 2005...
- Page 15 Pressing this button again will revert to the previous screen The position of the bandpass frequencies can be adjusted up or down the spectrum using the left and right arrows Xmic 24/01/05 MAN-095-0001 Revision B © Palmer Environmental Ltd 2005...
-
Page 16: Mlp Mode
MLP stands for Minimum Level Profiling. This is performed by stepping along the line of the suspect pipe and recording the sound levels. The ground microphone is placed on the ground and the sample button pressed momentarily. The Xmic then records the minimum noise over three seconds. -
Page 17: Mlp Mode Screens
+ or – buttons on the right side of the screen. This indicates the greatest leak noise acquired and the probable position of the leak. Xmic 24/01/05 MAN-095-0001 Revision B © Palmer Environmental Ltd 2005... -
Page 18: Guidance To Effective Acoustic Leak Detection
When a leak is produced in a metallic pipe the leak noise will transmit well through the pipe. It does not travel so well through a plastic pipe. This means that a leak Xmic 24/01/05 MAN-095-0001 Revision B... - Page 19 If there are no accessible contact points or if the pipe is of non-metallic material, use the microphone foot for listening, placing the foot over the pipe route in the area of the suspected leak. Move along the pipe route listening at each accessible pipefitting Xmic 24/01/05 MAN-095-0001 Revision B...
- Page 20 The loudest leak noise will then indicate the location of the leak bearing in mind the ground conditions already mentioned. Xmic 24/01/05 MAN-095-0001 Revision B...
-
Page 21: Xmic Technical Specification
Page 20 Xmic Technical Specification Control Unit Processor: 4MHz 16 bit Input impedance: 1MOhm Output impedance: 6 to 16 Ohms Amplification: 46dB Frequency range: 30 to 3000Hz Distortion: Better than 1% Battery: 2 x Lithium ion 1.8Ah rechargeable batteries Battery life: Minimum 25 hours (without backlight) - Page 22 The hand probe option includes the tripod and two stainless steel probe rods (each 400mm in length) Combined weight of rods 162g Headphones Aviation quality headphones are supplied as standard with the Xmic. Xmic 24/01/05 MAN-095-0001 Revision B © Palmer Environmental Ltd 2005...
-
Page 23: Warranty
CONTACT Fluid Conservation Systems, Inc 502 TechneCenter Drive, Suite B Milford, Ohio 45150 Toll free (800) 531-5465 Fax (513) 831-9336 www.fluidconservation.com Note: Fluid Conservation Systems, Inc reserves the right to change products, services and/or specifications without additional notice to the consumer.
Need help?
Do you have a question about the XMIC and is the answer not in the manual?
Questions and answers