Advertisement
Battery Compartment Cover
1
FUNCTION AND OPERATION:
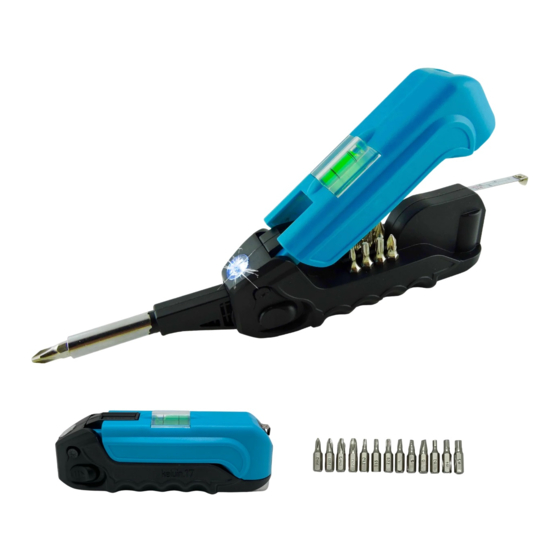
This tool features a tape measure, a level, 13 screwdriver bits, a miniature hammer, and LED ashlight.
1. LED Flashlight:
Use 2 x CR2032 DC 3V button cell battery (Included).
Press ON/OFF switch to turn ON, and press again to turn OFF.
2. Level:
Place the folded tool onto the surface you require to level. When the bubble sits neatly in the center of the window, between the two black lines, your item is level
and can be xed in place.
3.Two Position Bit Attachment:
•Slide the release button down. The bit attachment will spring out and automatically lock in place. (There are two angle positions to choose).
• Lift the top handle to reveal the bit assortment.
• Select your chosen bit and place into the end of the bit attachment .You are now ready to commence with the job in hand.
• When nished, slide the release button down and at the same time, push down the bit attachment back into place.
4. Tape Measure:
Pull out the free end to the desired length. Release free end to allow the tape measure to fold away into the tool.
5. Miniature Hammer: Fold the tool when in use.
6. Bits Assortment: Assortment of 12 screwdriver bits in di erent types and sizes.
TO REPLACE BATTERY:
1. Lift the top handle, slide out the battery compartment cover. Then insert 2 new CR2032 batteries with correct polarities.
2. Close the battery compartment cover and top handle.
BATTERY NOTE:
For best results. be sure to check the expiration date because fresh button cell batteries will ensure uninterrupted usage/enjoyment of the product. Remove the button
cell batteries if the product will not be used for an extended period. Correct battery installation, or try a fresh set of cell batteries.
CAUTION:
Batteries should be removed and replaced by adults only. Do not mix old and new·cell batteries. Do not mix alkaline, standard (carbon - zinc), or rechargeable (nickel -
cadmium) Batteries. Do not use rechargeable batteries. To avoid explosion or leakage, do not dispose of batteries in a re or attempt to recharge standard or alkaline
batteries. Be sure to insert batteries with the correct polarities and always follow battery manufacture's instructions. Remove batteries and store them in a cool, dry place
when not in use. Be sure to always remove old and dead batteries from product.
WARNING
1. This product contains 2 small batteries. Swallowed batteries can also cause nerve damage and paralyze the vocal cords. Seek immediate medical attention if battery(s)
are swallowed or inhaled. Keep small batteries out of the reach of children.
2. Small parts are a choking hazard. Keep out of the reach of the children.
Couvercle du compartiment à piles
1
FONCTIONNEMENT :
Cet outil comprend un ruban à mesurer, un niveau, treize embouts à tournevis, un mini marteau et une lampe de poche à DEL.
1.Lampe de poche à DEL
Fonctionne avec 2 piles boutons CR2032 CC de 3 V (comprises).
Appuyer sur le bouton ON/OFF (MARCHE/ARRÊT) pour allumer la lumière, puis de nouveau pour l' éteindre.
2. Niveau :
Mettre l'outil plié directement sur la surface à niveler. Lorsque la bulle se trouve exactement au centre de la fenêtre, entre les deux traits noirs, la surface
est alors nivelée et peut être xée en place.
Porte-embout à deux angles:
Abaisser le bouton dégagement. Le porte-embout sortira et se bloquera automatiquement en place. ( il est possible de choisir entre deux angles).
•
Soulever la poignée supérieure pour dévoiler l'assortiment d' émbouts.
•
Choisir l'émbout désiré et insérer sur l'étrémité du porte-embout. Le tournevis est maintenant prêt a l'emploi.
•
Une fois le travail terminé, abaisser le bouton de dégagement et, en même temps, repousser le porte-embout en place.
•
Kelvin Tools 145 lakeshore rd e. Mississauga, Ontario L5G 4T9 CANADA, emailus@kelvintools.com 1 866 776 3549
INSTRUCTION SHEET
2
3
Release button
ON/ OFF Switch
THIS PRODUCT IS NOT A TOY. FOR ADULT USE ONLY
2
3
Bouton de dégagement
Bouton
MARCHE/ARRÊT
Top Handle
6
4
5
Poignée
Supérieure
6
4
5
Patent #
US D650,257 S
Wear Safety Goggles
Porter des Lunettes de Sécurité
usar gafas de seguridad
2 x CR2032 Battery
2 Piles
CR2032
Advertisement
Table of Contents

Related Manuals for Kelvin 17

Summary of Contents for Kelvin 17
- Page 1 Une fois le travail terminé, abaisser le bouton de dégagement et, en même temps, repousser le porte-embout en place. • Patent # US D650,257 S Kelvin Tools 145 lakeshore rd e. Mississauga, Ontario L5G 4T9 CANADA, emailus@kelvintools.com 1 866 776 3549...
- Page 2 2. Las partes peque as son un riesgo de as xia. Manténgalas fuera del alcance de los ni os. ESTE PRODUCTO NO ES UN JUGUETE. EXCLUSIVO PARA EL USO DE ADULTOS. Patent # US D650,257 S Kelvin Tools 145 lakeshore rd e. Mississauga, Ontario L5G 4T9 CANADA, emailus@kelvintools.com 1 866 776 3549...
Need help?
Do you have a question about the 17 and is the answer not in the manual?
Questions and answers