Advertisement
Quick Links
Advertisement

Summary of Contents for aram huvis Aramo Smart NavigatorII-100
- Page 1 ASNII-100 User’s Manual ramo mart avigator SKIN DIAGNOSIS SYSEM...
- Page 2 FCC Statement This device complies with Part 15 of the FCC Rules. Operation is subject to the following two conditions: (1) This device may not cause harmful interference. and (2) This device must accept any interference received, including interference that may cause undesired operation.
- Page 3 Content 1. How to use 2. How to operate • System setting • Wireless & network setting 3. How to diagnosis • Full mode • View mode 4. How to set 5. Additional information • Standard & Features • Troubleshooting Guide & FAQ •...
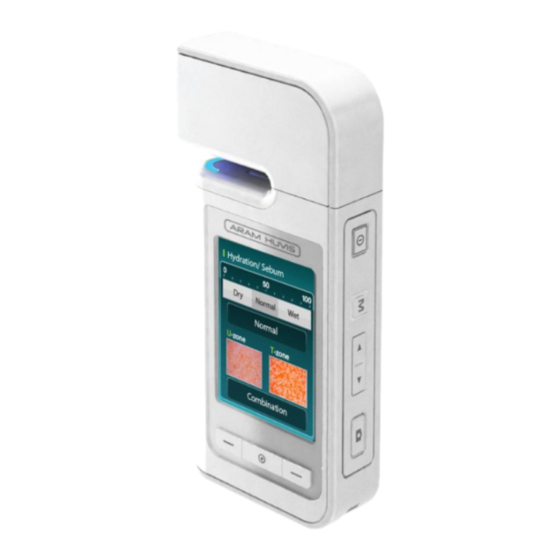
- Page 4 System and components ① ② ⑨ ③ ⑩ ⑪ ⑫ ⑭ ⑬ ④ ⑤ ⑥ ⑦ ⑧ Number Function Number Function ① Moisture/Elasticity sensor ⑧ SD memory card slot ② LED light & Lens ⑨ On / Off ③ Touch screen ⑩...
- Page 5 Battery uses Open the cover. Insert the battery. Close the cover. Battery front side How to charge By Battery charger By Cradle Charge the unit after connecting the Plug the charger into the cradle and cable. connect the device to the cradle. Available to re-charge the spare bat tery on back side of cradle.
- Page 6 Use the touch screen The touch screen lets you select items or perform function. Learn basic actions to use touch screen. • Tap : Touch once with your finger to select or launch the menu option, or application • Drag : Tap and drag your finger up, down, left, or right to move to items on lists. •...
- Page 7 Icons to operate in Manual Icons To do Touch to take images from the device Go to capturing page Cancel Go back to previous page Use the image taken for diagnosis Analysis Analyze the image 3D Image Go back to previous page on skin image Mode Change the lighting mode >...
- Page 8 Turn on / off & System main page * Tap in red box - On/Off button: Press and hold for 3 seconds - “Sleep” mode on / off : Press the button Turning on… Turning off… Go to “setup” page Go back to system main page Icons To do...
- Page 9 How to set the system * Tap in red box ≫ Application setting Check the “√” mark. The setting have to be a ctivated to download ap plication. ≫ Brightness setting Adjust the Brightness to display the application more effectively.
- Page 10 How to set the system * Tap in red box ≫ Language setting Keyboard language ② ① Deactivate Select the language you Changed the keyboard want to use language...
- Page 11 How to set the system * Tap in red box ≫ Language setting How to change the keyboard language Press and hold the “space-bar” to show the language Drag left or right to choose selection the language How to change the System language Select the language you want to use...
- Page 12 How to set the system * Tap in red box ≫ Date & Time setting How to set date Enter the current date How to set time zone & time Select user’s time zone or city name Enter the current time...
- Page 13 How to set the system * Tap in red box ≫ Wi-Fi connection ① Tap “setup”. ② On System main page Check the Wi-Fi mark Find and connect the available Wi-Fi...
- Page 14 How to set the system * Tap in red box ≫ Bluetooth Pairing How to pair the diagnosis system with the host device Note * Host device : all kinds of PC including tablet PC you want to send the diagnosed result or the related images.
- Page 15 How to set the system * Tap in red box ≫ Bluetooth Pairing How to change the name of diagnosis system Enter the device name what you want...
- Page 16 Diagnosis Process ≫ How to setup * Tap in red box Tap “setup”. ≫ Language ≫ Option Drag * Show measurement page before starting diagnosis. - Green: activate status - Gray: deactivate status Select the language ≫ Measurement * Show the diagnosed result by number on the capture page.
- Page 17 Diagnosis Process ≫ How to setup * Tap in red box Tap “setup”. ≫ Language ≫ Option Drag * Show measurement page before starting diagnosis. - Green: activate status - Gray: deactivate status Select the language ≫ Measurement * Show the diagnosed result by number on the capture page.
- Page 18 Diagnosis Process ≫ How to setup * Tap in red box ≫ Advance ≫ Network Selected status Unselected status Check the version of Set Wireless connection; Wi-Fi or Bluetooth application ≫ Email Enter the ID (ex. abcd1234) Enter the Domain (ex. @gmail.com) Enter the Password (ex.
- Page 19 Diagnosis Process ≫ Full mode * Tap in red box ≫ Start diagnosis Note * Gray : deactivate status * Black : activate status Enter age group and gender of customer ≫ Hydration & Elasticity Place the sensor onto your skin and tap * Do NOT move during the measurement.
- Page 20 Diagnosis Process ≫ Full mode * Tap in red box ≫ Sebum ( T & U zone) Put the below sebum tape (pink area) onto the U or T-zone of your face for 3 seconds. → How to hold the sebum paper T - ZONE How to put the sebum paper on T-zone U - ZONE...
- Page 21 Diagnosis Process ≫ Full mode * Tap in red box ≫ Sebum ( T & U zone) Tap each image to magnify Analysis to go back to “Sebum-U/T” page. > * Touch the “ ” or fling the screen to go to next page. Note * Tap the screen to focus.
- Page 22 Diagnosis Process ≫ Full mode * Tap in red box ≫ Pore Tap. Analysis Drag 3D image > * Touch the “ ” or fling the screen to go to next page. Note * Tap the screen to focus.
- Page 23 Diagnosis Process ≫ Full mode * Tap in red box ≫ Melanin Tap. Analysis ≫ Sensitivity Tap. Analysis ≫ Wrinkle Choose the area by moving Tap. Analysis the white box > Note * Touch the “ ” or fling the screen to go to next page. * Tap the screen to focus.
- Page 24 Diagnosis Process ≫ Full mode * Tap in red box ≫ Wrinkle 3D image ≫ Acne Analysis > Note * Touch the “ ” or fling the screen to go to next page. * Tap the screen to focus.
- Page 25 Diagnosis Process ≫ Full mode * Tap in red box ≫ Analysis result Note * Product recommendation : to be updated...
- Page 26 Diagnosis Process ≫ Full mode * Tap in red box ≫ Send Enter the customer’s email address. Turn to USB storage… Recognized as a Removabl e disk on PC Note * Bluetooth : to be updated...
- Page 27 Diagnosis Process ≫ View mode * Tap in red box ≫ NL mode (for Wrinkle) to change Choose the area by moving Mode the lighting mode. the white box Turn to USB storage… 3D image ≫ PL mode (for Melanin) to change the lighting mode.
- Page 28 Diagnosis Process ≫ View mode * Tap in red box ≫ UV mode (for Acne) to change the lighting mode. Mode > * Touch the “ ” or fling the screen to go to next page. Note * Tap the screen to focus.
- Page 29 How to update the application * Tap in red box Note * Check the Wi-Fi connection before updating ② ② ① ① Drag down...
- Page 30 How to remove the application * Tap in red box On System main page Find “Smartnavi” application.
- Page 31 How to re-install the application after * Tap in red box removing Drag down ② Enter the address below and ① download the application On System main page www.aramhuvis.com/data/asn2/smartnavi.apk...
- Page 32 Standard & Features Section Item Contents Optical/Camera Camera 5M pixel CMOS Sensor X30,X60 TPL Sensor Hydration Light Normal, Polarize, UV-[3CH] S5PV210 ARM-CORTEX A8 [1GHz] Memory DDR2 SDRAM (512MB) / NAND FLASH (512MB) SD Memory T-Flash (Micro SD) 2.2Inch TFT LCD QVGA (240*320) Touch R-TOUCH Wi-Fi...
- Page 33 Troubleshooting Guide & FAQ I cannot turn on the device. • Connect and charge the device (or the battery) using the adaptor provided the supplier. (The battery charging indicator will be shown on the system main page.) I cannot power on the device even the battery is still full. •...
- Page 34 Troubleshooting & FAQ I cannot connect to Wi-Fi. • Check the connection status on setting page. • Try to connect to another Wi-Fi. • - Bluetooth : Check the pairing status and try to re-pair the device with host device. I cannot connect to Blue-tooth.
- Page 35 CAUTION UPON INSTALL & USE Thanks for using the product of Aram HUVIS Co., Ltd.. The product undergoes strict quality management and inspection process before production and introduction to market. Product defect or trouble during warranty period is entitled to free repair.
- Page 36 CAUTION UPON INSTALL & USE 1. Humidity Do not install the product in the place with rain leakage or of high humidity. If the product is leaking, it may cause damage or fire. 2. Repair Do not disassemble or remodel the product because it may cause danger such as an electric shock. When a problem occurs, do not attempt to repair it.
- Page 37 Rm.801 Byucksan Technopia, # 434-6 Sangdaewon-dong, Jungwon-gu, Seongnam-city, Gyeonggi-do, KOREA 462-716 TEL [82-31] 732.6320 FAX [82-31] 732.6330 E- MAIL info@ aramhuvis.com WEBSITE www.aramhuvis.com...
Need help?
Do you have a question about the Aramo Smart NavigatorII-100 and is the answer not in the manual?
Questions and answers