Advertisement
Quick Links
Controls
O
Power Button, Hold for 2 seconds to power On/OFF meter.
Backlight Button, On/OFF
Menu Button, push to enter menu functions
MENU
Left or Max/Min Button, Push once to activate
Left
––––
and repeat to cycle through options
Max Min
Right or Hold Button, Push once to activate.
O
Right
––––
Push again to deactivate
Hold
MENU
––––
Pair Button, On/O Wireless BLE Module.
PAIR
When powered on, the wireless
Left
––––
Enter
Max Min
module will strobe when searching for smart
––––
Down
device. When connected with smart device,
symbol will indicate signal strength.
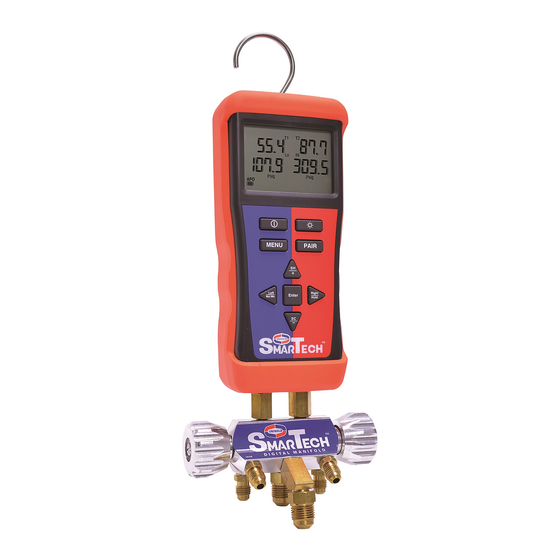
Display Features
Temperature Readings:
T1
Low Side Temperature
T1 ˚F
T2
T2
High Side Temperature
55.4 87.7
ºC
Degree Celsius
ºF
Degree Fahrenheit
Lo
Hi
107.9 309.5
Pressure Readings:
Lo
Low Side Pressure
Psig
Psig
Hi
High Side Pressure
APO
2
Psig
Pressure (pounds/in
)
HOLD MAX MIN
Bar
Pressure (bar)
kPa
Pressure (kilo-Pascals)
2
2
Kg/cm
Pressure (kilograms/centimeter
)
inHg
Negative Pressure (inches of mercury)
cmHg
Negative Pressure (cm of mercury)
Hold
Value is held
Max
Show maximum value in record mode
Min
Show minimum value in record mode
APO
Auto Power O enabled, Settings; 30 Min., 120 Min. or Manual
ON/OFF
Battery Life indicator
When powered on, the wireless module will strobe while searching
for smart device. When connected with smart device, symbol will
indicate wireless connection strength.
Menu Navigation
Menu button accesses Auto Power, Pressure, and Temperature
MENU
preferences.
Left
Right and Left buttons navigate menu options.
––––
Right
––––
Max Min
Hold
Down
––––
Up and Down buttons change the preference
Up
–
––––
+
in the menu.
Enter button selects the preference.
Enter
Getting Started
PAIR
Up
+
1. Install (6) AA batteries by removing the protective rubber boot. Start at the top
Right
––––
Hold
of the meter and rotate boot around meter to gain access to the rear battery
–
compartment. NOTE: Do not peel back and bend the protective rubber boot
TM
as this may stretch and deform the material.
2. Hold the
O
Power Button for 2 seconds to power on your new manifold.
3. Connect hoses and temperature clamps to manifold; use the Velcro cable straps
to organize the lead wires onto the blue and red hoses. Attach protective padded
case and secure to meter with velco straps.
4. Download the free Uniweld SmarTech Digital Manifold app on your compatible
smart device from the Google Play Store or the Apple App Store.
Open app and send email registration; once completed the app will open and
appear on your smart device.
You are now ready to CONNECT to the SmarTech Manifold.
5. Turn on the SmarTech Manifold and press CONNECT on the app.
Press SCAN
and the USMAN device will appear. Press CONNECT (wait 5
seconds), your meter will beep once con rming connectivity.
6. Press
to go back to the Home Screen and view system's real-time pressures,
temperatures, Superheat and Subcooling readings. CONNECT will change to
indicating connectivity.
Home Screen
TM
Select from
109 refrigerant
R-410A
pro les and
create saved list
LOW SIDE PSIG
107.9
VAPOR SATURATION
UNBOXING
35.0
F
LOW TEMP
55.4
F
NON-TXV
SUPERHEAT
SUPERHEAT
(NON-TXV)
(NON-TXV)
PUSH HERE
or
NON-TXV
TXV
ROTATE
PUSH HERE
RUBBER
PUSH HERE
BOOT
OUTDOOR DRY BULB
MANUAL
82.4
F
DATA
ENTRY
RETURN AIR DRY BULB
68.4
F
DELTA T
SMART CHARGE ZONE™
Color coded di erential for
accurate "In the Zone" system charge.
SUBCOOLING
(TXV)
10.0
F
TARGET
14.6
ACTUAL
F
4.6
DIFF.
F
SUBCOOLING
(TXV)
10.0
F
TARGET
10.3
F
ACTUAL
0.3
F
DIFF.
SUBCOOLING
(TXV)
10.0
F
TARGET
4.2
ACTUAL
F
5.8
DIFF.
F
Home Screen Icons
CONNECT
APP
or
HIGH SIDE PSIG
CONNECTED
309.5
LIQUID SATURATION
EMAIL
98.0
REPORT
F
HIGH TEMP
87.7
F
SUBCOOLING
(TXV)
10.0
F
TARGET
10.3
F
ACTUAL
REPORT
00.3
F
DIFF.
INDOOR WET BULB
57.0
F
SUPPLY AIR DRY BULB
48.2
F
20.2
F
SETTINGS
RED ZONE
System is
over charged
with refrigerant
and requires
removal of excess
refrigerant
GREEN ZONE
HOME
System is
properly charged
for maximum
e ciency and
optimal performance
BLUE ZONE
System is
under charged
and requires
additional
refrigerant
2850 Ravenswood Road, Fort Lauderdale, FL 33312 U.S.A.
Customer Service: 800.323.2111 • 954.584.2000 • Fax: 954.587.0109
Press the SmarTech logo to visit the
website for tutorial videos, FAQ,
and Resources.
Export a SmarTech Veri ed Report and
email system performance data as a PDF
or CSV le that can be easily tracked and
saved. Images from the jobsite can be
attached to the email for a complete
back up report before and after the
work is completed.
Enter data for Company Information,
Project Details, and Project Notes
that will be saved and automatically
appear in the SmarTech Veri ed Report.
Project Details and Project Notes must
be edited for each job location.
Device Settings for Wireless
and Manual Input, Superheat and
Subcooling Input, Elevation, Email
Preferences, and Update Pro le.
There are also instructions for
restoring the meter to Factory
Default, Temperature and Pressure
Calibration, and selecting Pressure
and Temperature preferences.
Pressing the HOME button will take you back to the
Home Screen.
info@uniweld.com • www.uniweld.com
Advertisement

Related Manuals for Uniweld Smarttech USMAN5

Summary of Contents for Uniweld Smarttech USMAN5
- Page 1 RED ZONE (TXV) System is 10.0 TARGET over charged 14.6 4. Download the free Uniweld SmarTech Digital Manifold app on your compatible with refrigerant ACTUAL Pressing the HOME button will take you back to the and requires Hold Value is held smart device from the Google Play Store or the Apple App Store.
- Page 2 1. Connect (E) Red EZ Turn Hose to (F) High Side service tting. normal wear on rubber gaskets and seats. 2. Connect (C) Blue EZ Turn Hose to (G) Low Side service tting. 3. Optional: Connect (Uniweld Part# UVG) Digital Vacuum Gauge USER MANUAL - PART# USMAN5 See Figure 1 Figure 2 to (T) Blue Hose EZ Access “T”...
Need help?
Do you have a question about the Smarttech USMAN5 and is the answer not in the manual?
Questions and answers