Table of Contents
Advertisement
Quick Links
Advertisement
Table of Contents

Summary of Contents for TimberBlindsMetroShade Motorized Sheer Remote Control
- Page 1 Battery Powered Motorized Window Shadings Remote Control Guide...
-
Page 2: Table Of Contents
Control Like Never Before This guide shows you how to set up and operate Battery Powered motorized window shadings using the remote control. You’ll also learn the two methods to operate your window shadings. All control features can be used with either method. Choose the method that works best for you. -
Page 3: Getting Started
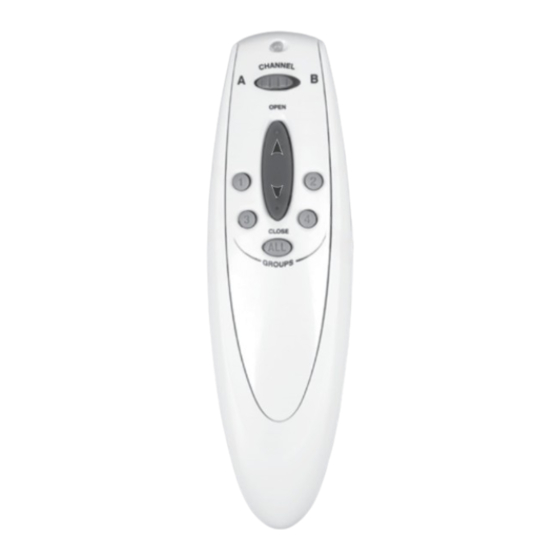
Getting Started Install batteries in the remote. Remote Front Back Indicator Light Infrared Channel Selector Setup OPEN Group 2 Group 1 CLOSE Group 3 Group 4 Groups Master Reset Battery Compartment... -
Page 4: Sensor Eye Location
Sensor Eye Location Sensor eye is located below the headrail. NOTE: The manual control button, used for operating a window shading without a remote, is usually adjacent to the sensor eye. -
Page 5: Basic Operation
Basic Operation In its default mode, the remote sends an infrared signal: Aim the Remote at the Sensor Eye. NOTE: For more information about the locations of sensor eyes, see “Sensor Eye Location” on page 2. Press and release the OPEN CLOSE button to operate the window shading. -
Page 6: Radio Control
Radio Control Getting Started with Radio Control Radio control gives you the ability to control individual window shadings or multiple window shadings at the same time, even if they are in another room. Group Assignment To use radio control, each window shading must first be assigned to a group. - Page 7 Radio Control Group Addition or Removal Before you begin, operate the window shading using infrared control to make sure that you are communicating with only one window shading and that the window shading is working properly. TIP: Move the remote as close as possible (2"– 3") to the sensor eye when assigning groups.
- Page 8 Radio Control Radio Control Operation Operating your window shadings using radio control is much like using infrared control, except that you can control multiple window shadings at the same time, even if they are in another room, and you do not have to aim the remote at the sensor eye. 1.
- Page 9 Radio Control Setting Up a Duplicate Remote If you want a backup for your primary remote, you can quickly duplicate the current remote. When this procedure is complete, any change made with one of the remotes also affects the operation of the other remote.
-
Page 10: Intermediate Stops
Intermediate Stops Setting Intermediate Stops An intermediate stop allows a window shading to be preset so that it will stop at the same “intermediate” position each time it is opened or closed. 1. Open and close the window shading fully, then move it to the desired intermediate position. -
Page 11: Express Mode
Express Mode Express Mode When the window shading is in any position, you can open or close it fully (bypassing the intermediate stop) as follows: 1. Press the appropriate group button. 2. Press and hold the OPEN CLOSE button for 2 seconds. The window shading opens or closes fully. -
Page 12: Additional Features For Window Shadings
Additional Features Opening Vanes 1. When the shading is in the fully closed position with the vanes closed, press and release the assigned group button. 2. Press and release the CLOSE button. The shading remains closed while the vanes open to allow more light. Closing Vanes 1. -
Page 13: Troubleshooting
Troubleshooting Problem Window shading does not operate with the remote. Solution 1. Make sure the Indicator Light on the remote comes on when you try to operate the window shading. If the Indicator Light does not come on, ® replace the batteries in your remote. 2. - Page 14 Troubleshooting Problem No infrared operation. Solution Make sure that you are pointing the remote at the sensor eye. Make sure that you are close enough to the sensor eye. Make sure that the sensor eye is not covered or obstructed. Make sure that there is no direct sunlight or bright, focused light shining on the sensor eye.
- Page 15 Troubleshooting Problem Window shading operates when you do not want it to operate. Solution If the Indicator Light on your remote is red when you press the OPEN or CLOSE button, go to “Unexpected infrared operation” below. If the Indicator Light on your remote is a steady green when you press the OPEN CLOSE button, go to “Unexpected radio...
- Page 16 Troubleshooting Problem Unexpected radio control operation. Solution Make sure you have chosen the correct group to operate. If you need to remove a window shading from a group, see “Group Addition or Removal” on page 5. If the Indicator Light on the remote is not a steady green when you press the OPEN CLOSE button, the remote is using infrared.
- Page 17 Troubleshooting Resetting a Window Shading To clear all stops and reset the window shading: 1. Open the window shading completely. 2. Aim the remote at the sensor eye on the window shading. 3. Press and hold the OPEN button for 6 seconds. The window shading moves slightly (or “jogs”) to indicate that all stops are now cleared.
- Page 18 Troubleshooting Changing the Infrared Channel of a Window Shading Window shadings can operate on either of two infrared channels. While many installations work well when all window shadings are on the same infrared channel, it can sometimes be convenient to change the infrared channel for some window shadings to reduce inadvertent operation.
-
Page 19: Group Assignment Worksheet
Group Assignment Worksheet Before assigning window shadings to groups, we recommend that you plan your group assignments. For example, you might create a group for all window shadings in a single room or a group just for all window shadings on one wall. NOTE: A window shading can be a member of more than one group. -
Page 20: Technical Information
Technical Information Remote Control Batteries: 2 AAA Operating Frequencies: IR: 40 kHz ® RF: 2.4 GHz ® Radio Frequency FCC Compliance This device complies with Part 15 of the FCC Rules. Operation is subject to the following two conditions: (1) this device may not cause harmful interference, and (2) this device must accept any interference received, including interference that may cause undesired operation.
Need help?
Do you have a question about the Motorized Sheer Remote Control and is the answer not in the manual?
Questions and answers