Table of Contents
Advertisement
Quick Links
5
ATERIAL
THICKNESS
LENGTH
A36 Steel
1/4"
A36 Steel
1/4"
A36 Steel
1/4"
A36 Steel
1/4"
A36 Steel
1/4"
A36 Steel
1/4"
A36 Steel
32 5/16"
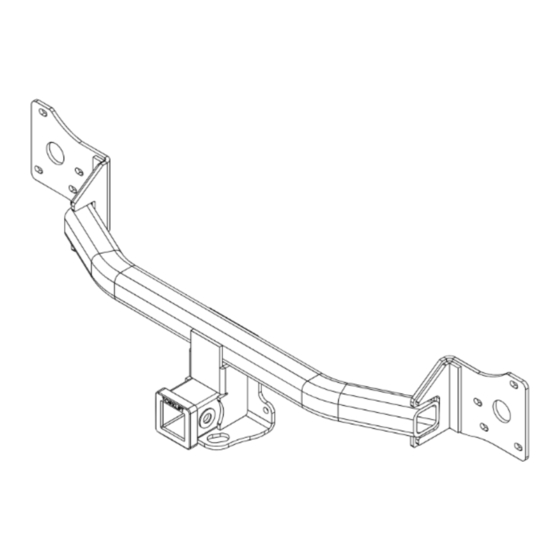
Installation Instructions
Application Fits
2009-2014 Honda Fit
X7286 & X7287
4
3
2" & 1.25" EcoHitch Stealth
Gross Tongue Weight (TW) 200 LBS
Gross Towing Weight (GTW) 2,000 LBS
2
1
www.torkliftcentral.com
support@tlcentral.com
D
C
Torklift Central
315 Central Ave N
Kent, WA 98032
253-854-1832
B
090915
Advertisement
Table of Contents

Related Manuals for Torklift central X7286

Summary of Contents for Torklift central X7286
-
Page 1: Installation Instructions
Installation Instructions Application Fits 2009-2014 Honda Fit X7286 & X7287 2” & 1.25” EcoHitch Stealth Gross Tongue Weight (TW) 200 LBS Gross Towing Weight (GTW) 2,000 LBS Torklift Central 315 Central Ave N Kent, WA 98032 253-854-1832 www.torkliftcentral.com ATERIAL THICKNESS LENGTH support@tlcentral.com... - Page 2 Bolt Kit Weight: 336g +/- Hardware Included QTY Fastener QTY Fastener 5/16” Flat Washer M8-1.25 Hex Nut 5/16” Lock Washer M8-1.25 x 40mm Hex Cap Bolt 3/8” Flat Washer Nut Plate 3/8” Lock Washer Stiffener Bracket 3/8”-16 Hex Nut Grade 5 18”...
- Page 3 Step 5. Push the tab (A) to release the bottom hook (B), then pull on the rear bumper (C) at the wheel arch areas to release it from the hooks (D) on the side spacers (E). See Figure [4]. Fig. 4 Step 6.
- Page 4 Step 8. Bend the small metal tabs of the impact bar upward toward the center of the bar before reinstallation. See Figure [6]. Fig. 6 Step 9. Lower exhaust by lubricating the rubber exhaust bungs with a lubricant such as WD-40 and slide off.
- Page 5 SIZE DWG. NO. ASTM A36 Steel HE INFORMATION CONTAINED IN THIS DRAWING IS THE SOLE 007286-W2 ROPERTY OF TORKLIFT CENTRAL. ANY REPRODUCTION IN STOCK ART OR AS A WHOLE WITHOUT THE WRITTEN PERMISSION OF 0.371lbs ORKLIFT CENTRAL IS PROHIBITED. MAKE...
- Page 6 Step 15. Find the center of the bumper fascia and mark a 6”x5” section for trimming. Using an air saw or utility knife, trim your marked portion of the bumper fascia then apply the provided Trim Lok. Use a pair of wire cutters to trim the excess Trim Lok. See Figure [13] for reference only.
- Page 7 Torklift Central assumes no liability for vehicle manufacturers warranty due to the use of a Torklift Central trailer hitch being used for towing behind any vehicle or using the trailer hitch in a manner that it was not designed for. Although this specific trailer hitch has a load rating, which includes trailer tongue weight, and a trailer weight carrying capacity, Torklift Central is not responsible for the voiding of any warranty on any vehicle due to factory towing limitations.
Need help?
Do you have a question about the X7286 and is the answer not in the manual?
Questions and answers