Table of Contents
Advertisement
Quick Links
Advertisement
Table of Contents

Related Manuals for Pentech PSG1003

Summary of Contents for Pentech PSG1003
- Page 1 PENTECH, INC. Operating Manual – Parts Manual July, 2008 Issue 4 Plural Component Impingement Mixing Mechanical Purge Spray Gun Palm Spray Gun Pentech , Inc. 7256 21 Street East Sarasota, FL 34243 Phone: 941-739-2700 Fax: 941-739-2722 www.pentech.us...
-
Page 2: Table Of Contents
COUPLING BLOCK / WHIP HOSE ASSEMBLY, PARTS LIST FLUSH TANK ASSEMBLY, EXPLODED VIEW FLUSH TANK ASSEMBLY, PARTS LIST PENTECH WARRANTY PENTECH, INC. INFORMATION List of Figures PALM GUN OVERALL VIEW ATTACHING PALM GUN WHIP HOSE ASSEMBLY TO HEATED HOSE 11... -
Page 3: Technical Data, Palm Spray Gun
Palm Spray Gun Technical Details Maximum Fluid Working Pressure 3500 psi Minimum Air Inlet Pressure 100 psi Maximum Air Inlet Pressure 130 psi Minimum Material Output 1lb. / min. Maximum Material Output 6 lbs. / min. Maximum Fluid Temperature 200 F. ¼”... -
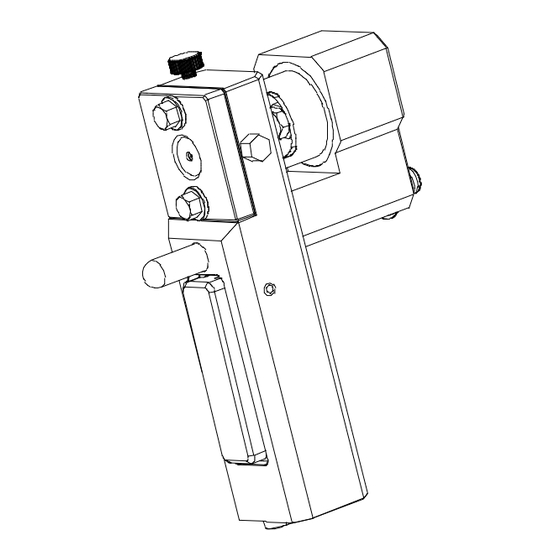
Page 4: Overall View, Palm Spray Gun
Pattern Air Control Valve Air Cylinder Assembly Palm Spray Gun Overall View Air Cap Check Valve Handle Assembly Trigger Guard Coupling Block Trigger Paddle Material Shutoff Valves Whip Hose, Material Air / Safety Valve Whip Hose, Air Filter / Swivel Assembly... -
Page 5: Palm Spray Gun Package List
The Palm Spray Gun Package Includes PSG1003 Palm Spray Gun Package Includes: PSG2100 Palm Gun Complete PSG5300 Coupling Block / Whip Hose Assembly, 3 Ft. PSG9000 Tool Kit Includes: PSG9009 Nut Driver, 5/16 PSG9010 Combination Wrench PSG9011 Pin Vise, Small... -
Page 6: Safety Information And Warnings
Safety Information & Warnings Before operating the Palm Gun, personnel should fully understand the contents, recommendations, and safety notes contained in this manual. Failure to follow these guidelines may result in severe bodily injury or damage to equipment and property. The safety guidelines outlined in this manual are not intended to be all inclusive. -
Page 7: General Operation Overview
GENERAL OPERATION OVERVIEW Gun Safety Devices: The Palm Gun has three methods of putting the gun in the safe mode. # 1. Air Safety Valve: The gun will not trigger without air pressure to the air cylinder. To engage the air safety valve, turn handle counterclockwise to off position. -
Page 8: Theory Of Operation
Theory of Operation Pushing Trigger: When the gun is triggered, air is directed by the trigger spool valve to the air cylinder. This moves the valving rod rearward from the PCD, past the A and B ports. This allows material to flow through the A and B ports in the mix module. As A and B material enters the center of the mix module, the two streams impinge with each other at high pressure and velocity and start the mixing action. -
Page 9: Pressure Balance
Pressure Balance Due to the low output capabilities of the Palm Gun, it is important to properly size the A and B material orifices in the mix module. The chart on page 16 can serve as a guide. Many conditions can affect the A & B pressure balance. Material viscosity difference of A &... -
Page 10: Method Of Attaching Palm Gun Coupling
Important Tips for Operation Air cap and mating front face of gun must be very clean and free of nicks to insure a good seal. No gasket is used here. Air cap bolts must be tightened with a wrench until tight. Consult your material supplier for the proper cleaning and flushing solvent to use. -
Page 12: Initial Gun Start-Up
Initial Gun Start Up Install Coupling Block / Whip Hose Assembly to Heated Hose Set: Attach Coupling Block / Whip Hose Assembly to existing heated hose bundle using either adapter fittings, or adapter blocks. See page 9. Check to see that A & B material shut off valves are closed. Turn on hose heat and machine heaters. -
Page 13: Normal Gun Start-Up
Normal Gun Start Up Assemble Palm Gun: With air cap, PCD, and mix module removed, use flush tank or solvent squeeze bottle to insure that basket filter ports and ports to mix module seat are clean and open. A drill of the proper diameter can be used to clear build-up that may be present. -
Page 16: Module / Pcd Chart
Module / PCD Chart ROUND SPRAY PATTERN PART APPROX. OUTPUT CLEAN OUT DRILL ITEM # NUMBER DESCRIPTION PATTERN AT 24" DRILL # DRILL SIZE PSG9001-13 Module, Mix, Round Pattern 1.25 - 2 Lbs./Min. .0135 PSG9003-20 PCD, Round Pattern, .020 4" - 6" .020 PSG9001-13 Module, Mix, Round Pattern 1.5 - 2.5 Lbs./Min. -
Page 17: Spraying And Normal Operation
Spraying and Normal Operation Note: The Palm Gun comes standard with 3 ft. unheated whip hoses. Their purpose is to limit operator fatigue by providing more flexibility, as well as saving the wear and tear on the more expensive heated whip hose assembly. Due to the small amount of unheated material in the whip hoses, it may take a moment for the heated material to reach the gun and the spray pattern to fully develop. -
Page 18: Gun Shutdown And Cleaning
Gun Shutdown and Cleaning Removing Palm Gun from Coupling Block: Close A & B material shut off valves on coupling block. With pattern air still on, trigger gun repeatedly to relieve pressure in material ports. Turn off pattern air valve. Close air safety valve on coupling block. -
Page 19: Troubleshooting
Troubleshooting PROBLEM CAUSE SOLUTION Very slight air leakage at sides of air cap This is normal No action required Valving rod does not acuate No air pressure Connect air supply, open valve Low air pressure Set air pressure to 100-130 psi Rear seal packing nut too tight Loosen packing nut Mist from PCD when not triggered... -
Page 20: Parts Identification Section
Parts Identification Section... -
Page 21: Repair And Tool Kit List
Repair and Tool Kit List PSG3015 Trigger O-ring Repair Kit Includes: PSG2005 Spring, Spool Valve PSG2025 O-ring, Spool Valve PSG3006 Air Cylinder Repair Kit Includes: PSG3014 O-ring PSG3008 O-ring, Front Cap PSG3010 O-ring PSG3011 Snap Ring, External PSG3004 Pan Head Screw PSG3007 Internal Snap Ring PSG3016... -
Page 23: Handle Assembly, Parts List
Handle Assembly PSG2000 PART QTY. ITEM # NUMBER USED DESCRIPTION PSG2001 Handle PSG2017 Air Needle Valve PSG2021 Rear Seal PSG2022 Rear Seal Packing Nut PSG2008 O-Ring PSG2019 Check Valve - A PSG2020 Check Valve - R See Chart Below Module, Mix See Chart Below PSG2002 Air Cap... -
Page 25: Air Cylinder Assembly, Parts List
Parts List Air Cylinder Assembly PSG3000 PART QTY. ITEM NUMBER USED DESCRIPTION PSG4001 Valving Rod Bolt PSG4000 Valving Rod PSG3005 Valving Rod Cover PSG3007 Internal Snap Ring PSG3008 O-Ring PSG3009 Front Cap PSG3014 O-Ring PSG3010 O-Ring PSG3011 Snap Ring, External PSG3012 Piston PSG3013... -
Page 27: Coupling Block / Whip Hose Assembly, Parts List
Coupling Block / Whip Hose Assembly PSG5300 PART QTY. ITEM NUMBER USED DESCRIPTION PSG5001 Coupling Block PSG5004 Pipe Plug PSG2006 Button Head Cap Screw PSG5500 Manual Valve PSG5003 Coupling Block Bolt PSG5007 Whip Hose, A or B, 3 Ft. PSG5009 Filter Swivel Assembly PSG5012 Cartridge Filter, 60 Mesh... -
Page 29: Flush Tank Assembly, Parts List
Flush Tank Assembly PSG8000-A PART QTY. ITEM # NUMBER USED DESCRIPTION PSG8001 Flush Tank, 1 Gallon PSG7001 Flush Block PSG5004 Pipe Plug PSG8005 Elbow PSG7006 Pipe Plug PSG7002 Releif Valve PSG7012 Check Valve PSG5005 Air Valve PSG7007 Pipe Tee PSG8009 Nipple, QD PSG8008 Tubing, Plastic... -
Page 30: Pentech Warranty
Returned Material Authorization (RMA) number issued by Pentech, Inc. If product is found to be defective in material or workmanship, Pentech will issue full credit to customer for the freight charges involved in returning the product to Pentech.
Need help?
Do you have a question about the PSG1003 and is the answer not in the manual?
Questions and answers