Advertisement
Quick Links
EN Instruction manual
SAFETY
• This appliance shall not be used by children
EN | Instruction manual
aged less than 8 years. This appliance can be
used by children aged from 8 years and above
NL | Gebruiksaanwijzing
and persons with reduced physical, sensory or
FR | Mode d'emploi
mental capabilities or lack of experience and
knowledge if they have been given
DE | Bedienungsanleitung
supervision or instruction concerning use of
ES | Manual de usuario
the appliance in a safe way and understand
the hazards involved. Children shall not play
PT | Manual de utilizador
with the appliance. Keep the appliance and its
IT | Manuele utente
cord out of reach of children aged less than 8
years. Cleaning and user maintenance shall
SV | Bruksanvisning
not be made by children unless older than 8
PL | Instrukcja obsługi
and supervised.
• By ignoring the safety instructions the
CS | Návod na použití
manufacturer can not be hold responsible for
SK | Návod na použitie
the damage.
• If the supply cord is damaged, it must be
replaced by the manufacturer, its service
agent or similarly qualified persons in order to
avoid a hazard.
• Never move the appliance by pulling the cord
and make sure the cord can not become
entangled.
• The appliance must be placed on a stable,
VE5888
level surface.
VE5889
• The user must not leave the device
unattended while it is connected to the supply.
• This appliance is only to be used for
PARTS DESCRIPTION / ONDERDELENBESCHRIJVING / DESCRIPTION DES PIÈCES / TEILEBESCHREIBUNG /
household purposes and only for the purpose
DESCRIPCIÓN DE LAS PIEZAS / DESCRIÇÃO DOS COMPONENTES / DESCRIZIONE DELLE PARTI /
it is made for.
BESKRIVNING AV DELAR / OPIS CZĘŚCI / POPIS SOUČÁSTÍ / POPIS SÚČASTÍ
• To protect yourself against an electric shock,
do not immerse the cord, plug or appliance in
1
2
3
4
5
6
7
the water or any other liquid.
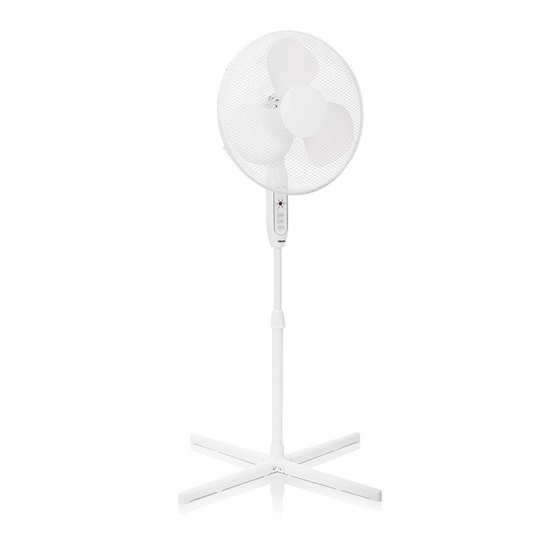
PARTS DESCRIPTION
1. Front guard
2. Fan blade lock button
3. Fan blades
4. Locknut for the rear guard
5. Rear guard
6. Axle
7. Oscillation pen
8. Control panel
9. Pole
8
10. Stand cover
11. Stand
12. Tighten knob for the stand
BEFORE THE FIRST USE
9
• Take the appliance and accessories out the box. Remove the
stickers, protective foil or plastic from the device.
12
Mounting
1. Place the pole in the stand, make sure the tab on the pole is aligned
with the recess in the stand.
10
11
2. Important: push the pole firmly in the base. Tighten the pole by
turning the tighten knob at the bottom of the stand.
3. Loosen the screw on the housing by turning it to the left and place
the housing on the pole and fasten the screw again.
4. Mount the rear guard to the motor by matching the holes on the rear
guard to the round pins on the motor housing. Put the guard over
the pins.
5. Secure the rear guard to the motor housing with the locknut for the
rear guard.
6. Put the blades onto the axle, tighten the blades by turning on the
fan blade lock button.
7. Test the blades by rotating with your hand. Make sure there is no
friction, when there will be some friction repeat the previous steps
again.
8. Mount the front guard on the rear guard with the clips and the
supplied screw.
• Place the device on a flat stable surface and ensure a minimum of 10
cm. free space around the device. This device is not suitable for
installation in a cabinet or for outside use.
• Put the power cable into the socket. (Note: Make sure the
voltage which is indicated on the device matches the local voltage
before connecting the device. Voltage 220V-240V 50/60Hz)
USE
• Use the speed control knobs to choose the desired ventilation level.
• To make the fan head oscillate, push down the Oscillation Knob.
• To stop the fan head from oscillating, pull-up the Oscillation Knob.
CLEANING AND MAINTENANCE
• Clean the appliance with a damp cloth. Never use harsh and abrasive
cleaners, scouring pad or steel wool, which damages the device.
• Never immerse the electrical device in water or any other liquid. The
device is not dishwasher proof.
GUARANTEE
• This product is guaranteed for 24 months granted. Your warranty is
valid if the product is used in accordance to the instructions and for the
purpose for which it was created. In addition, the original purchase
(invoice, sales slip or receipt) is to be submitted with the date of
purchase, the name of the retailer and the item number of the product.
• For the detailed warranty conditions, please refer to our service
website: www.service.tristar.eu
ENVIRONMENT
This appliance should not be put into the domestic garbage at
the end of its durability, but must be offered at a central point for the
recycling of electric and electronic domestic appliances. This symbol on
the appliance, instruction manual and packaging puts your attention to
this important issue. The materials used in this appliance can be
recycled. By recycling of used domestic appliances you contribute an
important push to the protection of our environment. Ask your local
authorities for information regarding the point of recollection.
Support
You can find all available information and spare parts at
service.tristar.eu!
NL Gebruiksaanwijzing
Support
U kunt alle beschikbare informatie en reserveonderdelen vinden op
VEILIGHEID
service.tristar.eu!
• Dit apparaat mag niet worden gebruikt door
kinderen jonger dan 8 jaar. Dit apparaat kan
FR Manuel d'instructions
worden gebruikt door kinderen vanaf 8 jaar en
SÉCURITÉ
door personen met verminderde lichamelijke,
• Cet appareil ne doit pas être utilisé par des
zintuiglijke of geestelijke vermogens of gebrek
enfants de moins de 8 ans. Cet appareil peut
aan de benodigde ervaring en kennis indien ze
être utilisé par des enfants de 8 ans ou plus et
onder toezicht staan of instructies krijgen over
des personnes présentant un handicap
hoe het apparaat op een veilige manier kan
physique, sensoriel ou mental voire ne
worden gebruikt alsook de gevaren begrijpen
disposant pas des connaissances et de
die met het gebruik samenhangen. Kinderen
l'expérience nécessaires en cas de surveillance
mogen niet met het apparaat spelen. Houd het
ou d'instructions sur l'usage de cet appareil en
apparaat en het netsnoer buiten bereik van
toute sécurité et de compréhension des risques
kinderen jonger dan 8 jaar. Laat reiniging en
impliqués. Les enfants ne doivent pas jouer
onderhoud niet door kinderen uitvoeren, tenzij
avec l'appareil. Maintenez l'appareil et son
ze ouder zijn dan 8 jaar en onder toezicht staan.
cordon d'alimentation hors de portée des
• De fabrikant is niet aansprakelijk voor schade
enfants de moins de 8 ans. Le nettoyage et la
voortvloeiend uit het niet opvolgen van de
maintenance utilisateur ne doivent pas être
veiligheidsinstructies.
confiés à des enfants sauf s'ils ont 8 ans ou
• Als het netsnoer beschadigd is, moet het
plus et sont sous surveillance.
worden vervangen door de fabrikant, de
• Si vous ignorez les instructions de sécurité, le
onderhoudsmonteur van de fabrikant of door
fabricant ne saurait être tenu responsable des
personen met een soortgelijke kwalificatie om
dommages.
gevaar te voorkomen.
• Si le cordon d'alimentation est endommagé, il
• Verplaats het apparaat nooit door aan het snoer
doit être remplacé par le fabricant, son
te trekken. Zorg ervoor dat het snoer nergens in
réparateur ou des personnes qualifiées afin
verstrikt kan raken.
d'éviter tout risque.
• Het apparaat moet op een stabiele, vlakke
• Ne déplacez jamais l'appareil en tirant sur le
ondergrond worden geplaatst.
cordon et veillez à ce que ce dernier ne soit pas
• De gebruiker mag het apparaat niet onbeheerd
entortillé.
achterlaten wanneer de stekker zich in het
• L'appareil doit être posé sur une surface stable
stopcontact bevindt.
et nivelée.
• Dit apparaat is uitsluitend voor huishoudelijk
• Ne laissez jamais le dispositif sans surveillance
gebruik en voor het doel waar het voor bestemd
s'il est connecté à l'alimentation.
is.
• Cet appareil est uniquement destiné à des
• Dompel het snoer, de stekker of het apparaat
utilisations domestiques et seulement dans le
niet onder in water of andere vloeistoffen om
but pour lequel il est fabriqué.
elektrische schokken te voorkomen.
• Afin de vous éviter un choc électrique,
n'immergez pas le cordon, la prise ou l'appareil
ONDERDELENBESCHRIJVING
1. Voorste afschermkap
dans de l'eau ou autre liquide.
2. Borgknop ventilatorblad
3. Ventilatorbladen
DESCRIPTION DES PIÈCES
4. Borgmoer achterste afschermkap
1. Protection avant
5. Achterste afschermkap
2. Bouton de blocage de pales de ventilateur
6. As
3. Pales de ventilateur
7. Oscillatiepin
4. Écrou d'arrêt de protection arrière
8. Bedieningspaneel
5. Protection arrière
9. Stang
6. Axe
10. Houderkap
7. Pendule d'oscillation
11. Houder
8. Panneau de commande
12. Aandraaiknop voor de houder
9. Tige
10. Cache de support
VOOR HET EERSTE GEBRUIK
11. Support
• Haal het apparaat en de accessoires uit de doos. Verwijder de stickers,
12. Molette de serrage du support
de beschermfolie of het plastic van het apparaat.
Monteren
AVANT LA PREMIÈRE UTILISATION
1. Plaats de stang in de houder en zorg dat het uitsteeksel op de stang
• Sortez l'appareil et les accessoires hors de la boîte. Retirez les
met de inkeping in de houder is uitgelijnd.
autocollants, le film protecteur ou le plastique de l'appareil.
2. Belangrijk: duw de stang stevig in de houder. Zet de stang vast
Montage
door de knop aan de onderzijde van de houder aan te draaien. Zorg
1. Placez la tige dans le support. Assurez-vous que la languette sur la
dat
tige est alignée avec le renfoncement dans le support.
3. Draai de schroef van de behuizing linksom los en plaats de behuizing
2. Important : enfoncez la tige fermement dans la base. Serrez la tige
op de stang. Draai de schroef weer aan.
en tournant la molette de serrage au fond du support. Assurez-vous
4. Monteer de achterste afschermkap op de motor. Zorg ervoor dat de
que
gaten in de achterste afschermkap samenvallen met de ronde pinnen
3. Desserrez la vis du boîtier en tournant vers la gauche, placez le boîtier
op de motorbehuizing. Plaats de afschermkap over de pinnen.
sur la tige et resserrez la vis.
5. Bevestig de achterste afschermkap aan de motorbehuizing met de
4. Montez la protection arrière sur le moteur en alignant les orifices sur la
borgmoer voor de achterste afschermkap.
protection arrière avec les goupilles rondes sur le boîtier moteur.
6. Plaats de bladen op de as en zet de bladen vast door de
Placez la protection sur les goupilles.
vergrendelingsknop van het ventilatorblad aan te draaien.
5. Fixez la protection arrière sur le boîtier moteur avec l'écrou d'arrêt
7. Test te bladen door ze met uw hand te draaien, Zorg ervoor dat er
pour la protection arrière.
geen wrijving is. Indien er enige wrijving is, herhaal dan de vorige
6. Placez les pales sur l'axe et serrez les pales en tournant le bouton de
stappen.
verrouillage de pale de ventilateur.
8. Monteer de voorste afschermkap op de achterste afschermkap met de
7. Testez la rotation des pales à la main. Assurez-vous de l'absence de
clips en de meegeleverde schroef.
friction. En présence de friction, répétez les étapes précédentes.
• Plaats het apparaat op een vlakke, stabiele ondergrond. Zorg voor
8. Montez la protection avant sur la protection arrière avec les attaches
minimaal 10 cm vrije ruimte rondom het apparaat. Dit apparaat is niet
et la vis fournie.
geschikt voor inbouw of gebruik buitenshuis.
• Mettez l'appareil sur une surface stable plate et assurez un dégagement
• Sluit het netsnoer aan op het stopcontact. (Let op: Zorg er voor het
tout autour de l'appareil d'au moins 10 cm. Cet appareil ne convient pas
aansluiten van het apparaat voor dat het op het apparaat aangegeven
à une installation dans une armoire ou à un usage à l'extérieur.
voltage overeenkomt met de plaatselijke
• Branchez le cordon d'alimentation à la prise. (Remarque : Veillez à ce
netspanning. Voltage: 220V-240V 50/60Hz)
que la tension indiquée sur l'appareil corresponde à celle du secteur
local avant de connecter l'appareil. Tension 220V-240V 50/60Hz)
GEBRUIK
• Gebruik de snelheidsknoppen om de gewenste ventilatiestand te kiezen.
UTILISATION
• Druk op de oscillatieknop om de ventilatorkop te laten oscilleren.
• À l'aide des boutons de contrôle de vitesse, réglez le niveau de
• Druk op de oscillatieknop om de ventilatorkop te laten stoppen met
ventilation souhaité.
oscilleren.
• Pour que la tête du ventilateur oscille, enfoncez le Bouton d'Oscillation.
• Pour que la tête du ventilateur cesse d'osciller, tirez le Bouton
REINIGING EN ONDERHOUD
d'Oscillation.
• Reinig het apparaat met een vochtige doek. Gebruik nooit agressieve of
schurende reinigingsmiddelen, schuursponzen of staalwol; dit beschadigt
NETTOYAGE ET ENTRETIEN
het apparaat.
• Nettoyez l'appareil avec un chiffon humide. N'utilisez pas de produits
• Dompel het apparaat nooit onder in water of andere vloeistoffen. Het
nettoyants agressifs ou abrasifs, de tampons à récurer ou de laine de
apparaat is niet vaatwasserbestendig.
verre, ceux-ci pourraient endommager l'appareil.
• N'immergez jamais l'appareil dans l'eau ni aucun autre liquide. L'appareil
GARANTIE
ne peut pas être nettoyé en lave-vaisselle.
• Op dit product wordt een garantie van 24 maanden verleend. Uw
garantie is geldig indien het product is gebruikt in overeenstemming met
GARANTIE
de gebruiksaanwijzing en voor het doel waarvoor het gemaakt is. Tevens
• Ce produit est garanti pour une période de 24 mois. Votre garantie est
dient de originele aankoopbon (factuur, kassabon of kwitantie) te worden
valable si le produit est utilisé selon les instructions et pour l'usage
overlegd met daarop de aankoopdatum, de naam van de verkoper en
auquel il est destiné. De plus, la preuve d'achat d'origine (facture, reçu
het artikelnummer van het product.
ou ticket de caisse) doit être présentée, montrant la date d'achat, le nom
• Voor uitgebreide garantievoorwaarden verwijzen wij u naar onze
du détaillant et le numéro d'article du produit.
servicewebsite: www.service.tristar.eu
• Pour connaître les conditions de garantie détaillées, veuillez consulter
notre site Internet de service : www.service.tristar.eu
MILIEU
ENVIRONNEMENT
Dit apparaat mag aan het einde van de levensduur niet bij het
normale huisafval worden gedeponeerd, maar moet bij een speciaal
Cet appareil ne doit pas être jeté avec les déchets ménagers à la
inzamelpunt voor hergebruik van elektrische en elektronische apparaten
fin de sa durée de vie, il doit être remis à un centre de recyclage pour les
worden aangeboden. Het symbool op het apparaat, in de
appareils électriques et électroniques. Ce symbole sur l'appareil, le
gebruiksaanwijzing en op de verpakking attendeert u hierop. De in het
manuel d'utilisation et l'emballage attire votre attention sur un point
apparaat gebruikte materialen kunnen worden gerecycled. Met het
important. Les matériaux utilisés dans cet appareil sont recyclables. En
recyclen van gebruikte huishoudelijke apparaten levert u een belangrijke
recyclant vos appareils, vous contribuez de manière significative à la
bijdrage aan de bescherming van ons milieu. Informeer bij uw lokale
protection de notre environnement. Renseignez-vous auprès des autorités
overheid naar het inzamelpunt.
locales pour connaître les centres de collecte des déchets.
Support
UMWELT
Vous pouvez trouver toutes les informations et pièces de rechange sur
service.tristar.eu !
Dieses Gerät darf am Ende seiner Lebenszeit nicht im Hausmüll
DE Bedienungsanleitung
entsorgt werden, sondern muss an einer Sammelstelle für das Recyceln
von elektrischen und elektronischen Haushaltsgeräten abgegeben
werden. Das Symbol auf dem Gerät, in der Bedienungsanleitung und auf
SICHERHEIT
der Verpackung macht Sie auf dieses wichtige Thema aufmerksam. Die in
• Dieses Gerät darf nicht von Kindern unter 8
diesem Gerät verwendeten Materialien können recycelt werden. Durch
Jahren verwendet werden. Dieses Gerät darf
das Recyceln gebrauchter Haushaltsgeräte leisten Sie einen wichtigen
Beitrag zum Umweltschutz. Fragen Sie Ihre örtliche Behörde nach
von Kindern ab 8 Jahren und von Personen mit
Informationen über eine Sammelstelle.
eingeschränkten körperlichen, sensorischen
Support
oder geistigen Fähigkeiten oder einem Mangel
Sämtliche Informationen und Ersatzteile finden Sie unter service.tristar.eu!
an Erfahrung und Kenntnissen verwendet
werden, sofern diese Personen beaufsichtigt
ES Manual de instrucciones
oder über den sicheren Gebrauch des Geräts
SEGURIDAD
unterrichtet wurden und die damit verbundenen
• Este aparato no debe ser utilizado por niños
Gefahren verstanden haben. Kinder dürfen mit
menores de 8 años. Este aparato puede ser
dem Gerät nicht spielen. Halten Sie das Gerät
utilizado por niños a partir de los 8 años y por
und sein Anschlusskabel außerhalb der
personas con capacidades físicas, sensoriales
Reichweite von Kindern unter 8 Jahren.
o mentales reducidas, o que no tengan
Reinigungs- und Wartungsarbeiten dürfen nicht
experiencia ni conocimientos, sin son
von Kindern vorgenommen werden, es sei
supervisados o instruidos en el uso del aparato
denn, sie sind älter als 8 und werden
de forma segura y entienden los riesgos
beaufsichtigt.
implicados. Los niños no pueden jugar con el
• Beim Ignorieren der Sicherheitshinweise kann
aparato. Mantenga el aparato y el cable fuera
der Hersteller nicht für Schäden haftbar
del alcance de los niños menores de 8 años.
gemacht werden.
Los niños no podrán realizar la limpieza ni el
• Ist das Netzkabel beschädigt, muss es vom
mantenimiento reservado al usuario a menos
Hersteller, dem Kundendienst oder ähnlich
que tengan más de 8 años y cuenten con
qualifizierten Personen ersetzt werden, um
supervisión.
Gefahren zu vermeiden.
• Si ignora las instrucciones de seguridad,
• Bewegen Sie das Gerät niemals durch Ziehen
eximirá al fabricante de toda responsabilidad
am Kabel, und stellen Sie sicher, dass sich das
por posibles daños.
Kabel nicht verwickelt.
• Si el cable de alimentación está dañado,
• Das Gerät muss auf einer ebenen, stabilen
corresponde al fabricante, al representante o a
Fläche platziert werden.
una persona de cualificación similar su
• Das Gerät darf nicht unbeaufsichtigt bleiben,
reemplazo para evitar peligros.
während es am Netz angeschlossen ist.
• Nunca mueva el aparato tirando del cable y
• Dieses Gerät darf nur für den
asegúrese de que no se pueda enredar con el
Haushaltsgebrauch und nur für den Zweck
cable.
benutzt werden, für den es hergestellt wurde.
• El aparato debe colocarse sobre una superficie
• Tauchen Sie zum Schutz vor einem
estable y nivelada.
Stromschlag das Kabel, den Stecker oder das
• El usuario no debe dejar el dispositivo sin
Gerät niemals in Wasser oder sonstige
supervisión mientras esté conectado a la
Flüssigkeiten.
alimentación.
• Este aparato se debe utilizar únicamente para
TEILEBESCHREIBUNG
1. Vordere Schutzvorrichtung
el uso doméstico y sólo para las funciones para
2. Lüfterflügel-Sicherungsknopf
las que se ha diseñado.
3. Lüfterflügel
4. Sicherungsmutter für hintere Schutzvorrichtung
• Para protegerse contra una descarga eléctrica,
5. Hintere Schutzvorrichtung
no sumerja el cable, el enchufe ni el aparato en
6. Achse
7. Oszillationsstift
el agua o cualquier otro líquido.
8. Bedienfeld
9. Stange
DESCRIPCIÓN DE LOS COMPONENTES
10. Ständerabdeckung
1. Protección delantera
11. Ständer
2. Botón de bloqueo de las aspas del ventilador
12. Ziehen Sie den Knopf für den Ständer fest.
3. Aspas del ventilador
4. Contratuerca de la protección trasera
VOR DER ERSTEN INBETRIEBNAHME
5. Protección trasera
• Nehmen Sie das Gerät und das Zubehör aus der Verpackung. Entfernen
6. Eje
Sie die Aufkleber, die Schutzfolie oder das Plastik vom Gerät.
7. Varilla de oscilación
Befestigung
8. Panel de control
1. Platzieren Sie die Stange im Ständer und stellen Sie sicher, dass die
9. Barra
Nase an der Stange in Bezug auf die Aussparung im Ständer
10. Cubierta del soporte
ausgerichtet ist.
11. Soporte
2. Wichtig: Drücken Sie die Stange fest in die Fassung. Ziehen Sie
12. Mando de apriete para el soporte
die Stange durch Drehen des Befestigungsknopfs an der Unterseite
des Ständers fest. Stellen Sie sicher, dass
ANTES DEL PRIMER USO
3. Lösen Sie die Schraube am Gehäuse, indem Sie sie nach links
• Saque el aparato y los accesorios de la caja. Quite los adhesivos, la
drehen, setzen Sie das Gehäuse auf den Ständer und befestigen Sie
lámina protectora o el plástico del dispositivo.
die Schraube wieder.
Montaje
4. Bringen Sie die hintere Schutzvorrichtung am Motor an, indem Sie die
1. Coloque la barra en el soporte; asegúrese de que la pestaña de la
Löcher an der hinteren Schutzvorrichtung mit den runden Stiften am
barra quede alineada con el hueco en el soporte.
Motorgehäuse ausrichten. Setzen Sie die Schutzvorrichtung über die
2. Importante: introduzca la barra firmemente en la base. Apriete la
Stifte.
barra girando el mando de apriete de la parte inferior del soporte.
5. Sichern Sie die hintere Schutzvorrichtung mit der Sicherungsmutter für
Asegúrese de que
die hintere Schutzvorrichtung am Motorgehäuse.
3. Afloje el tornillo de la carcasa girándolo a la izquierda y coloque la
6. Setzen Sie die Flügel auf die Achse und ziehen Sie die Flügel durch
carcasa sobre la barra y vuelva a apretar el tornillo.
Drehen des Lüfterflügel-Sicherungsknopfs an.
4. Monte la protección trasera en el motor haciendo coincidir los orificios
7. Überprüfen Sie die Flügel, indem Sie sie von Hand drehen. Stellen Sie
de la protección trasera con los pasadores redondos de la carcasa del
sicher, dass keine Reibung vorhanden ist; ist immer noch etwas
motor. Coloque la protección sobre los pasadores.
Reibung vorhanden, wiederholen Sie die vorherigen Schritte.
5. Fije la protección trasera a la carcasa del motor con la contratuerca de
8. Bringen Sie die vordere Schutzvorrichtung mit den Clips und der
la protección trasera.
mitgelieferten Schraube an der hinteren Schutzvorrichtung an.
6. Ponga las aspas en el eje, apriete las aspas girando el botón de
• Stellen Sie das Gerät auf eine ebene und stabile Fläche und halten Sie
bloqueo de aspas del ventilador.
einen Abstand von mindestens 10 cm um das Gerät herum ein. Dieses
7. Pruebe las aspas girando con la mano. Asegúrese de que no haya
Gerät ist nicht für den Anschluss oder die Verwendung in einem Schrank
fricción; cuando haya fricción repita de nuevo el paso anterior.
oder im Freien geeignet.
8. Monte la protección delantera sobre la protección trasera con los
• Stecken Sie den Stecker des Netzkabels in die Steckdose. (Hinweis:
ganchos de cierre y el tornillo suministrado.
Stellen Sie vor dem Anschließen des Geräts sicher, dass die auf dem
• Coloque el dispositivo sobre una superficie plana estable y asegúrese de
Gerät angegebene Netzspannung mit der örtlichen Spannung
tener un mínimo de 10 cm de espacio libre alrededor del mismo. Este
übereinstimmt. Spannung: 220V-240V 50/60Hz)
dispositivo no es apropiado para ser instalado en un armario o para el
uso en exteriores.
GEBRAUCH
• Conecte el cable de alimentación a la toma de corriente. (Nota:
• Wählen Sie mit den Geschwindigkeitsregelknöpfen die gewünschte
Asegúrese de que la tensión que se indica en el dispositivo coincida con
Ventilationsstärke.
la tensión local antes de conectarlo. Tensión 220V-240V 50/60Hz)
• Drücken Sie den Oszillationsknopf herunter, damit der Lüfterkopf
oszilliert.
USO
• Ziehen Sie auf den Oszillationsknopf nach oben, damit der Lüfterkopf
• Utilice los mandos de control de velocidad para seleccionar el nivel de
nicht mehr oszilliert.
ventilación deseado.
• Para que el cabezal del ventilador oscile, presione el mando de
REINIGUNG UND PFLEGE
oscilación.
• Reinigen Sie das Gerät mit einem feuchten Tuch. Verwenden Sie
• Para que el cabezal del ventilador deje de oscilar, tire hacia arriba del
niemals scharfe oder scheuernde Reiniger, Topfreiniger oder Stahlwolle.
mando de oscilación.
Dies würde das Gerät beschädigen.
• Tauchen Sie das Gerät niemals in Wasser oder andere Flüssigkeiten.
LIMPIEZA Y MANTENIMIENTO
Das Gerät in nicht spülmaschinenfest.
• Limpie el aparato con un paño húmedo. No utilice productos de limpieza
abrasivos o fuertes, estropajos o lana metálica porque se podría dañar el
GARANTIE
aparato.
• Dieses Produkt hat eine Garantie von 24 Monaten. Der
• No sumerja nunca el aparato en agua o cualquier otro líquido. El aparato
Garantieanspruch gilt nur, wenn das Produkt gemäß den Anweisungen
no se puede lavar en el lavavajillas.
und gemäß dem Zweck, für den es konzipiert wurde, benutzt wird. Der
Original-Kaufbeleg (Rechnung, Beleg oder Quittung) muss zusammen
GARANTÍA
mit dem Kaufdatum, dem Namen des Einzelhändlers und der
• Este producto cuenta con 24 meses de garantía. Su garantía es válida si
Artikelnummer des Produktes eingereicht werden.
el producto se utiliza de acuerdo con las instrucciones y el propósito
• Detaillierte Informationen über die Garantiebedingungen finden Sie auf
para el que se creó. Además, debe enviarse un justificante de la compra
unserer Service-Website unter: www.service.tristar.eu
original (factura, tíquet o recibo) en el que aparezca la fecha de la
compra, el nombre del vendedor y el número de artículo del producto.
Advertisement

Related Manuals for TriStar VE-5888


Summary of Contents for TriStar VE-5888
- Page 1 Fähigkeiten oder einem Mangel Sämtliche Informationen und Ersatzteile finden Sie unter service.tristar.eu! the hazards involved. Children shall not play worden gebruikt alsook de gevaren begrijpen...
- Page 2 Soporte w centralnym punkcie recyklingu domowych urządzeń elektrycznych i bruksanvisningen och förpackningen gör dig uppmärksam på detta. ¡Puede encontrar toda la información y recambios en service.tristar.eu! Assistência elektronicznych. Ten symbol znajdujący się na urządzeniu, w instrukcjach Materialen som används i denna apparat kan återvinnas. Genom att detí...
Need help?
Do you have a question about the VE-5888 and is the answer not in the manual?
Questions and answers