
Subscribe to Our Youtube Channel
Summary of Contents for KuSh Audio TWEAKER
- Page 2 Behold UBK’s shamelessly self-serving claim #327: the Tweaker can replicate, with extraordinary authenticity, all of the above compressors doing the things they do best; it can also do a lot of things none of them can.
- Page 3 Armed with that understanding, my mind slowly began to form the question whose answer is at the heart of the Tweaker: what if a compressor offered so much control over its detector that it could, with a little patience and exploration, be made to replicate the...
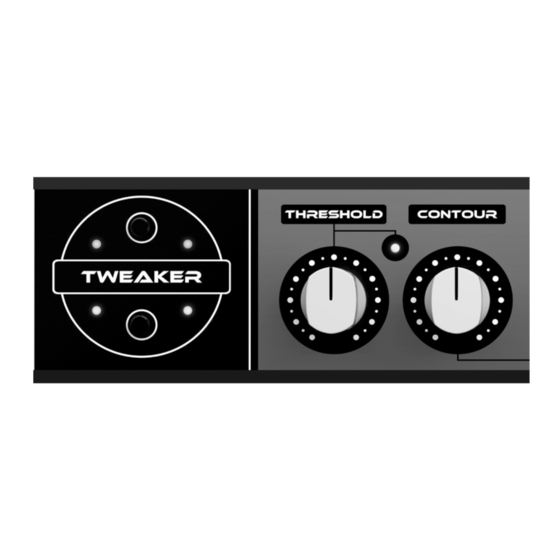
- Page 4 Part Three – Front Panel Layout Aka Why Does it Look Like This? In addition to being freakin’ gorgeous, Tweaker’s extensive front panel controls are purposefully divided into 3 sections, each of which corresponds with the 3 critical signal paths inside the compressor: I.
- Page 5 2. Sidechain Path: the middle group of controls contains the Threshold and Contour knobs, plus the Sidechain Shaper switch. This powerful trio lets you tell the Tweaker when, where, and why to compress, respectively. 3. Detector Path: the right-most group of controls contains the Attack, Release, and Curve knobs.
- Page 6 You can definitely get some filth out of this box, but you don’t have to; at its cleanest, the Tweaker runs at .003% THD, making it one of the cleanest compressors around.
-
Page 7: Mix & Output
8dB of reduction on your drum buss, for that split second the level produced by the VCA is reduced by 8dB… which reduces the distortion it generates. So the Tweaker’s distortion is ‘cleaned up’ in direct proportion to the amount of compression being applied, which means you can grunge up your drums but still have the transient punch come thru;... - Page 8 Even the simplest signal flows can be confusing, so let’s take a closer look to make sure you get the most out of the Tweaker’s unorthodox approach to parallel compression. On the Mix control, counterclockwise is your Dry signal, at unity gain, straight off the Inputs, untouched by any further circuitry.
- Page 9 (because the VCA is still releasing)… this is another one of those deceptively simple things the Tweaker does that can end up taking on a life of its own in your workflow, if you know how to leverage its...
- Page 10 For starters, in the case of low-ratio/high-threshold compression – often found in mix bus and mastering applications – you will find this LED is capable of teaching you to hear incredibly light and transparent forms of compression that you might otherwise miss if you were looking to the Gain Reduction meter to cue your ears to the compression.
- Page 11 In short, with a little studied practice, you can get the Tweaker to hear the way you hear, and to focus on the aspects of the sound you want it to focus on.
- Page 12 Use it anywhere you want the Tweaker to ignore the extreme bottom end when doing what it does. 300Hz HPF The 300Hz HPF is a very special filter, and is much higher than the HPF’s you’ll find on other analog boxes.
- Page 13 Clariphonic has the ability to lift up the top in ways no other eq can do, inserting one into the sidechain of the Tweaker would likewise allow it to press those high frequencies back down in a way no other compressor could.
- Page 14 ‘and’ (as in the eighth notes denoted by one- and-two-and-three-and-four-and). I’ll turn the Contour knob heavily to the left to focus the Tweaker on the low end, then define the degree of hat snap by massaging the attack until the beat is pumping upwards with a strong ‘chik’.
- Page 15 70 milliseconds at the other extreme. In practical terms, this means the Tweaker is capable of shaving all the transients flat, or letting all of them thru with a satisfying degree of impact & transparency.
- Page 16 Hype: Of all the controls on a compressor, it seems to me that Release has traditionally been the least sexy and most underrated of all. If I have my way, the Tweaker is going to change that forever. To be fair, the fact that Release is generally overlooked is understandable enough;...
- Page 17 Dual, however, is a very special mode that gives the Tweaker the same 2-stage release found in LA2a’s. What that means is that the Tweaker will release the first 50% of gain reduction very quickly, and the second 50% much more slowly.
- Page 18 And to the best of my knowledge, only one compressor on the planet has one control to adjust both the ratio and the knee, simultaneously: yes, that’s right, the Tweaker has just such a control, and it’s called ‘Curve’.
- Page 19 Part five - the tri-meter® Aka So many pretty lights! More than any other feature, the Tweaker’s Tri-Meter sets it apart, both visually and functionally, from every other analog compressor. As functional as it is beautiful, this meter array allows you to visualize, simultaneously and at-a-glance, the levels of your unprocessed Input signal, the Tweaker’s Output, and the amount of...
- Page 20 With all of this in my head, I decided that the Tweaker’s Input and Output meters--- much like the Gain Reduction meter --- would not be labeled with any dB value, and in fact do not obviously indicate any specific level at all.
- Page 21 your basic engineering style and predeliction for --- or aversion to --- distortion. And with that, the image below shows the Tri-Meter calibration, custom-tailored for you. Just figure out which of the following statements is most likely to come out of your mouth and you’ll have a good idea of where you generally want to see these meters peaking.
- Page 22 One exception to this rule is that you can set the Sidechain Shaper differently for each unit, so if (e.g.) you've got cinematic bass explosions on one side of a film mix, you can set that Tweaker to ignore the subs and let the other unit track the low end. Doing that would get you perfect bass tracking while the cinematic stuff gets ignored by both comps.
- Page 23 Aka The Gazintas and Gazoutas The connectors, from left to right: 1. AC Power. 110-260V, Tweaker doesn’t care, just plug it in. 2. Stereo Link. Use of a 3-conductor TRS-TRS cable is mandatory 3. Sidechain Insert. XLR Balanced Send & Return. Active only when the front-panel Sidechain Selector Switch is set to “XLR Insert”.
- Page 24 makes possible everything that comes after. He is a genius and a gentlemen of the first order. JP, a friend, a mentor, and the undisputed master of saying ‘you guys made a nice little circuit, now excuse me while I make it perform better in every possible way’…...
Need help?
Do you have a question about the TWEAKER and is the answer not in the manual?
Questions and answers