
Summary of Contents for Welger E-LINK RP 235
- Page 1 E-LINK RP 235 E - LINK START START STOP STOP 1753-27 Operating Manual 1729.99.03.02 08.04 from year of manufacture 2004...
-
Page 3: Table Of Contents
TWINE RUNS ONE-SIDED 10.13 ................40 TANDARD ERROR TWINE DOES NOT RUN 10.14 ..............40 TANDARD ERROR TWINE RUNS WITHOUT TYING 10.15 ................40 TANDARD ERROR 1 TAILGATE HOOK OPEN 10.16 ............40 TANDARD ERROR MAXIMUM BALING DENSITY REACHED WELGER RP 235 • E-LINK... - Page 4 VERVIEW OF THE BUTTON FUNCTIONS IN THE SCILLOSCOPE APPENDIX ..........................52 13.1 ............52 HRONOLOGICAL TYING PROCESS AT AUTOMATIC TYING Maschinenfabrik GmbH Gebrüder-Welger-Straße 3 • D-38304 Wolfenbüttel Phone: (+49) 53 31 / 404-142 • Fax: (+49) 53 31 / 404-143 eMail: wmf@welger.com WELGER RP 235 • E-LINK...
-
Page 5: Introduction
......Memory ......Control unit Balercontrol III 2 Requirements on the machine • On-board power supply ....12 V • Fuse protection, machine side:..20 A Operation with 24 V power supply is not permissible. WELGER RP 235 • E-LINK... -
Page 6: Safety Instructions
Caution! This symbol stands next to safety instructions: malfunctions and impairments of correct operation, possible material damage. Note! This symbol stands next to useful information: special information on how to use the machine most efficiently. WELGER RP 235 • E-LINK... -
Page 7: General Information
• The present wiring of the control and of the corresponding machine must not be used for electrical consumers other than mounted or proofed by the manufacturer. Overloading the electrical lines leads to excessive heating. • Always keep a working fire extinguisher within reach. WELGER RP 235 • E-LINK... -
Page 8: Protection Of The Electronic Control System
Ensure above all that the electrical and electronic components subsequently installed are in conformity with the EMC directive 89/336/EEC as amended, and that they are provided with the CE. WELGER RP 235 • E-LINK... -
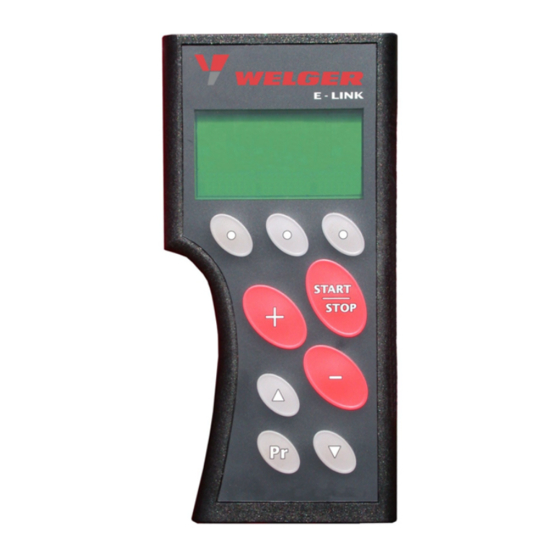
Page 9: The Menus
Open menu overview : press key Select menu: keys Confirm selection with key If no menu is to be selected: if no key is pressed for 5 seconds, automatic return to menu is effected. MONITOR MONITOR MONITOR MONITOR WELGER RP 235 • E-LINK... -
Page 10: "Monitor" Menu
Actual daily counter • Machine working time • Battery voltage • PTO speed Below the main field • Tying mode • Hydraulic switch (cutting device, bottom door, pick-up) • Operating parameter (bale diameter, net layers) WELGER RP 235 • E-LINK... -
Page 11: The Display
Automatic net tying automatic combined tying The PTO speed regulates the optional electric Lubrication pump and the measurement of the machine working time. Both will be activated at a PTO speed larger than 100 rpm. WELGER RP 235 • E-LINK... -
Page 12: Tying Modes
• • Manual net tying • • Automatic net tying • • automatic • combined tying The tying modes can be selected with the left button. Start tying: Press button <START/STOP> WELGER RP 235 • E-LINK... -
Page 13: Hydraulic Valve Block
The units are selected with the centre button. The selected unit is displayed directly above the centre button: Unit Symbol Pick-Up bottom door Cutting device The selected unit is moved by means of the tractor's distribution valve. WELGER RP 235 • E-LINK... - Page 14 The bottom door is displayed directly above the centre button: Move bottom door with the tractor's distribution valve. When the bottom door is opened because of a material jam this condition is displayed in a window (symbol "Bottom door"; with flashing exclamation mark). WELGER RP 235 • E-LINK...
- Page 15 Only those knife groups are displayed that can be moved in or out for the current moment, e.g. (here: 8-knife group). WELGER RP 235 • E-LINK...
-
Page 16: Operating Parameters
When the operating parameter "Net layers" is selected the set value can be set from 1.5 ... 4.0 with the buttons When the set net length is through the net knife is triggered and binding is finished. WELGER RP 235 • E-LINK... -
Page 17: Machine Status: Baling
After tying has been finished, the electronics indicate with a flashing arrow to open the tail gate by means of the tractor's distribution valve. No more material runs into the baler (stop tractor and machine). WELGER RP 235 • E-LINK... -
Page 18: Machine Status: Tail Gate Open
Machine standstill (after interrupted start of a twine- or net tying) is displayed by the standing material flow (material flow no more animated). In this condition it is waited for the manual start of a tying when the error has been removed. WELGER RP 235 • E-LINK... -
Page 19: Overview Of The Button Functions In The "Monitor" Menu
• Bale density • Net layers Decrease set value for selected operating parameters • Bale density • Net layers – no function – Acknowledge fault message (delete) (see chapter 10 Error messages) Call up menu WELGER RP 235 • E-LINK... -
Page 20: "Setup" Menu
Confirm selection with key Select parameter: keys Change parameter: keys Either return to menu overview: press key Or return to menu: press key MONITOR 3 sec. Scroll the display pages forward and backward: left and right button. WELGER RP 235 • E-LINK... - Page 21 (setting according to machine's equipment) Twine tying yes / no (setting according to machine's equipment) Lubrication pump yes / no (setting according to machine's equipment) Net knife 17 or 25 (only for machine type RP235S) WELGER RP 235 • E-LINK...
-
Page 22: Overview Of The Button Functions In The "Setup" Menu
– no function – centre button Scroll display pages forward right button – no function – Change parameter Change parameter Select parameter Select parameter Open menu overview: short key stroke Return to MONITOR menu: 3 sec. button stroke WELGER RP 235 • E-LINK... -
Page 23: "Systeminfo" Menu
SYSTEMINFO SYSTEMINFO Data can neither be entered nor selected in the menu SYSTEMINFO SYSTEMINFO SYSTEMINFO SYSTEMINFO Either return to menu overview: press key Or return to menu: press key MONITOR MONITOR MONITOR MONITOR 3 sec. WELGER RP 235 • E-LINK... -
Page 24: Overview Of The Button Functions In The "Systeminfo" Menu
– no function – – no function – – no function – – no function – – no function – Open menu overview: short key stroke Return to MONITOR menu: 3 sec. button stroke WELGER RP 235 • E-LINK... -
Page 25: "Diagnosis" Menu
Diagnostic functions while machine is in operation. Observation of all sensor channels and actor channels possible. Selection via special key combination. Attention, danger of injury! Extended diagnosis is executed while the machine is running. For trained and instructed service personnel only! WELGER RP 235 • E-LINK... -
Page 26: Standard Diagnosis
Confirm selection with key To previous display page: left button To next display page: right button Either return to menu overview: press key Or return to menu: press key MONITOR MONITOR MONITOR MONITOR 3 sec. WELGER RP 235 • E-LINK... - Page 27 R.P.M. R.P.M. R.P.M. Left twine Twine run left TWINE L. TWINE L. TWINE L. TWINE L. (only twine tying) Right twine Twine run right TWINE R. TWINE R. TWINE R. TWINE R. (only twine tying) WELGER RP 235 • E-LINK...
- Page 28 In the display DIAGNOSIS ANALOG SEN DIAGNOSIS ANALOG SENSORS DIAGNOSIS ANALOG SEN DIAGNOSIS ANALOG SEN SORS SORS SORS signals of the left and right distance sensors are displayed numerical and as bar graph. WELGER RP 235 • E-LINK...
- Page 29 Attention, fault! e. g. actor channel in control unit defective. Actor not triggered (–), but has switched (+). Attention, fault! e. g. short circuit or broken wire. Actor has not been triggered (–) and has not switched (–). WELGER RP 235 • E-LINK...
- Page 30 500 seconds. Viewing of all signals in real time is also possible: To the oscilloscope: press centre button WELGER RP 235 • E-LINK...
-
Page 31: Extended Diagnosis
Open menu overview: press key Call extended diagnosis: Press centre button and button simultaneously. Either return to menu selection: press key Or return to menu: press key MONITOR MONITOR MONITOR MONITOR 3 sec. WELGER RP 235 • E-LINK... -
Page 32: Overview Of The Button Functions In The "Diagnosis" Menu
Page forwards right button Toggling between automatic and manual actor diagnosis: Actor channel On Actor channel Off Select actor Select actor Open menu overview: short key stroke Return to MONITOR menu: 3 sec. button stroke WELGER RP 235 • E-LINK... -
Page 33: "Statistics" Menu
(#1, #2, #3 ... #20). The daily counter selected in each case is used for counting. Select daily counter (view and activate): press key Erase selected daily counter: press keys simultaneously for 3 seconds. WELGER RP 235 • E-LINK... -
Page 34: Overview Of The Button Functions In The "Statistics" Menu
Erase selected daily counter: 3 sec. button stroke Select daily counter (#1, #2, #3, ... #20) Select daily counter (#1, #2, #3, ... #20) Open menu overview: short key stroke Return to MONITOR menu: 3 sec. button stroke WELGER RP 235 • E-LINK... -
Page 35: Error Messages
If possible errors cannot be removed: Inform the customer service department. Tell the customer service about the displayed error messages. The error messages contain important information about the causes of a possible malfunction to the customer service. WELGER RP 235 • E-LINK... -
Page 36: System Error Messages
If the error occurs again after reconnection of the power supply, baling can be processed with switched off electronics and by means of emergency tying (see OI of the machine, chapter "Emergency operation of the tying unit"). Inform customer service! WELGER RP 235 • E-LINK... -
Page 37: System Error : Battery Voltage Too High
To trigger the net tying switch on the parking light (or the low beam or the high beam) for a short time until the net is grasped by the bale (recognisable from the fast rotation of the net roll). WELGER RP 235 • E-LINK... -
Page 38: Standard Error Messages
For this current tying the control ignores the net knife sensor. When the cause of the error has not been removed the error is displayed again for the next tying. Acknowledge fault messages: press key WELGER RP 235 • E-LINK... -
Page 39: Standard Error: Net Knife Set
One of the two twines does not run (cause for example empty twine spool). error message acknowledged. Subsequently: remove cause. Then the net tying or twine tying can be started. Acknowledge fault messages: press key Start twine- or net tying. WELGER RP 235 • E-LINK... -
Page 40: Standard Error: Twine Does Not Run
The signal tone stops buzzing when the error was acknowledged or when manual tying was started. Acknowledge fault messages: press key Start tying: Press button <START/STOP>. WELGER RP 235 • E-LINK... -
Page 41: 11 "System Service" Menu
11.1 Call-up „System Service“ menu Call up : hold centre button SYSTEM SERVICE SYSTEM SERVICE SYSTEM SERVICE SYSTEM SERVICE depressed (for about 10 seconds) when switching on the control voltage. Select submenu: keys Call-up selected submenu: Button WELGER RP 235 • E-LINK... -
Page 42: Monitor" Submenu
Select machine family: keys Call up selected machine family: Button Now, the control jumps automatically back to the menu (see chapter 6 "Setup" menu). To safe SETUP SETUP SETUP SETUP the changed setting: Safe selection with button WELGER RP 235 • E-LINK... -
Page 43: Eeprom Contents " Submenu
The self-test cannot be started without this test equipment, and is not described here. Select menu: keys SELF SELF SELF SELF- - - - TEST TEST TEST TEST Confirm selection with button Return to SYSTEM SERVICE: press key WELGER RP 235 • E-LINK... -
Page 44: Overview Of The Button Functions In The "System Service" Menu
Open menu overview Call SETUP of the Return to the Return to the SYSTEM SYSTEM SYSTEM SYSTEM selected machine family SYSTEM SERVICE SYSTEM SERVICE SYSTEM SERVICE SYSTEM SERVICE SERVICE MENU SERVICE SERVICE SERVICE Call-up selected MENU submenu WELGER RP 235 • E-LINK... -
Page 45: Oscilloscope
The oscilloscope mode can be used to view and analyse the status of all sensors and actors during the last 500 seconds (about 8 minutes). Viewing of all signals in real time is also possible. In each diagnostic display (see chapter 8 "Diagnosis" menu) the centre button leads to the corresponding oscilloscope. WELGER RP 235 • E-LINK... -
Page 46: Oscilloscope For Digital Sensors And Actors
Sensor/actor status Designation of the High: damped/connected sensor/actor channels Low: uncovered/disconnected (see chapter 12.3.7). Time window here: 10 sec. set Measured data recording: HOLD: recording stopped Channels not used Cursor position Cursor here: 495.2 sec. WELGER RP 235 • E-LINK... -
Page 47: Oscilloscope For Distance Sensors
Zoom factor (here: factor 2.5) Offset (zero point) (here: 1.0 V) Actual measurement value (in the HOLD mode the value is displayed at the cursor position) (here: 2.02 V) Cursor position Cursor (here: 490.2 sec.) WELGER RP 235 • E-LINK... -
Page 48: Operating The Oscilloscope
"Cursor" function can be used to view all times of the course recorded before: Position the selection bar (black) on the "Cursor" function using the buttons (see dashed circle). Move cursor to the desired position: buttons WELGER RP 235 • E-LINK... - Page 49 Or, set Offset to 63 %. In this case the measured values 63 % to 83 % are displayed. Position the selection bar (black) on the "Offset" function using the keys Set Offset value by means of the keys WELGER RP 235 • E-LINK...
- Page 50 S.W.1 S.W.1 S.W.1 CUTTING DEVICE 2 Valve B45 S.W.2 S.W.2 S.W.2 S.W.2 Speed (drive speed) Valve A2 D.Z. D.Z. D.Z. D.Z. Left twine Valve A14 FA.L FA.L FA.L FA.L Right twine FA.R FA.R FA.R FA.R WELGER RP 235 • E-LINK...
-
Page 51: Overview Of The Button Functions In The "Oscilloscope
- Cursor position (in HOLD mode only) - Offset (0..90% measuring range) (only for oscilloscope for distance sensors) - Zoom factor (1x - 2.5x - 5x - 10x) (only for oscilloscope for distance sensors) – no function – WELGER RP 235 • E-LINK... -
Page 52: Appendix
3.0 sec Buzzer Delay: 0 .. 5.0 sec 5.0 sec COMBINED TYING Buzzer Delay: 0 .. 5.0 sec 3.0 sec Twine motor 8.0 sec Net magnet 3.0 sec + delay: 0 .. 5.0 sec 5.0 sec WELGER RP 235 • E-LINK...
Need help?
Do you have a question about the E-LINK RP 235 and is the answer not in the manual?
Questions and answers